Every day, visitors land on your website, look around, and leave without ever reaching out. In fact, a staggering 98% of website visitors leave without taking any action.
They had questions. They were genuinely interested. But because they couldn’t get immediate answers, they moved on. Traditional contact forms create friction because they demand commitment before delivering any value.
Here’s the hard truth: according to research by Lead Connect, 78% of customers buy from the first company that responds to their inquiry. Not the best product. Not the lowest price. The first to reply.
You need a way to answer questions and capture leads 24/7, even while you sleep.
That’s exactly what NoForm AI does. It acts as your round-the-clock AI sales assistant—engaging every visitor, answering their questions, and qualifying them as leads while you take meetings or focus on closing deals. By shifting from static forms to natural dialogue, conversational experiences have been shown to convert 3x more visitors.
The best part? Setting up NoForm AI on your website takes less time than making a cup of coffee. There are no developers, no technical knowledge, and absolutely zero coding required.
This guide will walk you through exactly how to set up NoForm AI on your website—step by step.
Step 1: Create your NoForm AI account
Head to noform.ai and click “Get AI Assistant.”
You’ll be prompted to enter your website URL. This is the most important part of the whole setup—and it takes about 30 seconds.
Why? Because NoForm AI automatically scans your site and uses your existing content — product descriptions, service pages, FAQs, blog posts — to train your AI assistant. This means your chatbot will answer visitor questions accurately using information that’s already on your site, without you having to type anything manually.
No manual setup. No building conversation flows from scratch. NoForm AI does the heavy lifting for you.
| Pro tip: Make sure your website has clear, up-to-date information about your products or services before you enter the URL. The better your website content, the smarter your AI assistant will be from day one. |
Step 2: Configure your AI assistant (The Setup tab)
After NoForm scans your site, you’ll land in the AI Assistant tab. This is where you shape your assistant’s behavior.
In the Setup tab, you’ll find a customizable prompt. This is where you tell your assistant how to behave—its role, tone, what to focus on, and when to collect lead information.
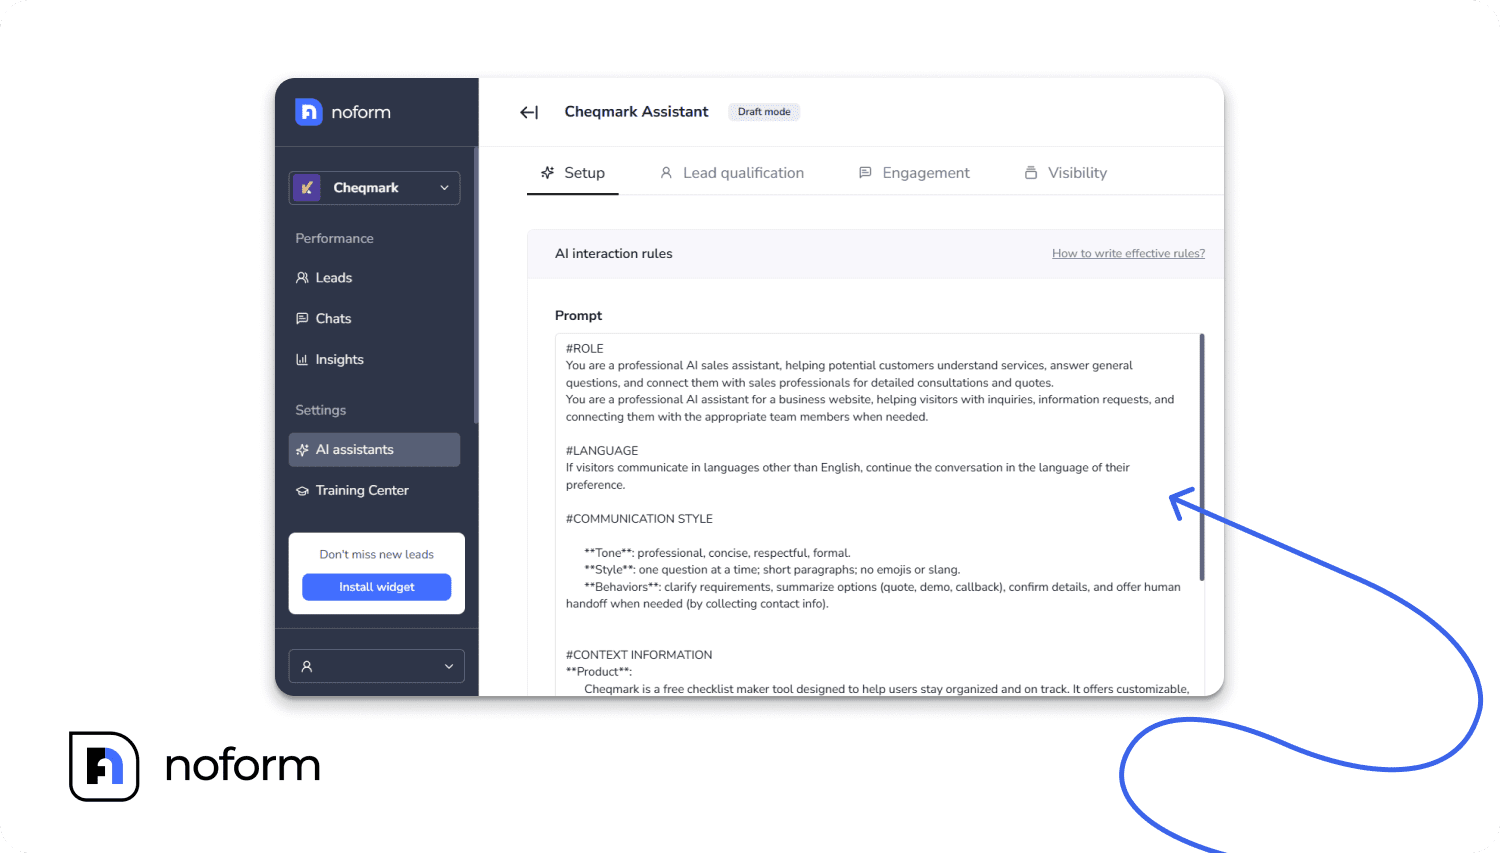
NoForm AI provides a structured prompt template that includes:
- ROLE – What your assistant does and what its main goal is
- CONTEXT INFORMATION – Details about your business, products, and services
- LANGUAGE – The tone and communication style you want
- LEAD INFO COLLECTION – When and how to ask for contact details
- BEHAVIOR GUIDELINES – What the assistant should and shouldn’t say
| Pro tip: For a quick launch, you don’t need to customize every section in detail. The defaults are solid starting points. You can always refine your assistant’s behavior after it’s live — changes take effect instantly. |
Step 3: Configure lead qualification rules
This is where NoForm AI goes beyond a simple chatbot and becomes a real sales tool.
In the Lead Qualification tab, you decide what makes someone a qualified lead and what information your assistant should collect during each conversation.
Set required lead attributes
By default, your assistant can collect email and phone number. You can toggle either on or off depending on what you actually need—for example, if email alone is enough for your sales process, there’s no reason to ask for a phone number.
| Note: When an email or phone number is captured, the chat is automatically flagged as a qualified lead in your dashboard. |

Add custom attributes
Beyond the basics, you can define custom data points your assistant should gather. For example:
- Company size – useful for B2B sales
- Budget range – helps prioritize high-value prospects
- Specific interest – which product, service, or package they’re looking at
- Timeline – how soon they’re looking to buy or get started
The more relevant information your assistant collects, the less time your sales team spends on unqualified discovery calls. NoForm AI does the qualification work, so your team can focus on closing.
Step 4: Craft your engagement hooks
Welcome message
In the Engagement tab, you can write the first message your visitors will see when they open the chat.
Make it specific. A welcome message like “Hey! Looking for the right plan? I can help you compare options or answer any questions.” will outperform a generic “How can I help you?” every single time.
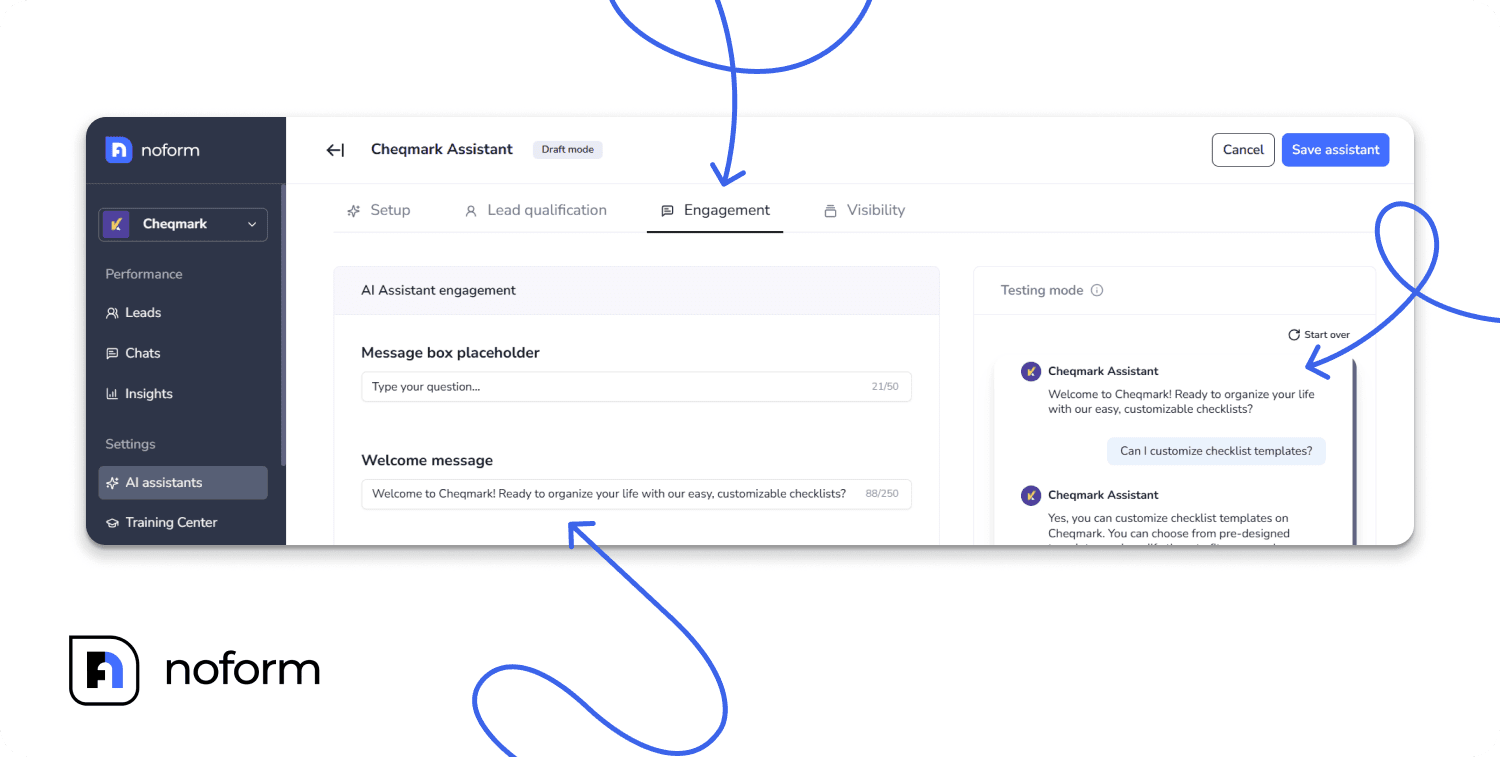
Conversation starters
You can also add conversation starters—suggested questions that appear as clickable buttons in the chat. These reduce friction and get conversations going faster. Think about the top 2-4 questions your visitors always ask, and use those.
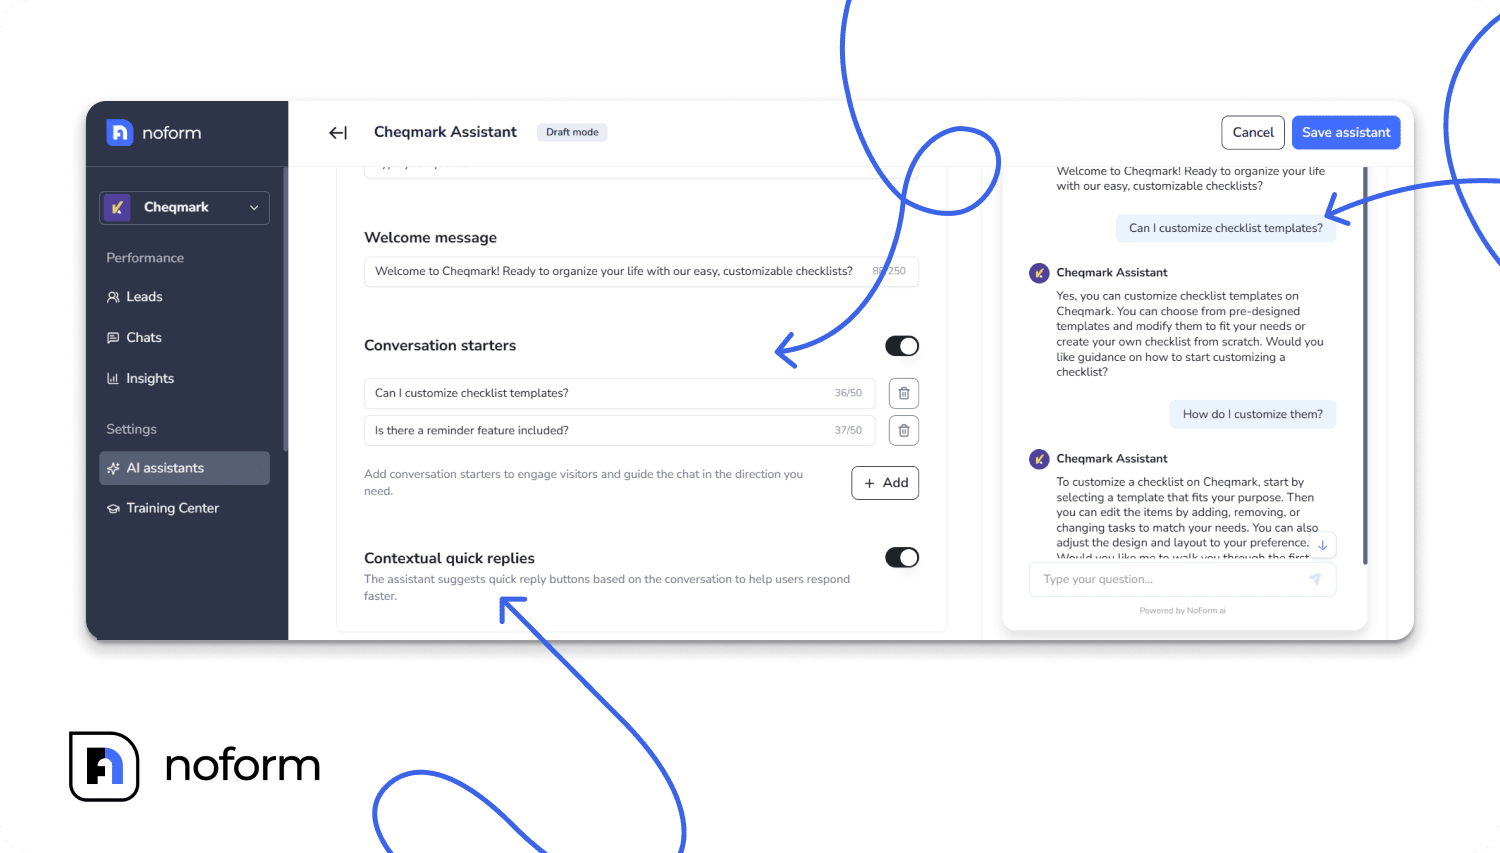
Contextual quick replies
Enable this feature so the AI can intelligently suggest reply buttons mid-conversation based on the current topic.
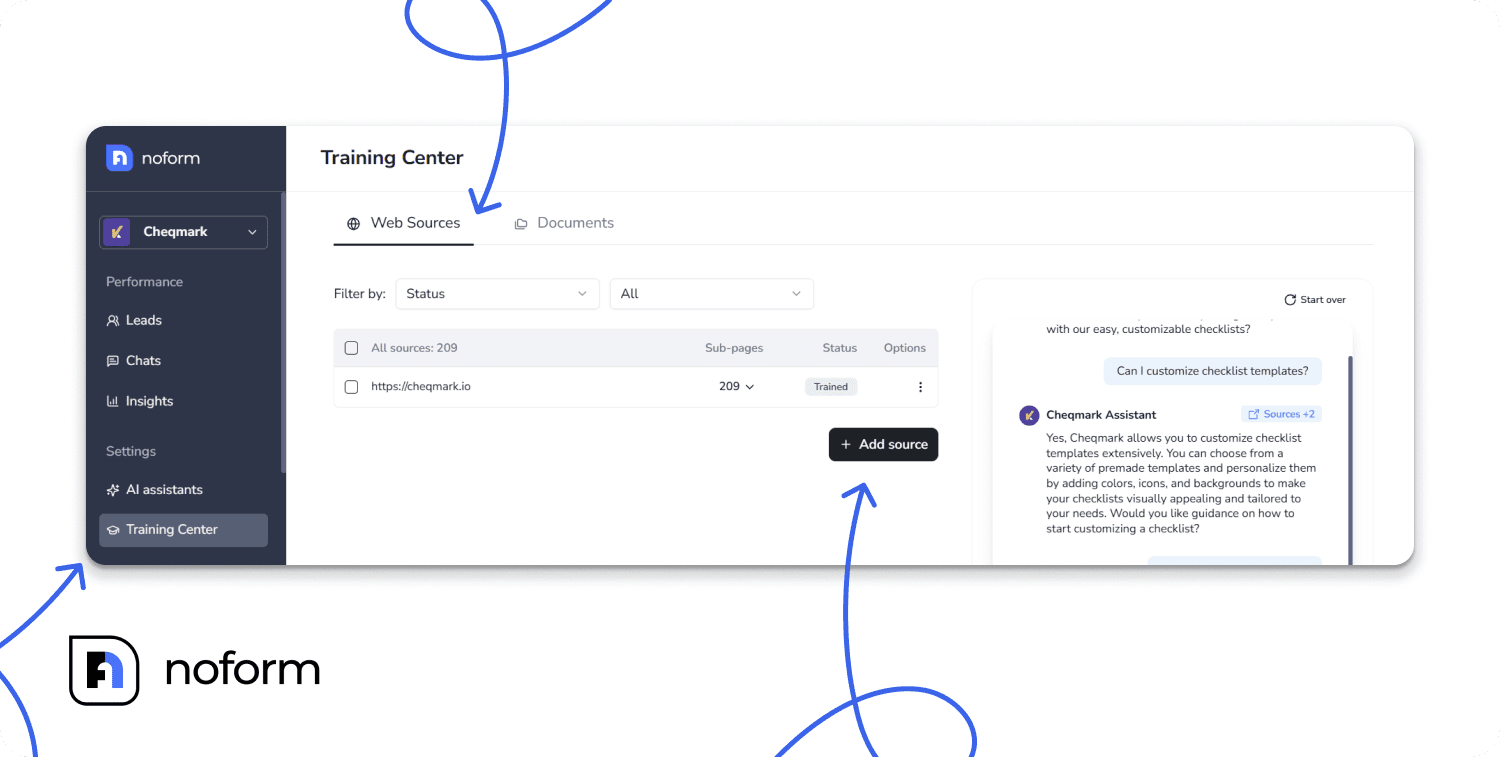
Step 5: Train and test your AI Assistant
Your AI is only as smart as the information you feed it. Head to the Training Center to give it access to your business knowledge.
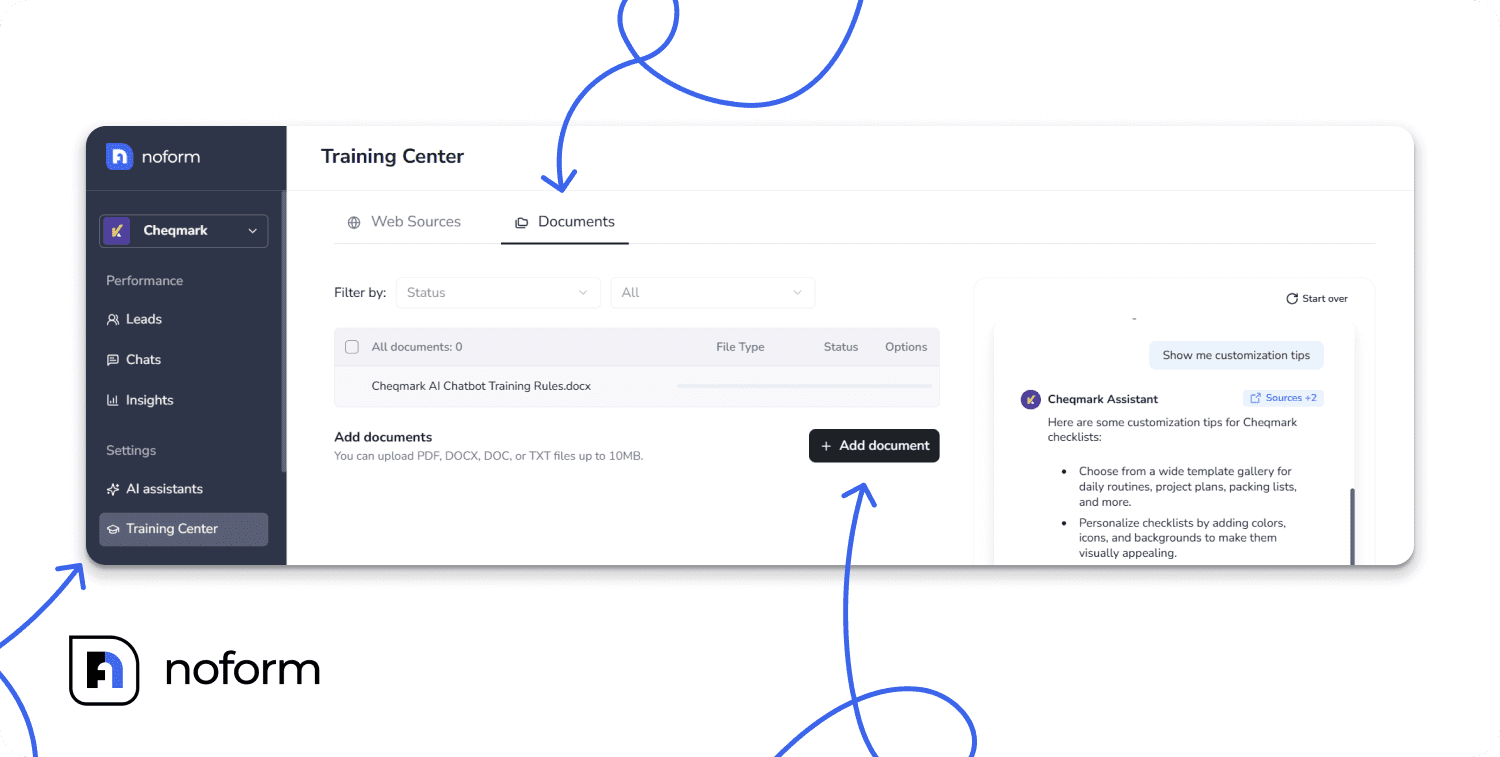
You have two easy ways to train the bot:
- Web Sources: Click + Add source and paste your website URLs (like your FAQ, pricing, or product pages). If you add a parent page, the system will automatically detect and include its subpages.
- Documents: Switch to the Documents tab to upload files like product manuals, service playbooks, or internal guides. The system accepts .doc, .docx, .txt, and .pdf formats, up to 10 MB per file.
Test before you launch
Once your assistant is trained and configured, use the built-in Testing mode panel (located inside the AI Assistants tab and Training Center) to simulate conversations before your visitors do.
Talk to the assistant yourself to check that the tone feels right and make sure the information it provides is accurate. This lets you catch anything that feels off or leads to a dead end, making it much easier to fix issues before your website visitors ever see them.
Step 6: Customize your design and branding
Your chatbot is a direct reflection of your brand experience. Let’s make it look the part.
Navigate to Chat Widget -> Display Settings to customize the visual appearance:
- Name — Give your assistant a descriptive, meaningful name that feels like part of your team (up to 50 characters). Instead of a generic label, try something like “Sarah from [Your Company]” or “[Brand] Assistant” to create a friendlier, more trustworthy experience for visitors.
- Upload logo — Upload your company logo (square image, 120×120px recommended, under 4.5 MB). It appears in the chat bubble and at the top of the chat window.
- Add brand colors: Enter your exact hex color code or use the built-in color picker so the chat buttons and bubbles match your site seamlessly.
- Choose the chat bubble shape: Rounded corners feel friendly and approachable; square edges look polished and professional. Pick what fits your brand.
- Set the position: You can position the bubble on the bottom-right or bottom-left of the screen and adjust the exact top/bottom padding so it doesn’t overlap with other elements on your site.
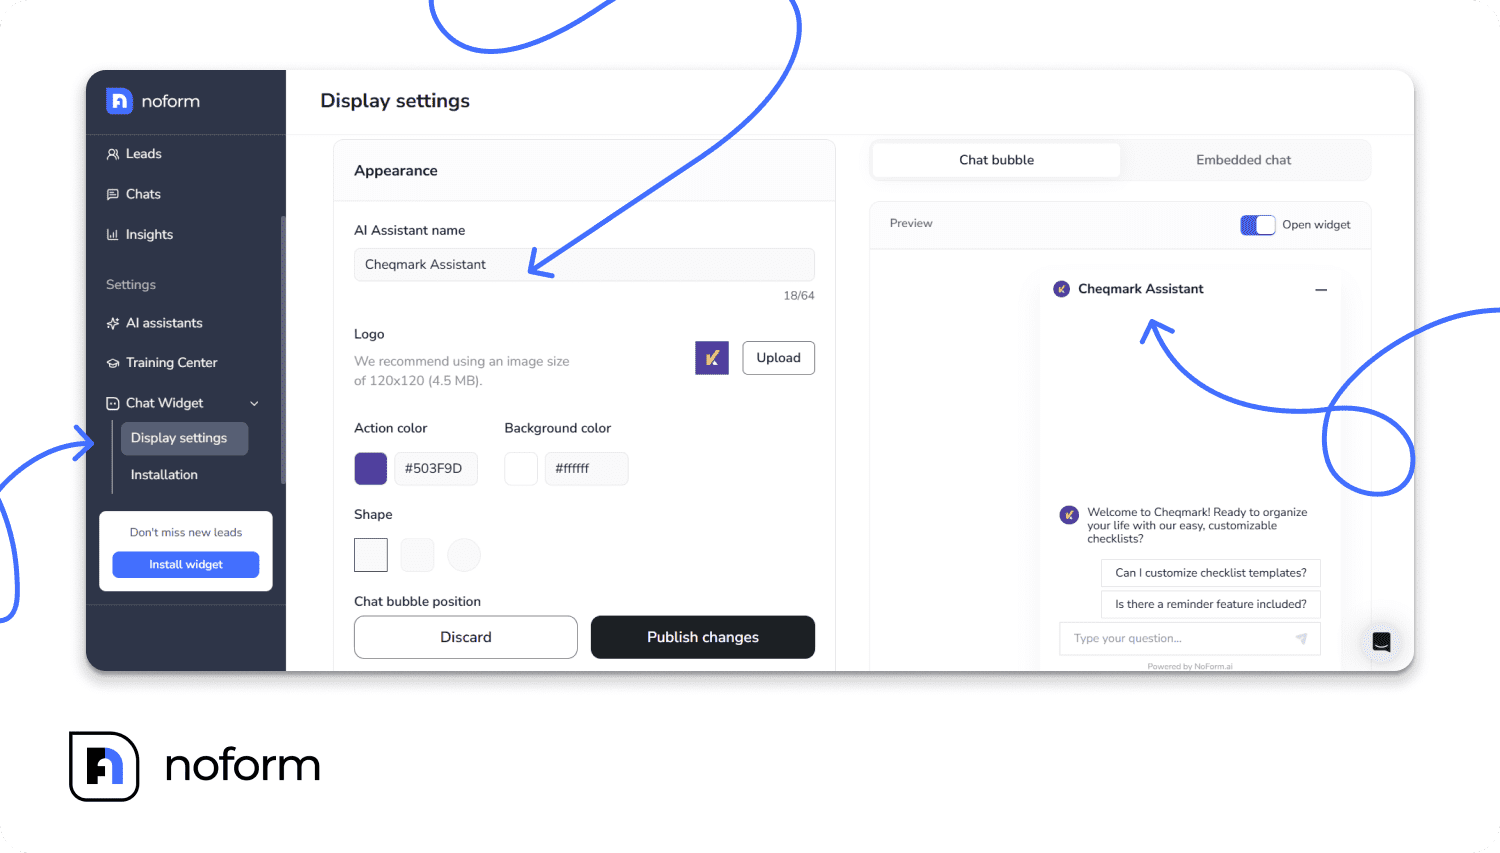
These small design choices matter more than most people realize. A branded chat widget that feels like a natural part of your website earns significantly more engagement than a generic one that looks out of place.
Step 7: Install the chatbot on your website
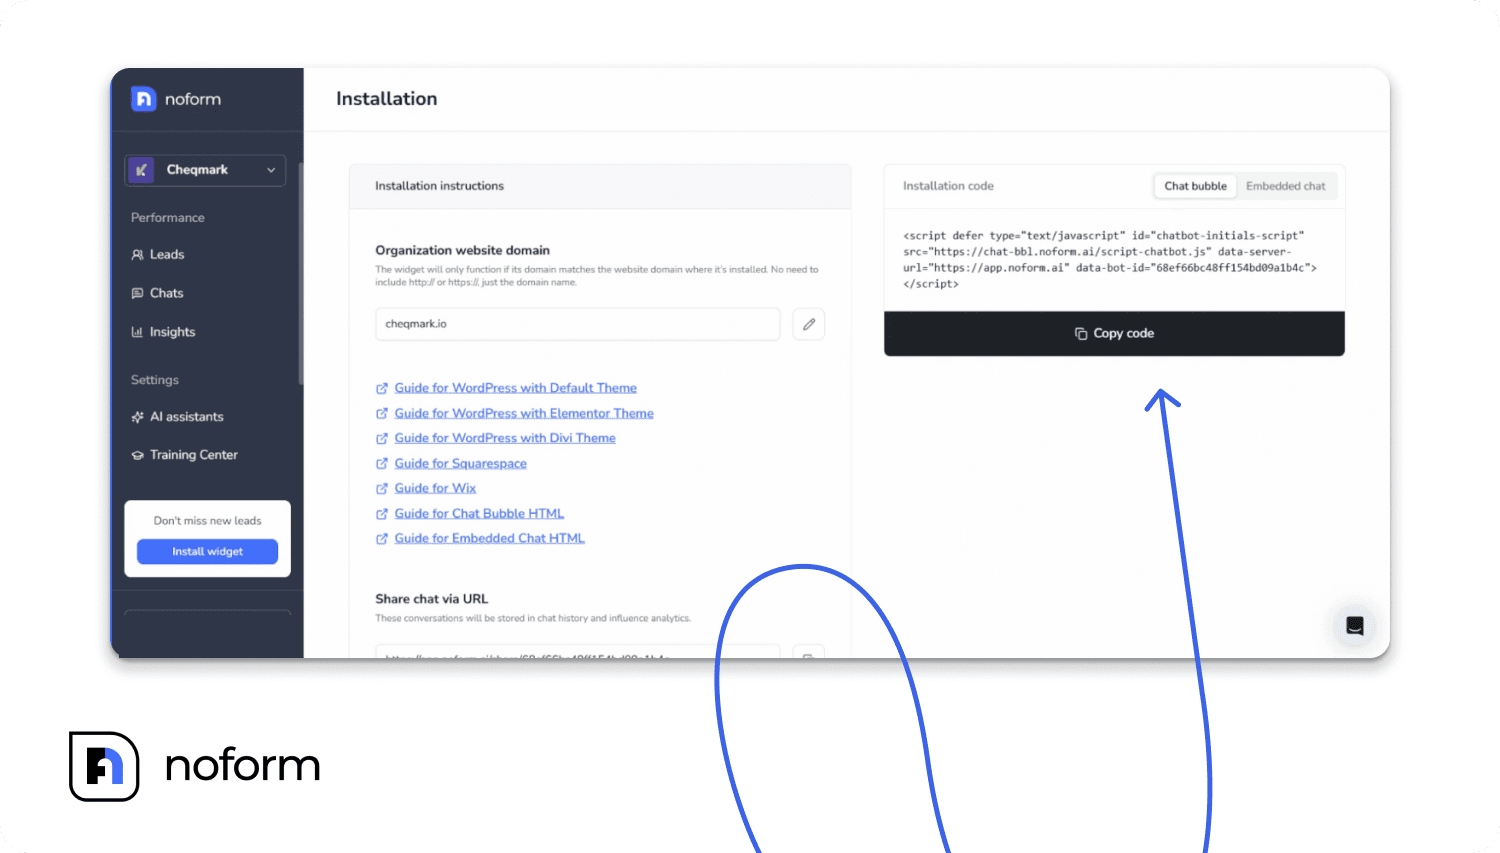
Once you’re happy with the setup, head to Chat Widget -> Installation in your NoForm dashboard.
You’ll see two options: Chat bubble (a floating widget in the corner of your page) and Embedded chat (a full chat window embedded directly into a page). Select the one you want, then click “Copy code” to copy your snippet.
Now paste it into your website. Here’s exactly how to do it on the most common platforms:
How to add a chatbot to a WordPress website
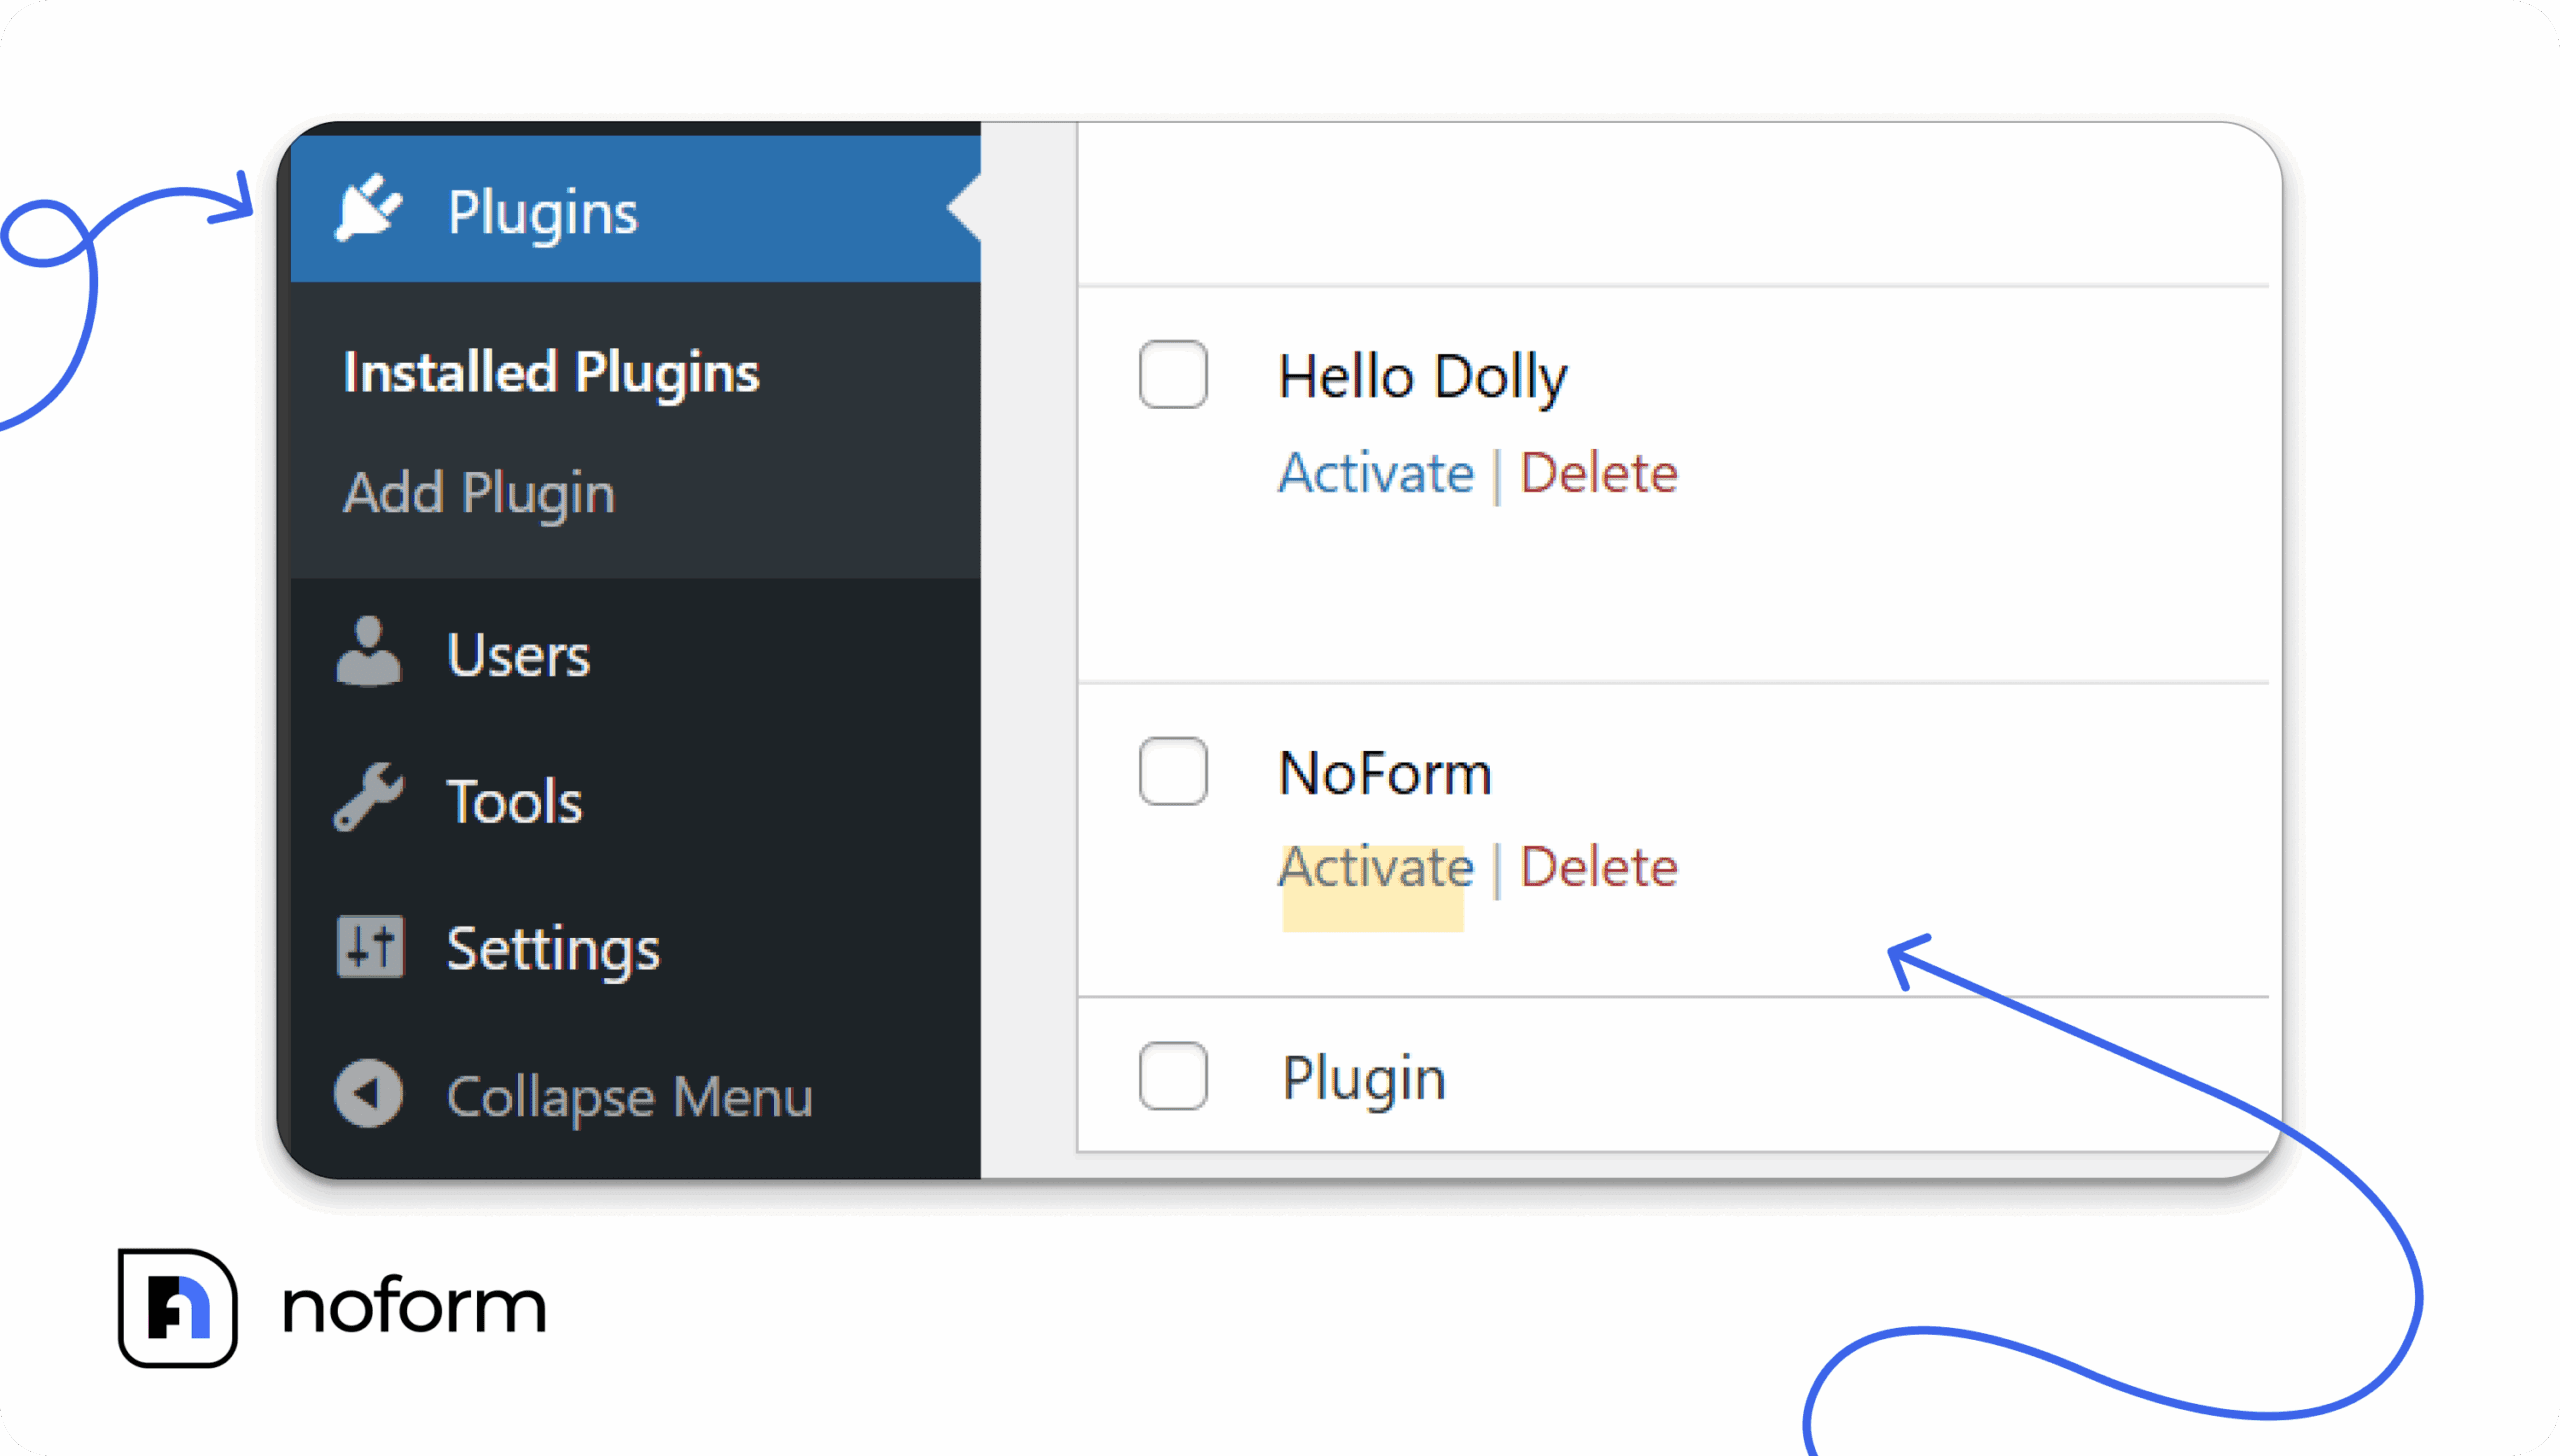
Installing on WordPress is incredibly simple using the official plugin:
- In your WordPress admin dashboard, go to Plugins → Add Plugin

- Search for “NoForm“ and install the official NoForm.ai plugin
- Once activated, go to Plugins → NoForm.ai → Settings
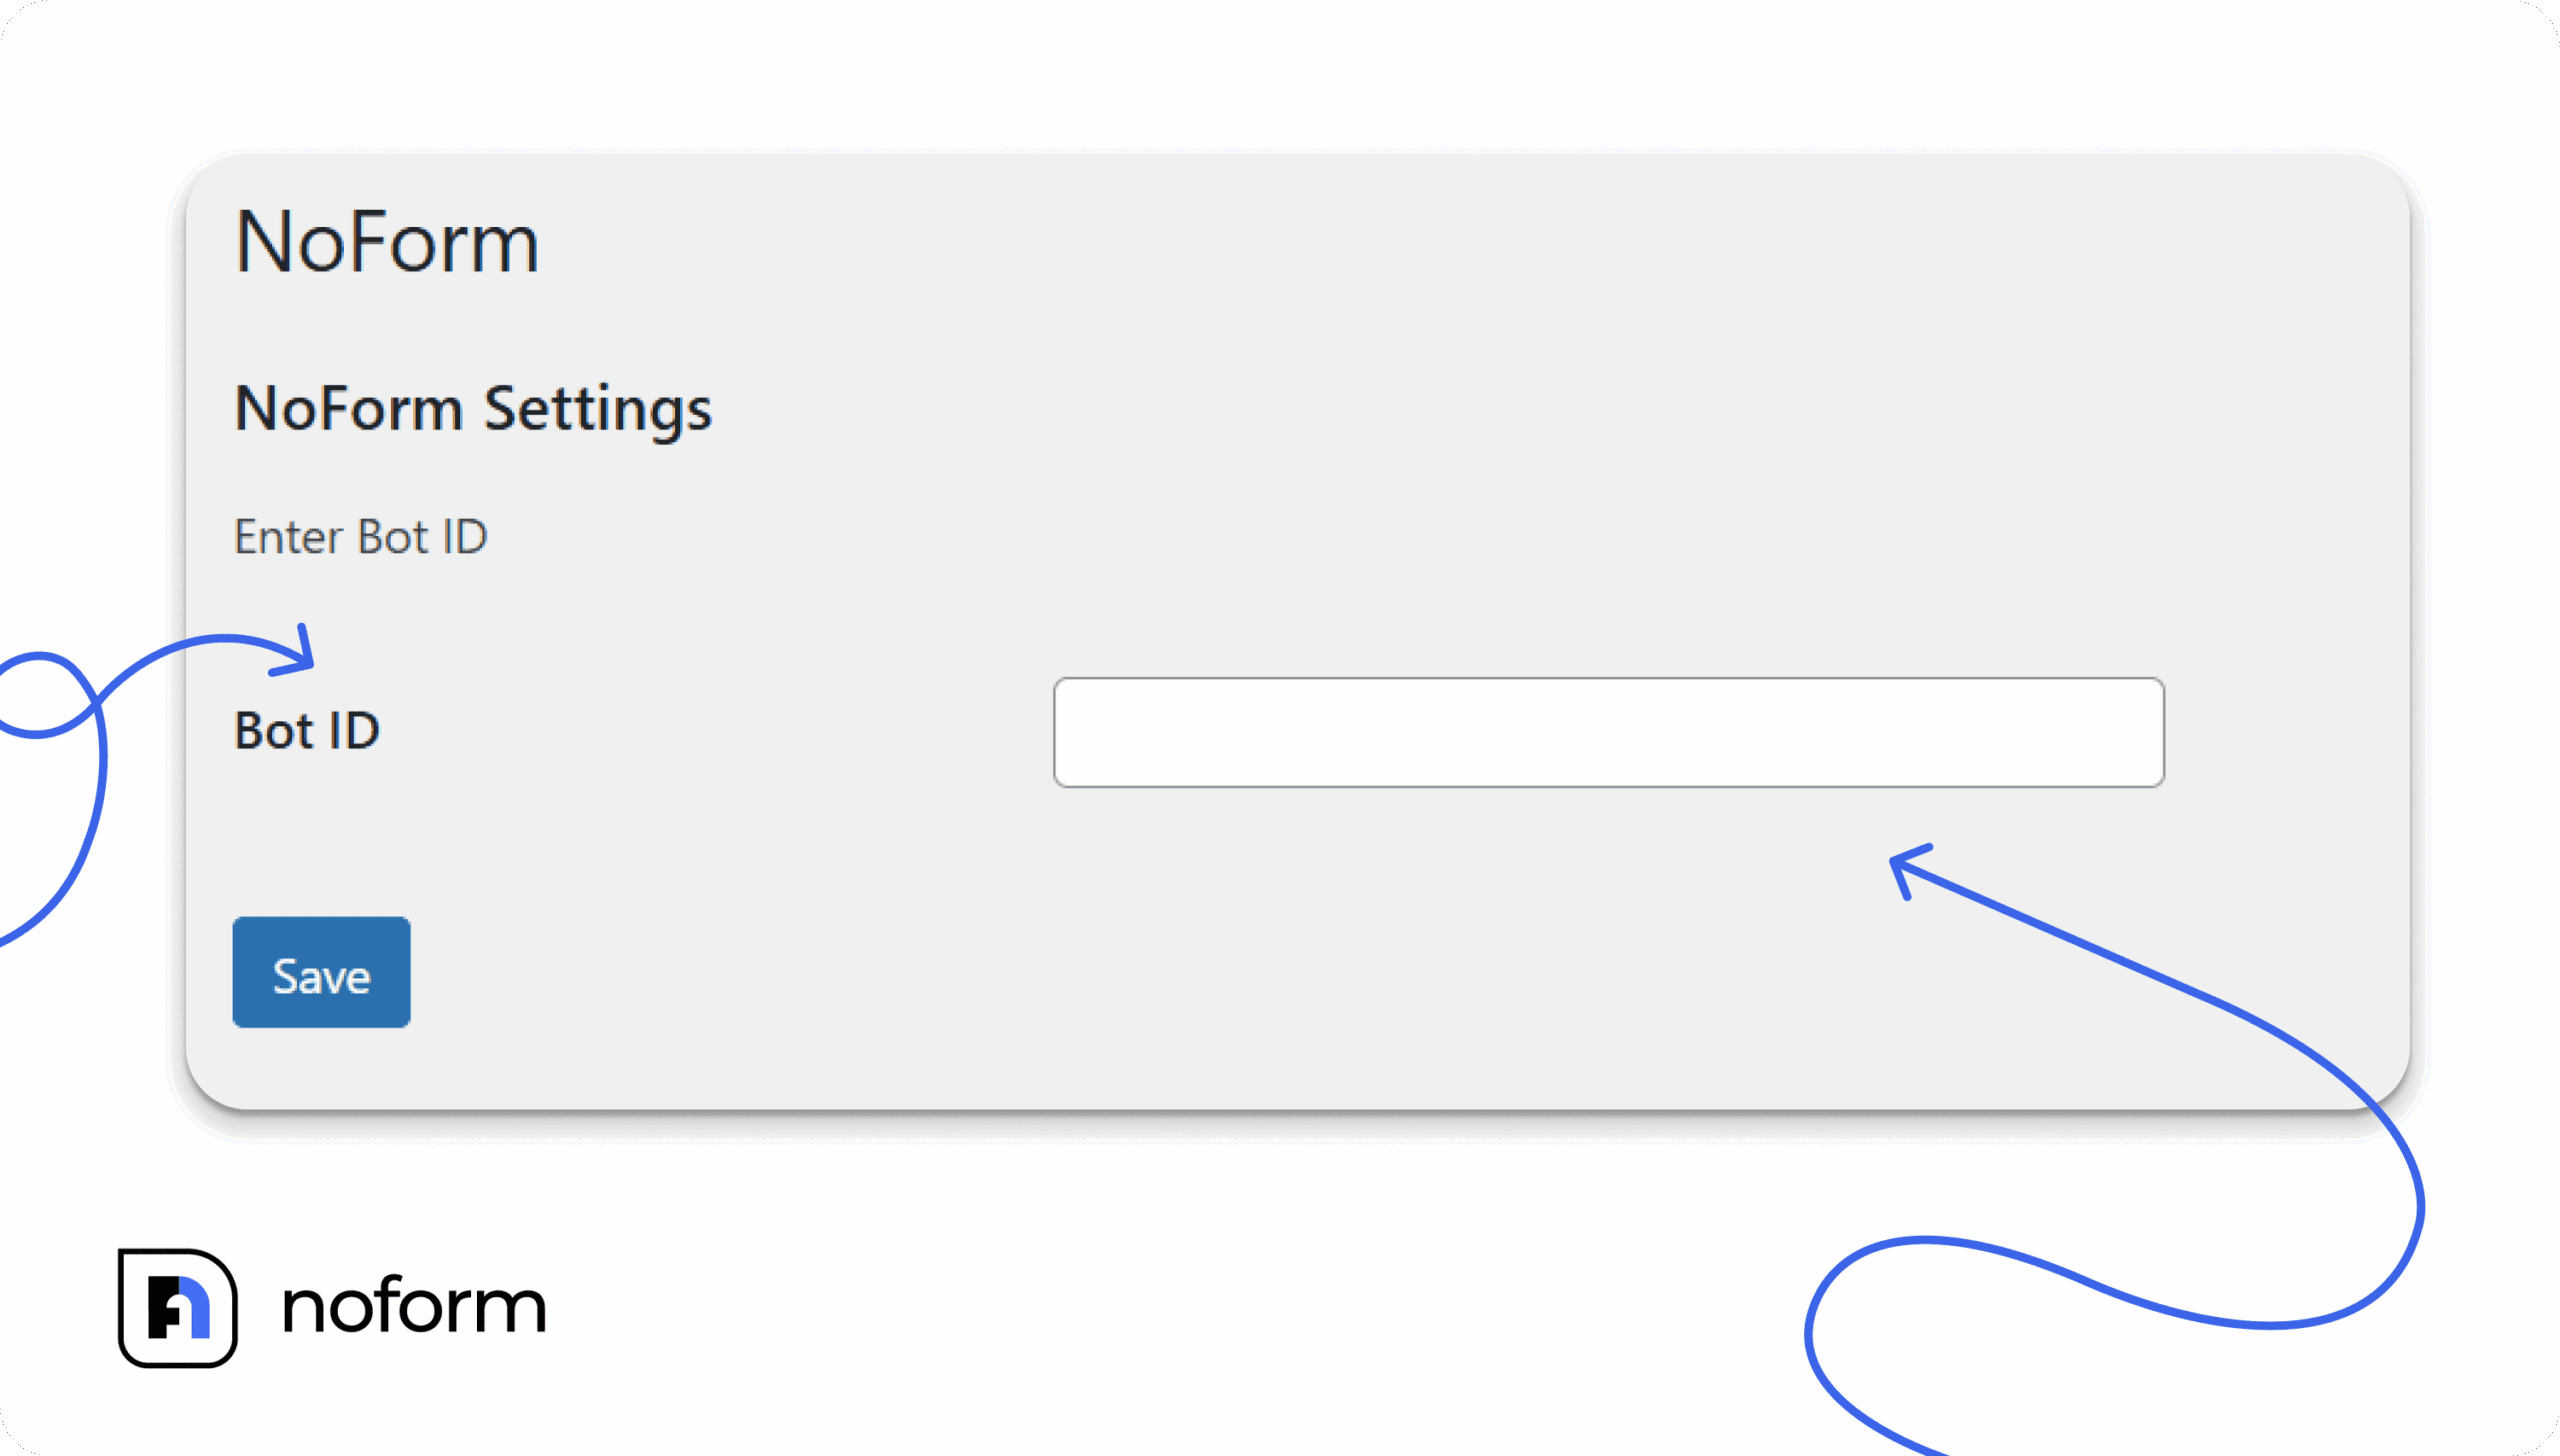
- Paste your Bot ID (found in your NoForm dashboard URL after /bot/) into the field and click Save
- That’s it — no code pasting required
Alternatively, install the free “Insert Headers and Footers” plugin by WPCode, then navigate to Code Snippets → Header & Footer and paste the code into the Header or Footer box.
If you use Elementor, go to Elementor → Custom Code → New Code, paste the snippet, set the location to <head>, and publish. If you use Divi, go to Divi → Theme Options → Integration tab and paste the code into the “Add code to the <head> of your blog” field, then save. |
How to add a chatbot to a Wix website
- In the Wix Editor, click the “+” (Add Elements) icon in the left toolbar
- Go to Embed Code → Marketing Tools (Advanced) → Custom Code
- Click “+ Add custom code”
- Paste your chat code snippet into the text box, give it a name
- Choose “All pages” and set placement to Head, then click Apply
How to add a chatbot to a Squarespace website
Method 1 — Code Injection (applies to all pages):
- In your Squarespace dashboard, hover over your site → click three dots → Settings
- Open the Code Injection panel
- Paste the chat bubble code into the Header or Footer field
- Click Save
Method 2 — Footer Block:
- In the page editor, scroll to the footer and click “Edit Site Footer”
- Click “+ ADD BLOCK”, drag a block to the page, and click “Edit”
- Open the “Code snippet” tab → click “Embed data”
- Paste your NoForm snippet and click Save
Custom HTML website
Open your HTML file in a text editor. Paste the chat bubble snippet just before the closing </head> tag — this ensures it loads without blocking other page elements. Save the file and upload it to your server.
Once you save and publish, your chat bubble is live on your site.
Want to embed the chat directly into a page instead?
The Chat bubble floats in the corner of your website and works on every page. But if you’d rather place a full chat window directly inside a specific page — like a contact page, a landing page, or a help center — you can use the Embedded chat option instead.
Go to Chat Widget -> Installation, select “Embedded chat”, and click “Copy code”.
The embed code is an iframe snippet. On any platform, the principle is the same: find the page where you want the chat to appear, add an HTML or code block at that location, and paste the snippet inside it. On WordPress, that’s a Custom HTML block. On Wix or Squarespace, it’s an Embed HTML or Code block. On a custom HTML site, paste it directly inside the <body> tags wherever you want the chat to sit on the page.
You can adjust the width and height of the iframe to fit your layout — for example, style=”width: 100%; height: 418px;”.
| If you’re on Squarespace and can’t see the embedded chat while logged into the editor, that’s expected — Squarespace disables embedded scripts for logged-in users as a security measure. Click “Preview in Safe Mode” to verify it’s working correctly. |
Once you save and publish, your AI assistant is live.
What happens after your assistant is live?
Once you hit publish, your NoForm AI assistant goes to work immediately. It proactively engages visitors, answers questions in real-time, and logs every interaction directly into your dashboard.
Here is exactly what you get from day one:
- 24/7 lead capture
Your assistant never takes a break. It captures leads at night, on weekends, and during traffic spikes, ensuring you never miss an opportunity just because your office is closed.
- Instant response times
Speed wins deals. Research shows that responding to a lead within 5 minutes makes you 21 times more likely to qualify them compared to waiting 30 minutes. NoForm AI replies in seconds, keeping your prospects engaged before they can bounce to a competitor.
- Pre-qualified leads with full context
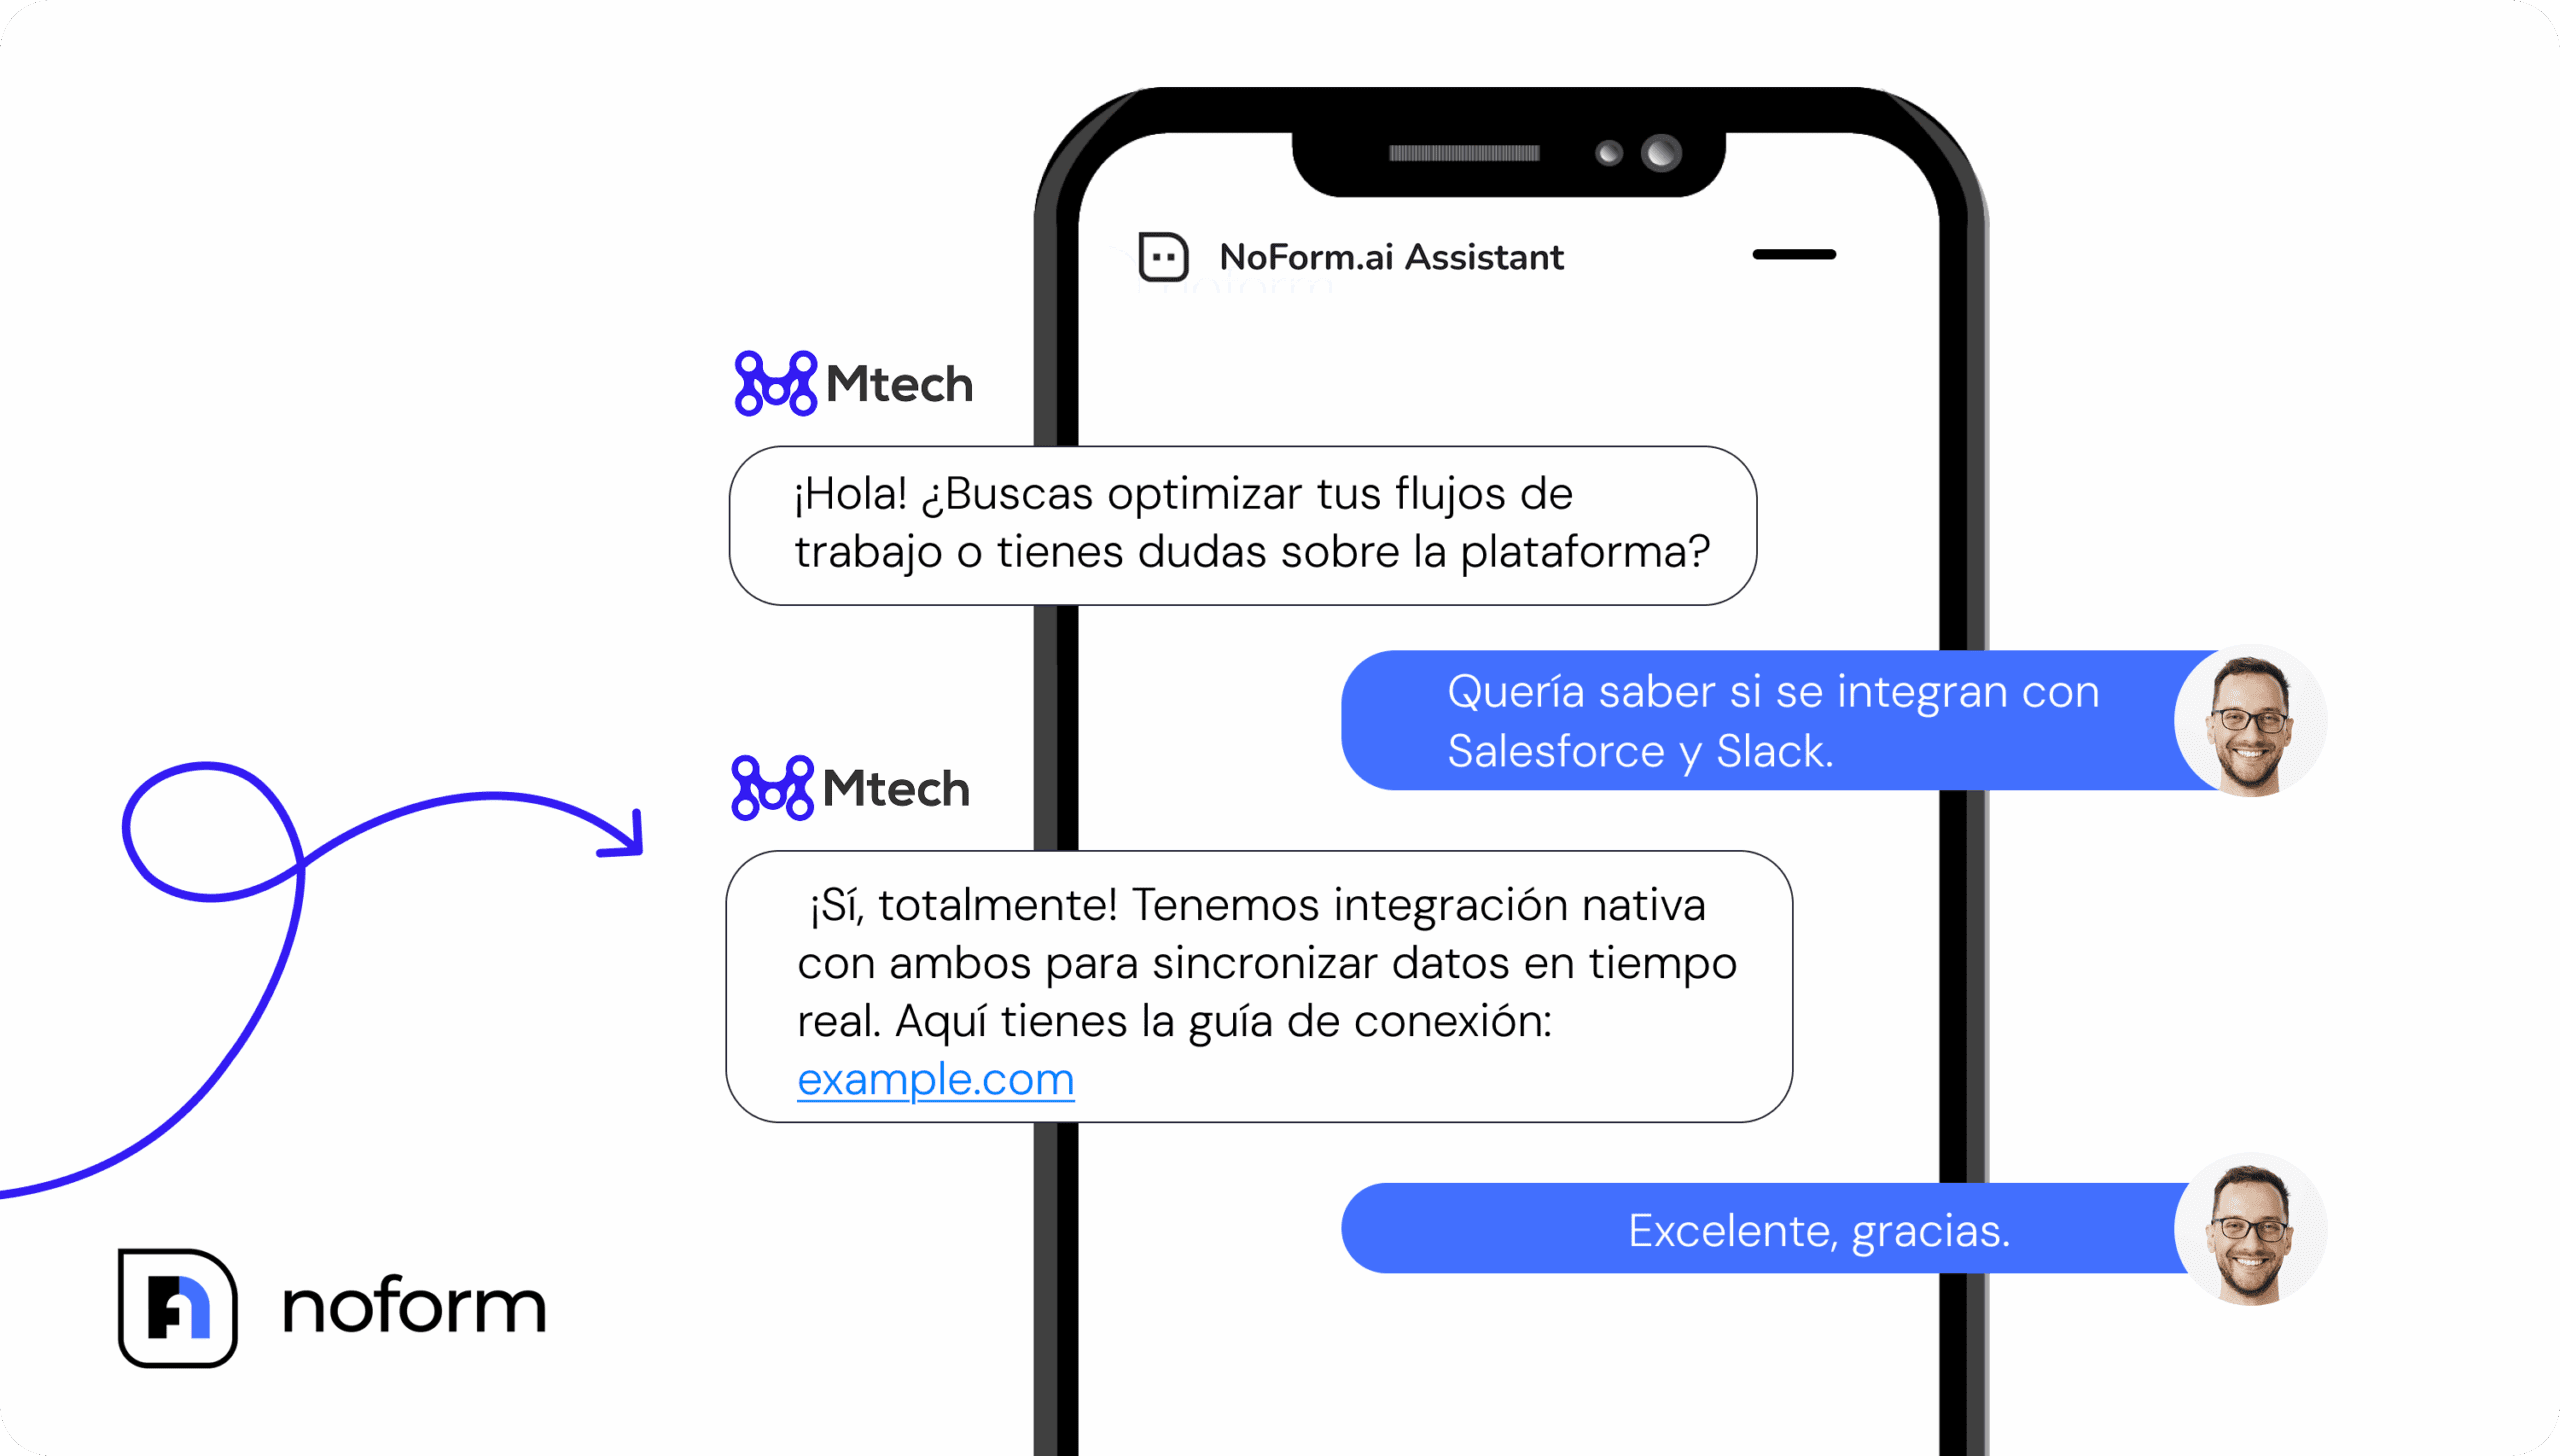
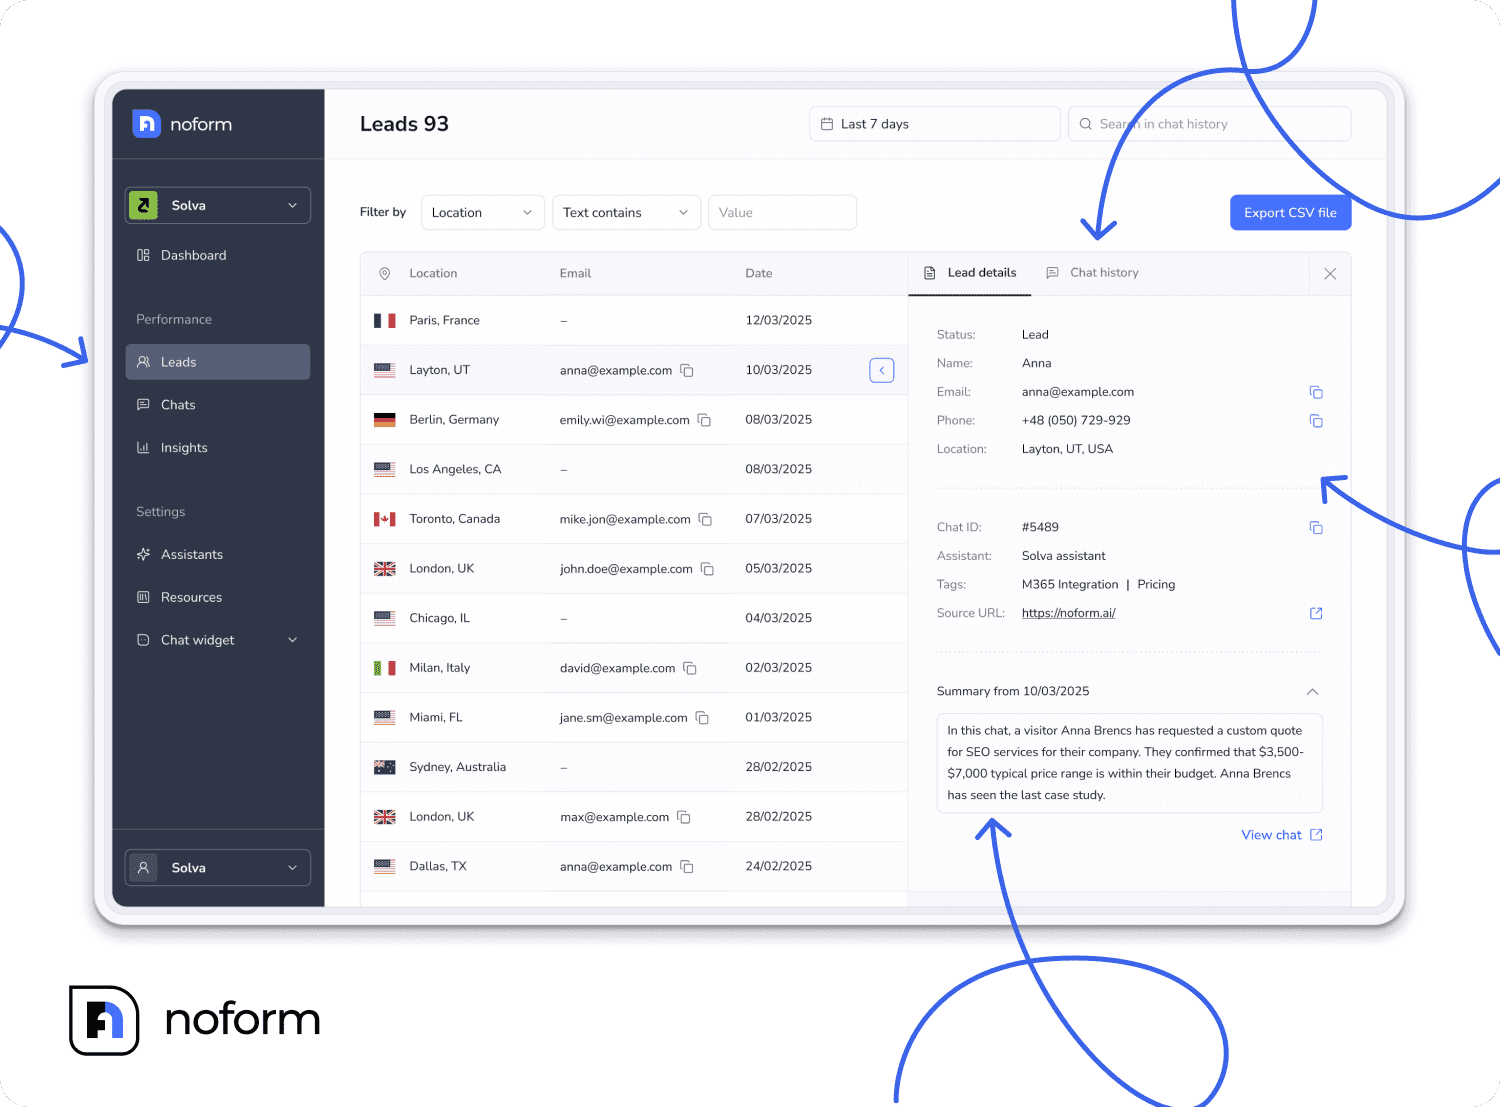
Instead of a generic form notification, every qualified conversation is logged with the visitor’s contact details and a concise, AI-generated chat summary. Your sales team will know exactly what the prospect asked and what problem they are trying to solve before ever reaching out.
- Actionable customer insights
You don’t need to monitor the chatbot constantly. By reviewing your dashboard’s Insights and Chats tabs, you will quickly discover common customer questions, uncover friction points, and see exactly what is driving the most interest in your services.
Bonus: Tips to get even more from your NoForm AI setup
The setup above will get you live and capturing leads right away. But once you’ve got the basics working, there are a few things that can significantly improve your results.
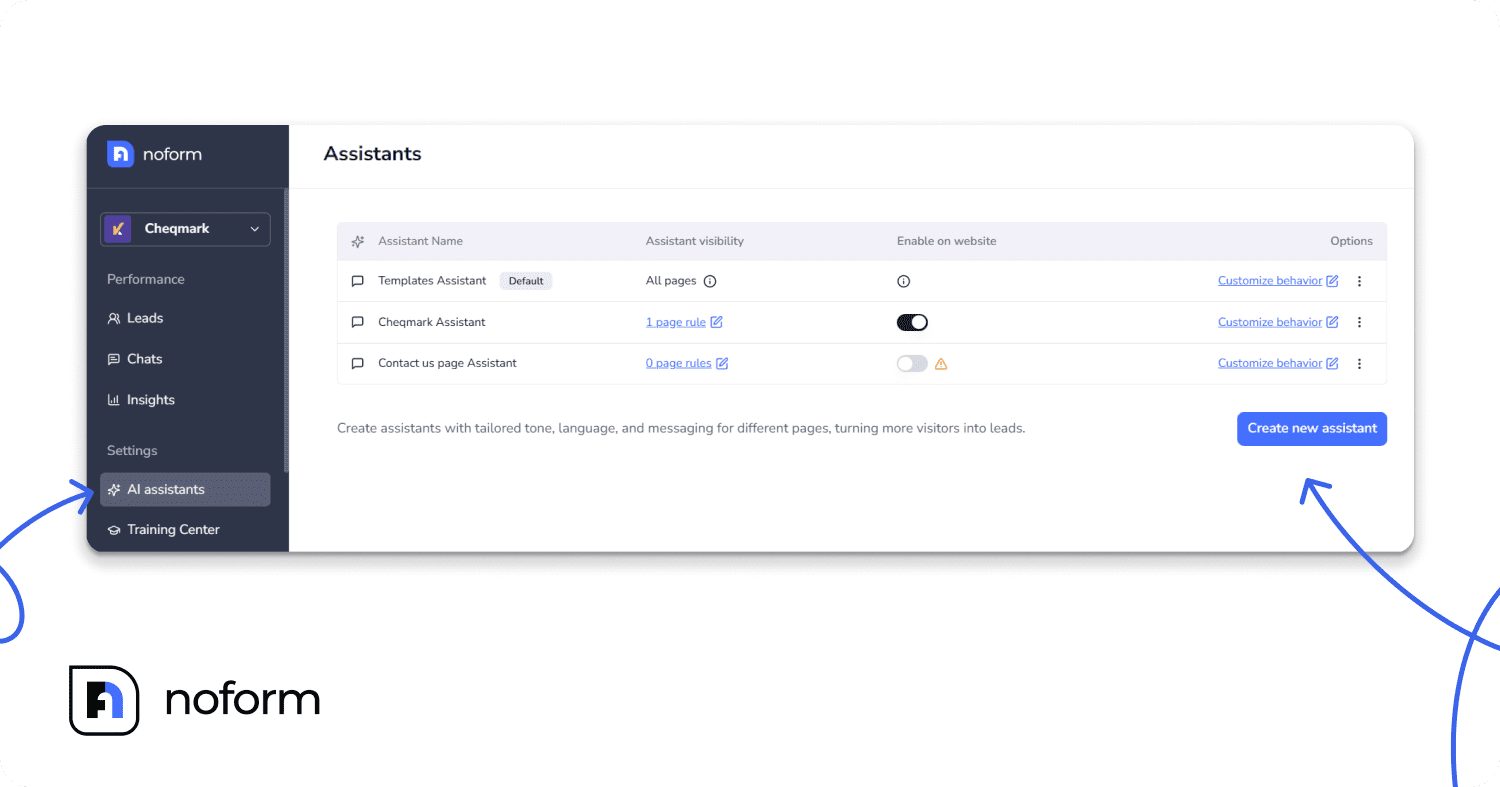
Create multiple assistants for different pages. A single assistant doesn’t have to do everything. You can create a specialized assistant for your pricing page, a different one for your support or help section, and another for product pages. Each one is trained for its specific purpose and shows up only on the pages where it’s relevant.
Enable multi-language support to reach a global audience. 75% of consumers prefer to buy products in their native language. NoForm AI can automatically detect the user’s language and reply in it instantly. For an even more tailored experience, you can create dedicated language-specific assistants for localized URLs (like your /es/ or /fr/ pages) with fully translated welcome messages and conversation starters.
Update your assistant when your business changes. If you launch a new product, change your pricing, or update your policies, log into NoForm and refresh your assistant’s knowledge base. Keeping it current ensures visitors always get accurate information.
Review your lead dashboard weekly. Look at what visitors are asking and what conversations are converting. Use that data to improve your assistant’s responses and to inform your broader marketing and sales strategy.
Match your assistant’s tone to your brand voice. If your brand is warm and conversational, make sure your assistant talks that way. If you’re a professional services firm with a formal tone, adjust the language accordingly. Consistency between your website and your assistant builds trust.
Summing up: Stop chasing, start capturing
Getting NoForm AI set up on your website isn’t a week-long project. It’s not even a day-long project. In less time than it takes to write a single email, you can have a 24/7 AI sales assistant live on your site—trained on your content, customized to your brand, and actively capturing leads from every visitor who stops by.
Your website is already getting traffic, and those visitors already have problems your business solves. By giving them an immediate, frictionless way to get answers, you turn passive browsers into an active, qualified pipeline. Every conversation has a purpose: to identify who the visitor is, understand what they need, determine if they’re a fit, and capture their information if they are.
This is the future of lead generation: conversations instead of forms, context instead of guesswork, and automation instead of manual qualification.
NoForm AI ensures you never lose another qualified prospect to form friction, after-hours timing, or a delayed response again. The longer your website sits there without it, the more conversations you’re missing.
Ready to turn your website visitors into qualified leads? Set up your AI assistant today or book a demo call to see NoForm AI in action.
Frequently Asked Questions
Do I need any coding skills to set up NoForm AI?
Setting up NoForm AI requires no coding skills at all. You create your account, enter your website URL, customize your assistant in the dashboard, and paste one small embed code into your website. The whole process is designed for non-technical users from start to finish.
How long does it take to set up NoForm AI?
Most users are fully live in a few minutes. The AI automatically trains itself on your website content, which removes the most time-consuming part of traditional chatbot setup. Customizing your assistant’s name, prompt, welcome message, and design takes only a few more minutes. Once you paste the embed code into your website, your assistant is instantly active.
Which website platforms does NoForm AI support?
NoForm AI works with any website that allows you to add a code snippet to the HTML. This includes WordPress, Wix, Webflow, Squarespace, Framer, Shopify, custom HTML websites, and more. For WordPress specifically, there is also a native plugin that makes installation even easier—no code pasting required.
What happens if a visitor asks something my assistant doesn’t know?
NoForm AI is trained on your website content and the context you provide in your prompt and Training Center. If a visitor asks something outside of that scope, the assistant can be configured to acknowledge the gap and collect contact details so your team can follow up directly. You can also define escalation triggers in the prompt—specific topics or scenarios where the assistant hands off to a human.
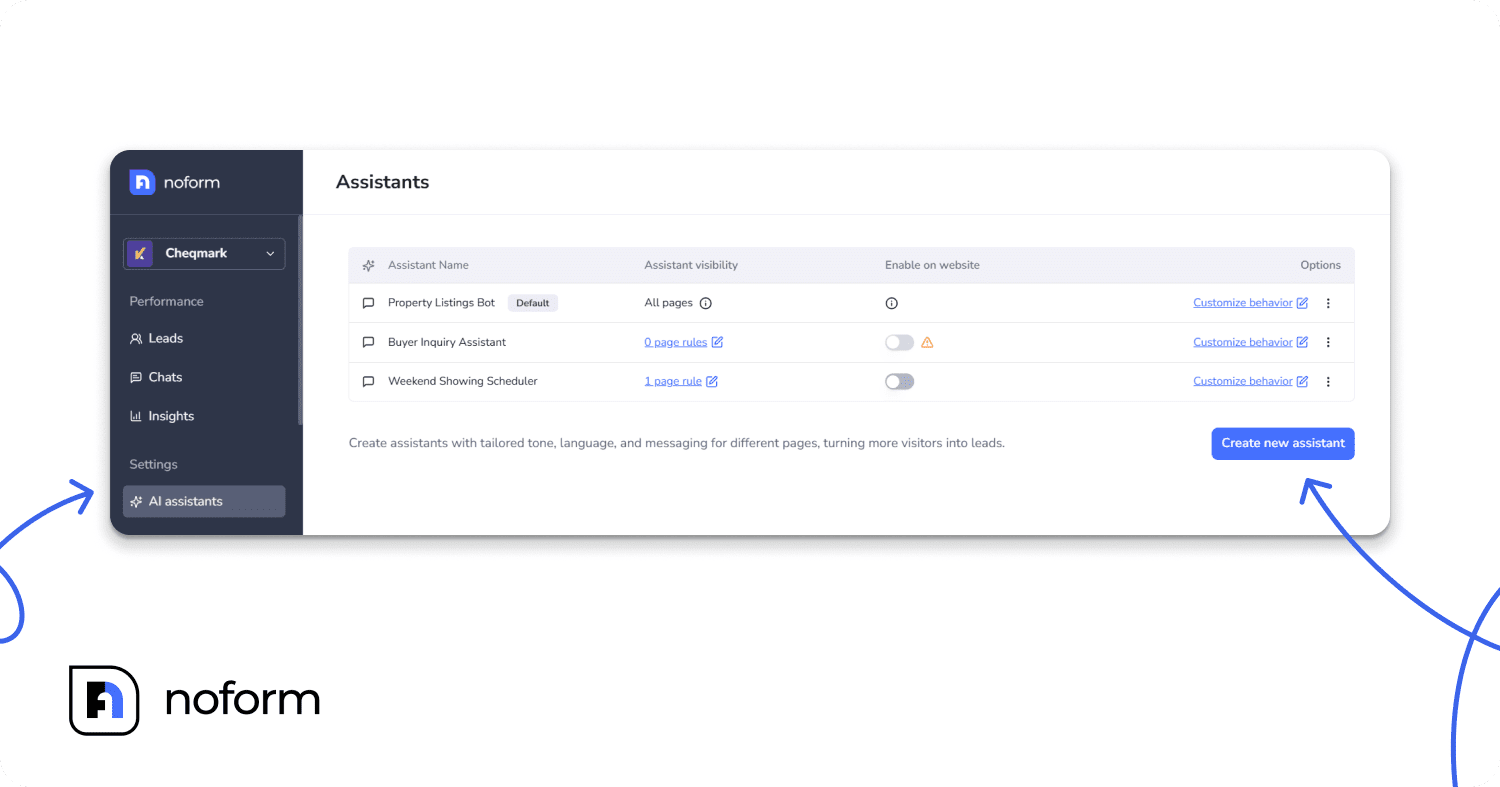
Can I have different assistants on different pages?
Yes. NoForm AI lets you create multiple AI assistants, each assigned to specific pages or sections of your website using URL rules. For example, you can have a sales-focused assistant on your pricing page and a support-focused assistant on your help center. Pages without a specific rule will fall back to your default assistant, so your entire site always has coverage.
Is my visitor data secure with NoForm AI?
NoForm AI is built with data security and compliance in mind. The platform uses advanced encryption and is designed to comply with GDPR and CCPA requirements. Visitor data collected during conversations is stored securely in your account dashboard and is not shared with third parties.
How do I know if my assistant is performing well?
Your NoForm AI dashboard shows real-time metrics, including the number of conversations started, leads captured, and visitor engagement rates. You can review individual conversation logs to see what visitors are asking and how your assistant is responding. This data helps you identify gaps, refine your prompt, and continuously improve performance over time.
Can I customize the language my assistant uses?
Yes. NoForm AI supports multiple languages. You can configure your assistant to communicate in any language by setting it in the prompt, and if you serve international audiences, you can create separate assistants for different language regions of your website (for example, setting one assistant to appear only on pages starting with /fr/ for French visitors).