What Is a WordPress chatbot plugin?
A WordPress chatbot plugin is a tool that adds an AI-powered chat widget to your site. When a visitor lands on your page, they see a small chat bubble in the corner. They click it, ask a question, and the AI responds — instantly, accurately, and without any human involvement.
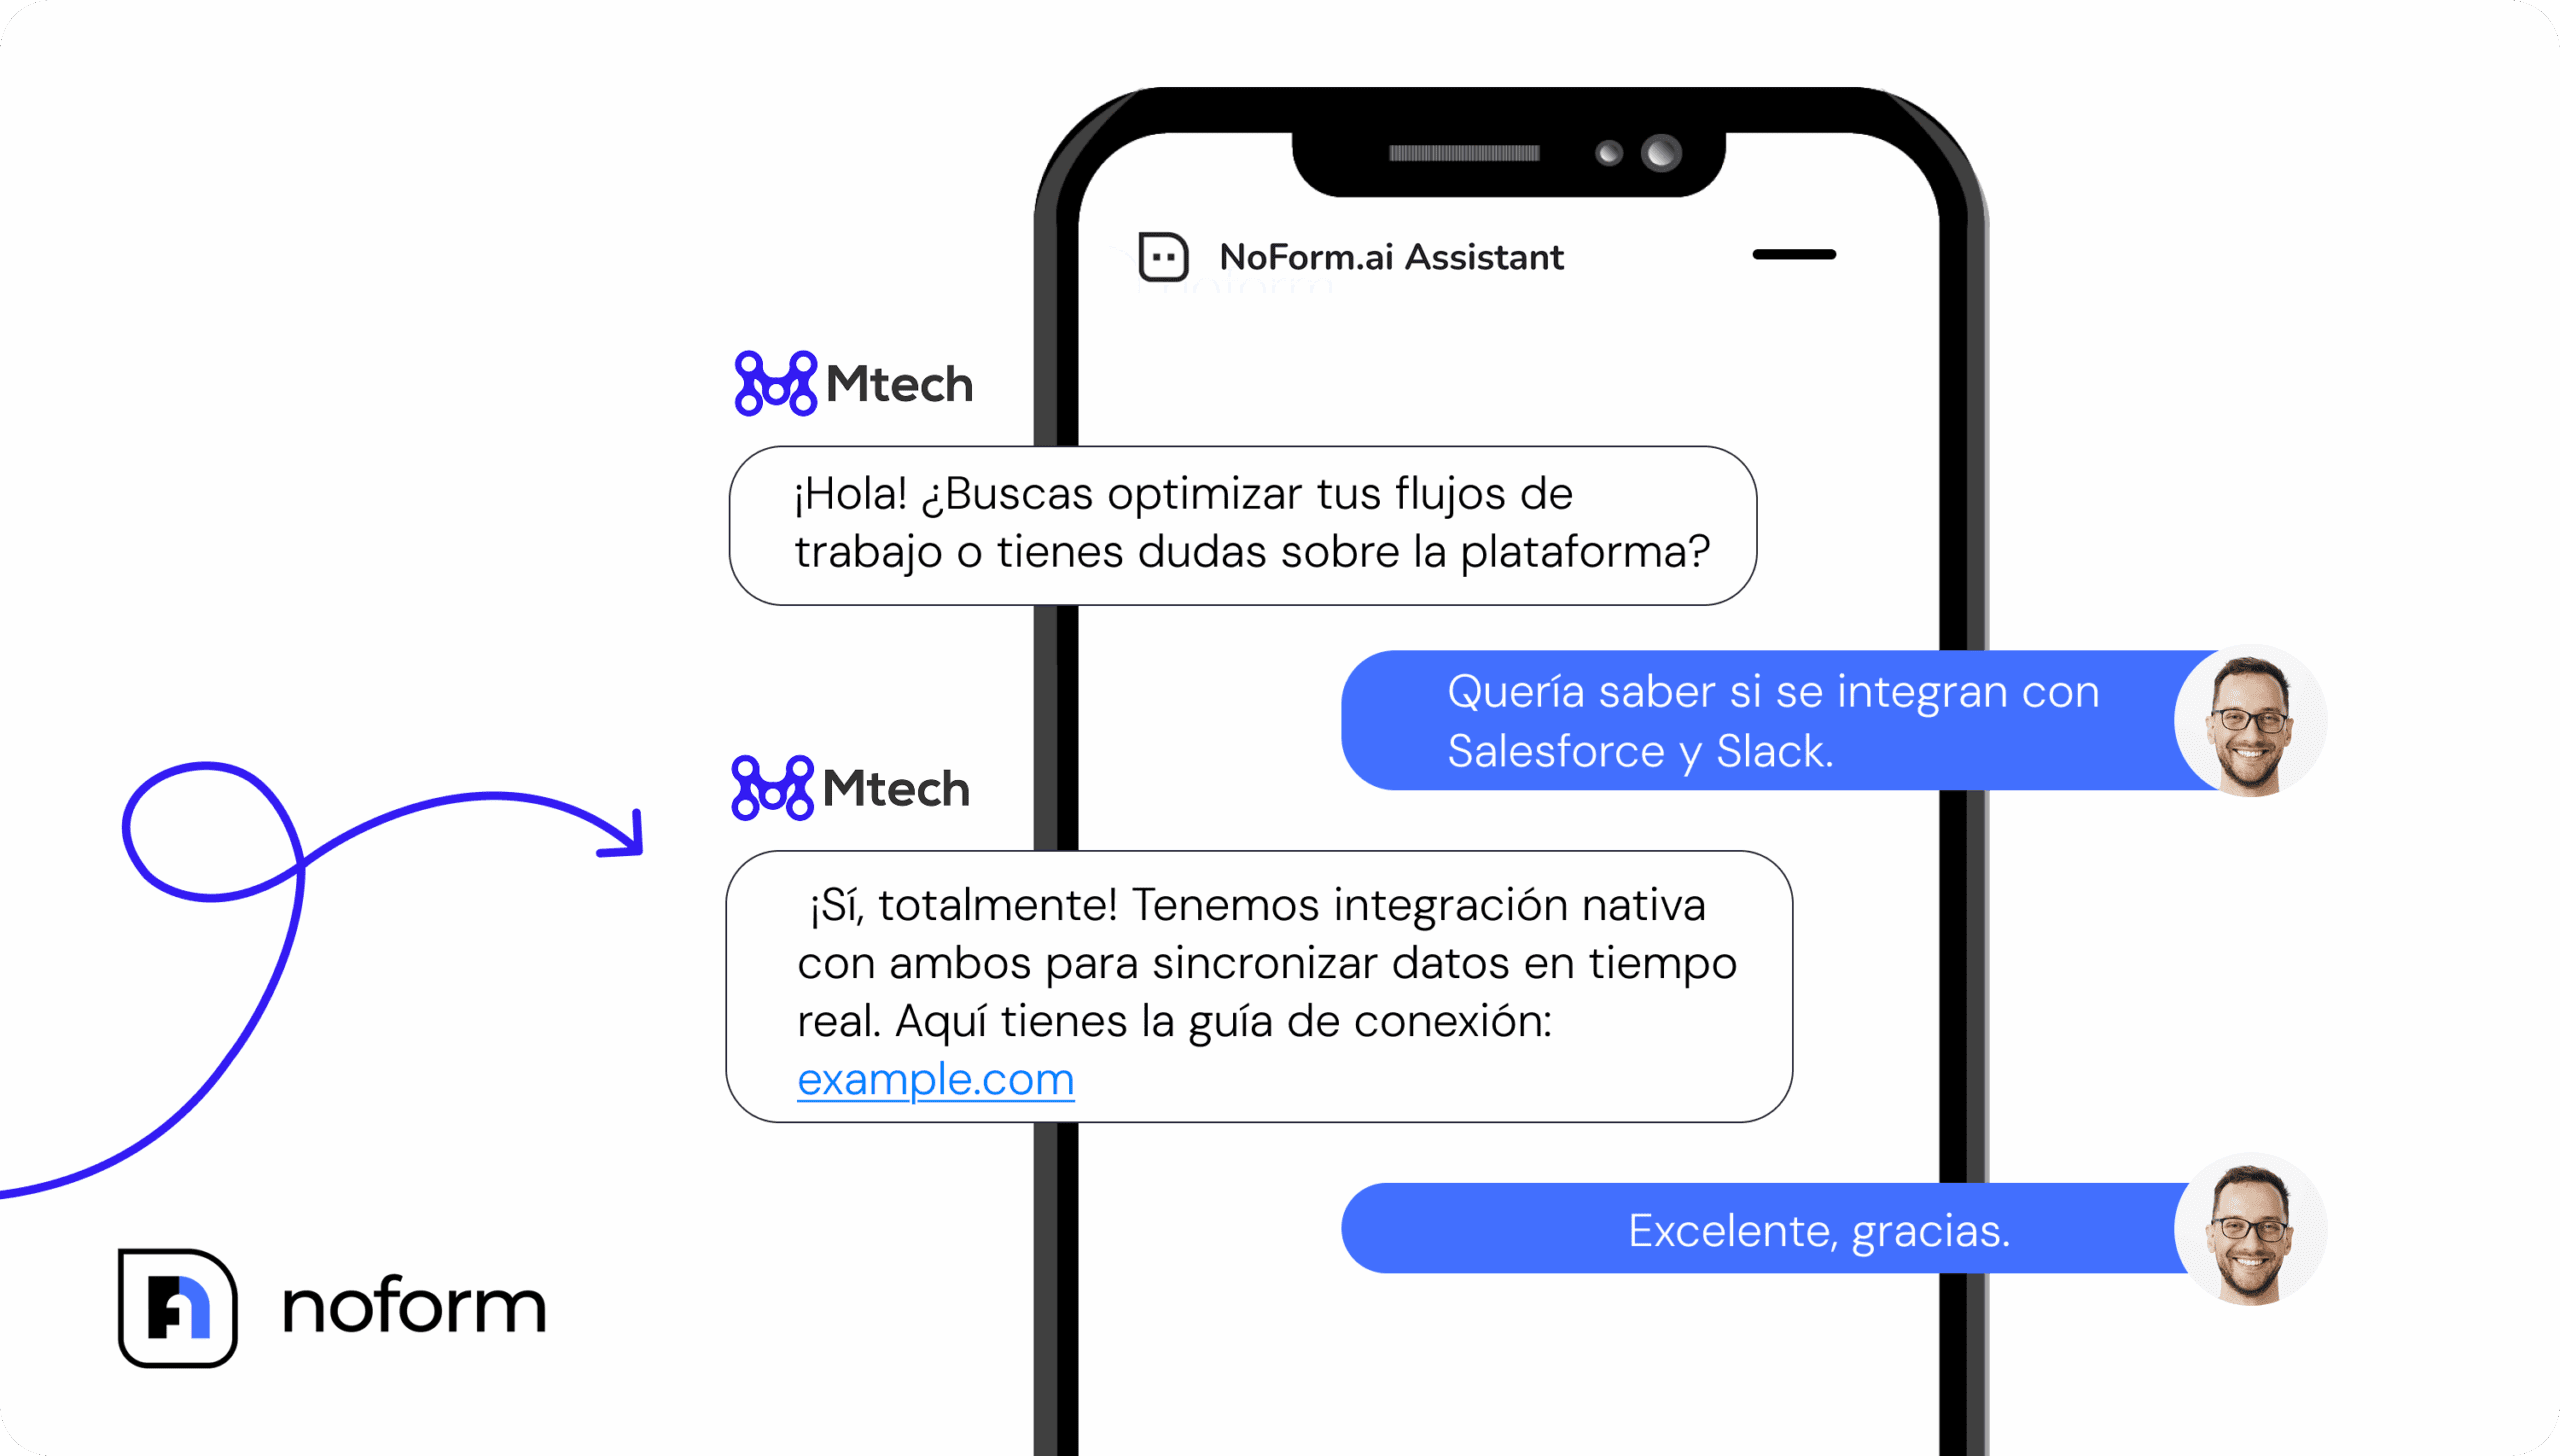
The best chatbot plugins for WordPress websites go beyond simple FAQ bots. They hold natural conversations, collect visitor information (name, email, phone), and help move people toward a decision. Think of it as a sales rep and support agent combined, available every hour of every day.
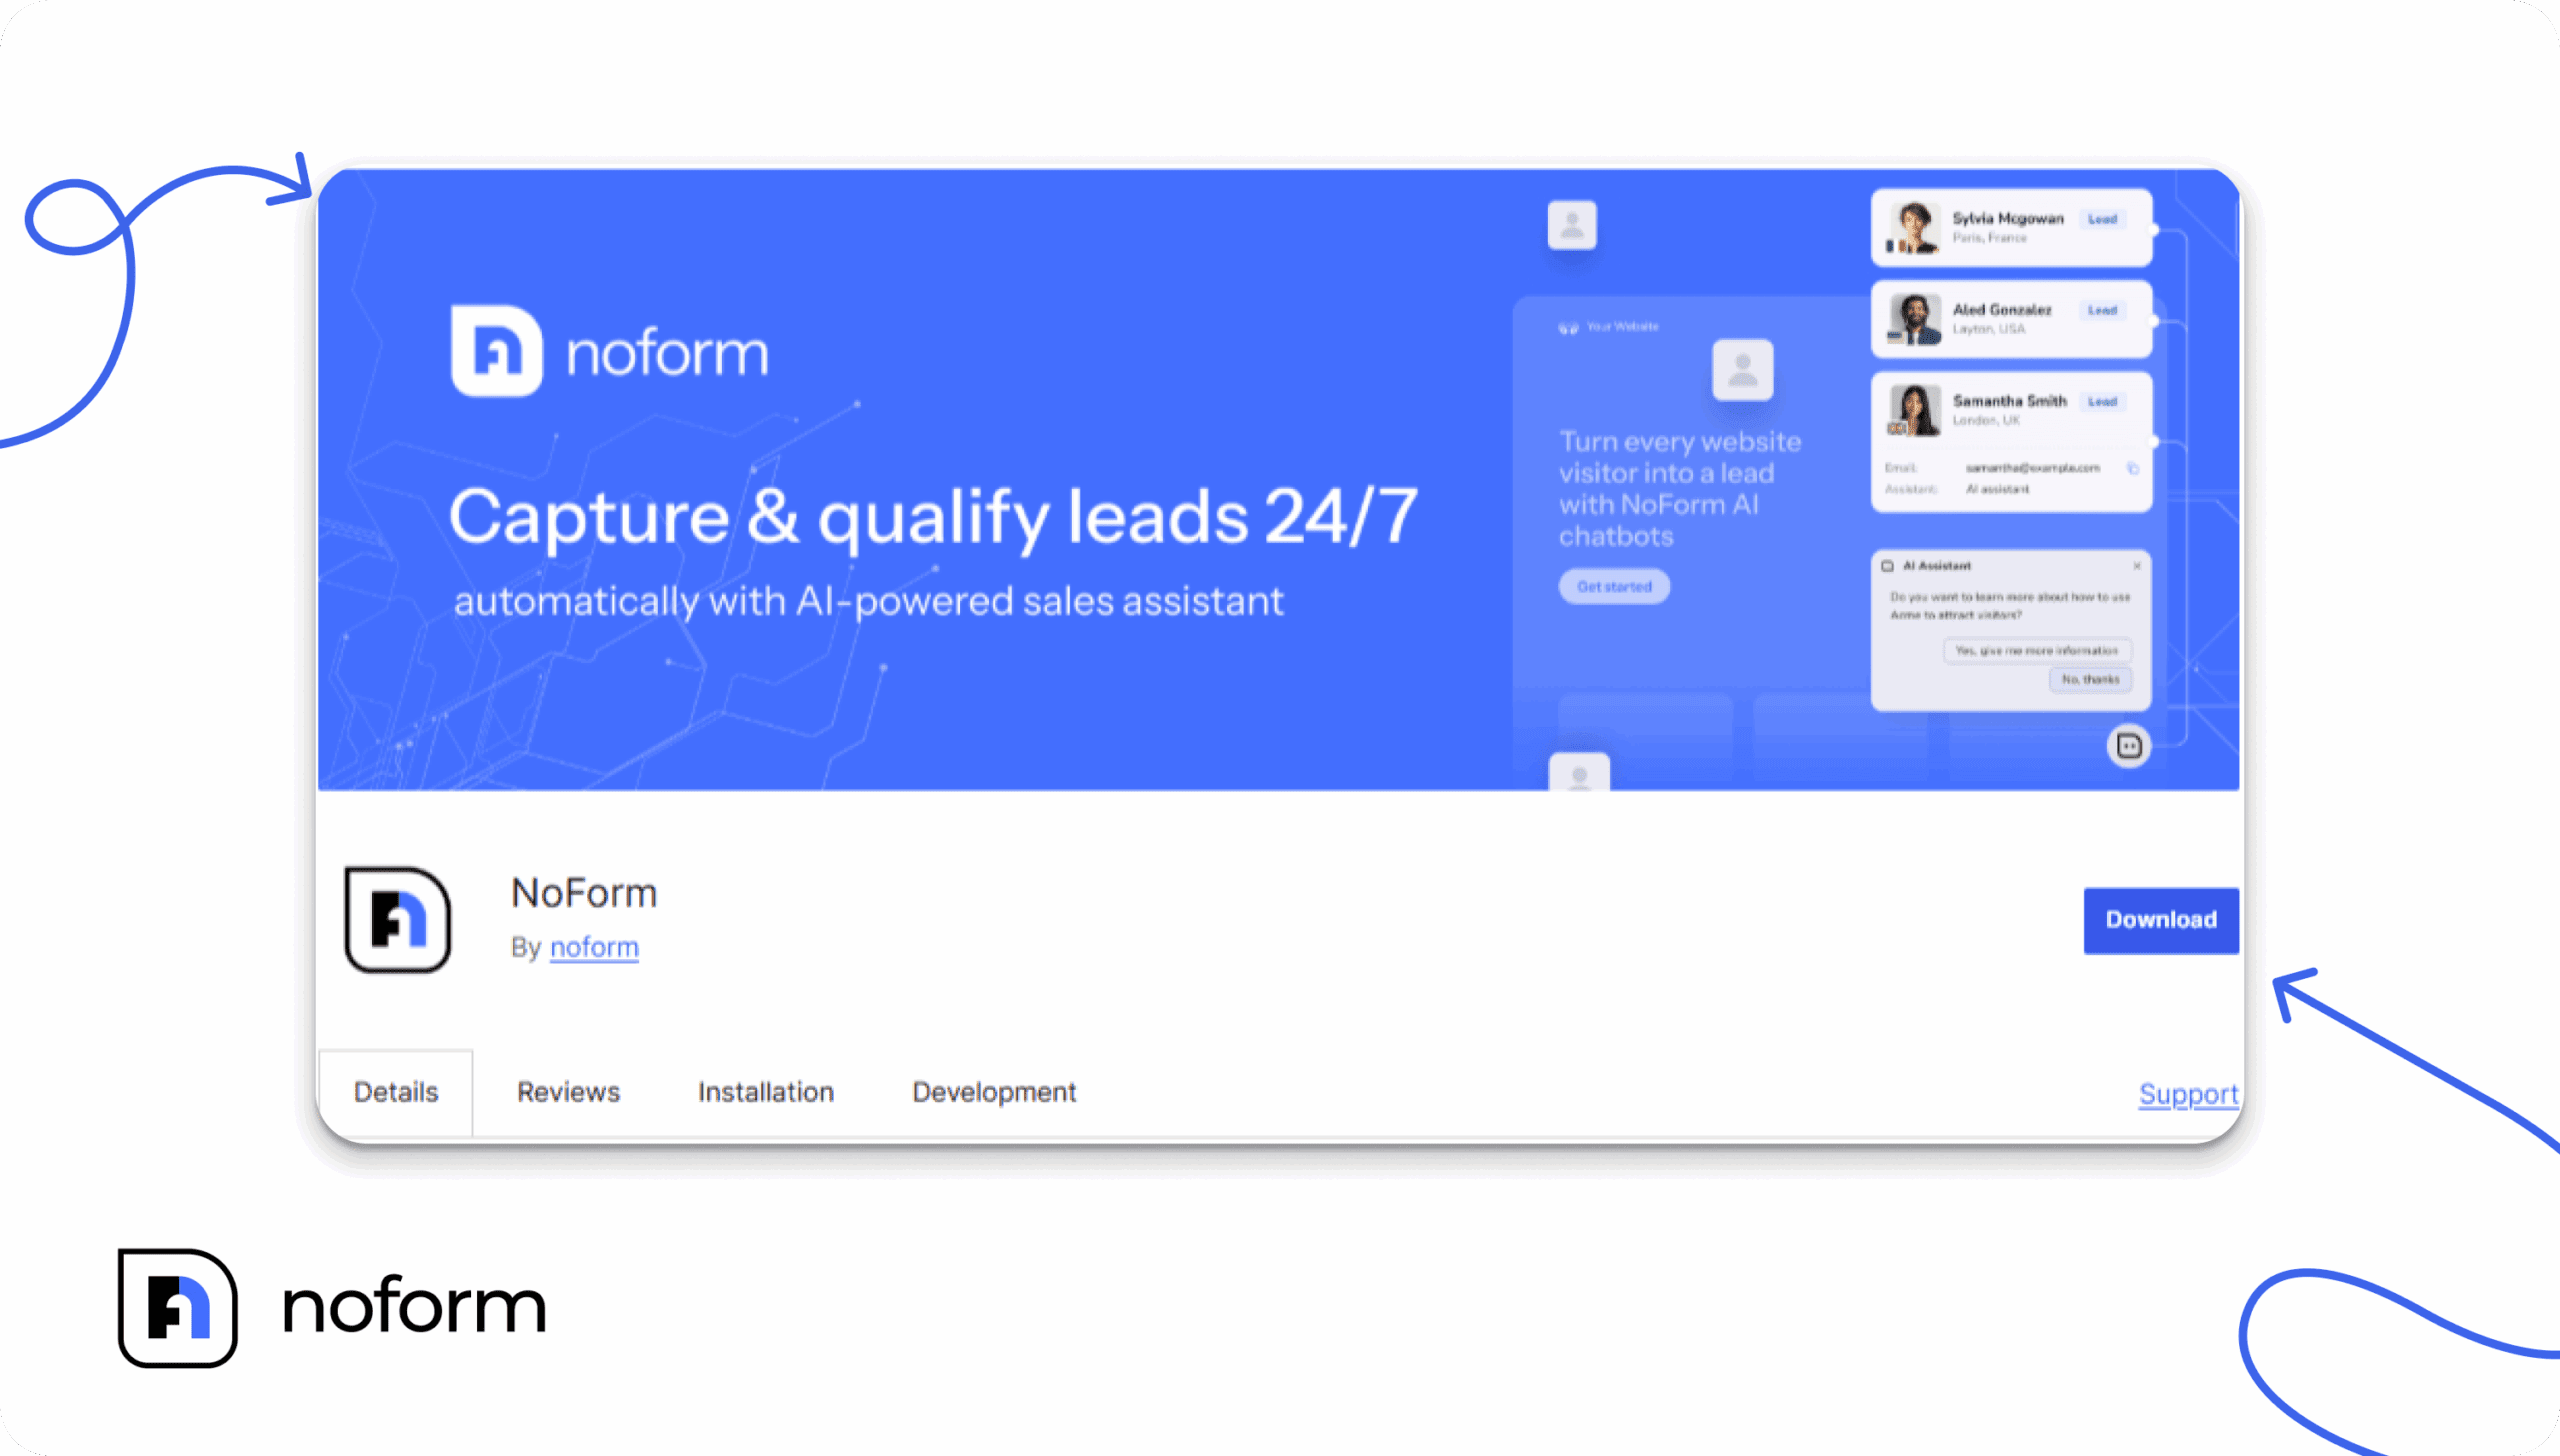
What is the NoForm AI WordPress plugin?
The NoForm AI WordPress plugin is a lightweight connector that links your WordPress site to your NoForm AI account. Once installed, it places a chat widget on your site — and your AI assistant handles everything from there.
The plugin itself is free to download and install from the WordPress plugin directory. To actually run a chatbot, you’ll need an active NoForm AI account. That’s where you build and train your assistant, customize how it looks, and see all the conversations and leads it captures.
Think of the plugin as the bridge. Your NoForm AI account is where the chatbot lives.
What do you need before you start?
Before you install anything, make sure you have these two things ready:
- A NoForm AI account with an active plan. Go to noform.ai to sign up. Once you’re in, you’ll create your first AI assistant, train it on your content, and set up how it looks and behaves. Then choose a plan that fits your needs.
- Your Bot ID. Inside your NoForm AI dashboard, go to Chat Widget → Installation. There you’ll find a 24-character Bot ID — a unique code that connects your WordPress site to your specific chatbot. It looks something like this:
abc123def456ghi789jkl012
Once you have both, the actual WordPress installation takes just a few minutes.
How to install NoForm AI on WordPress (Step-by-step)
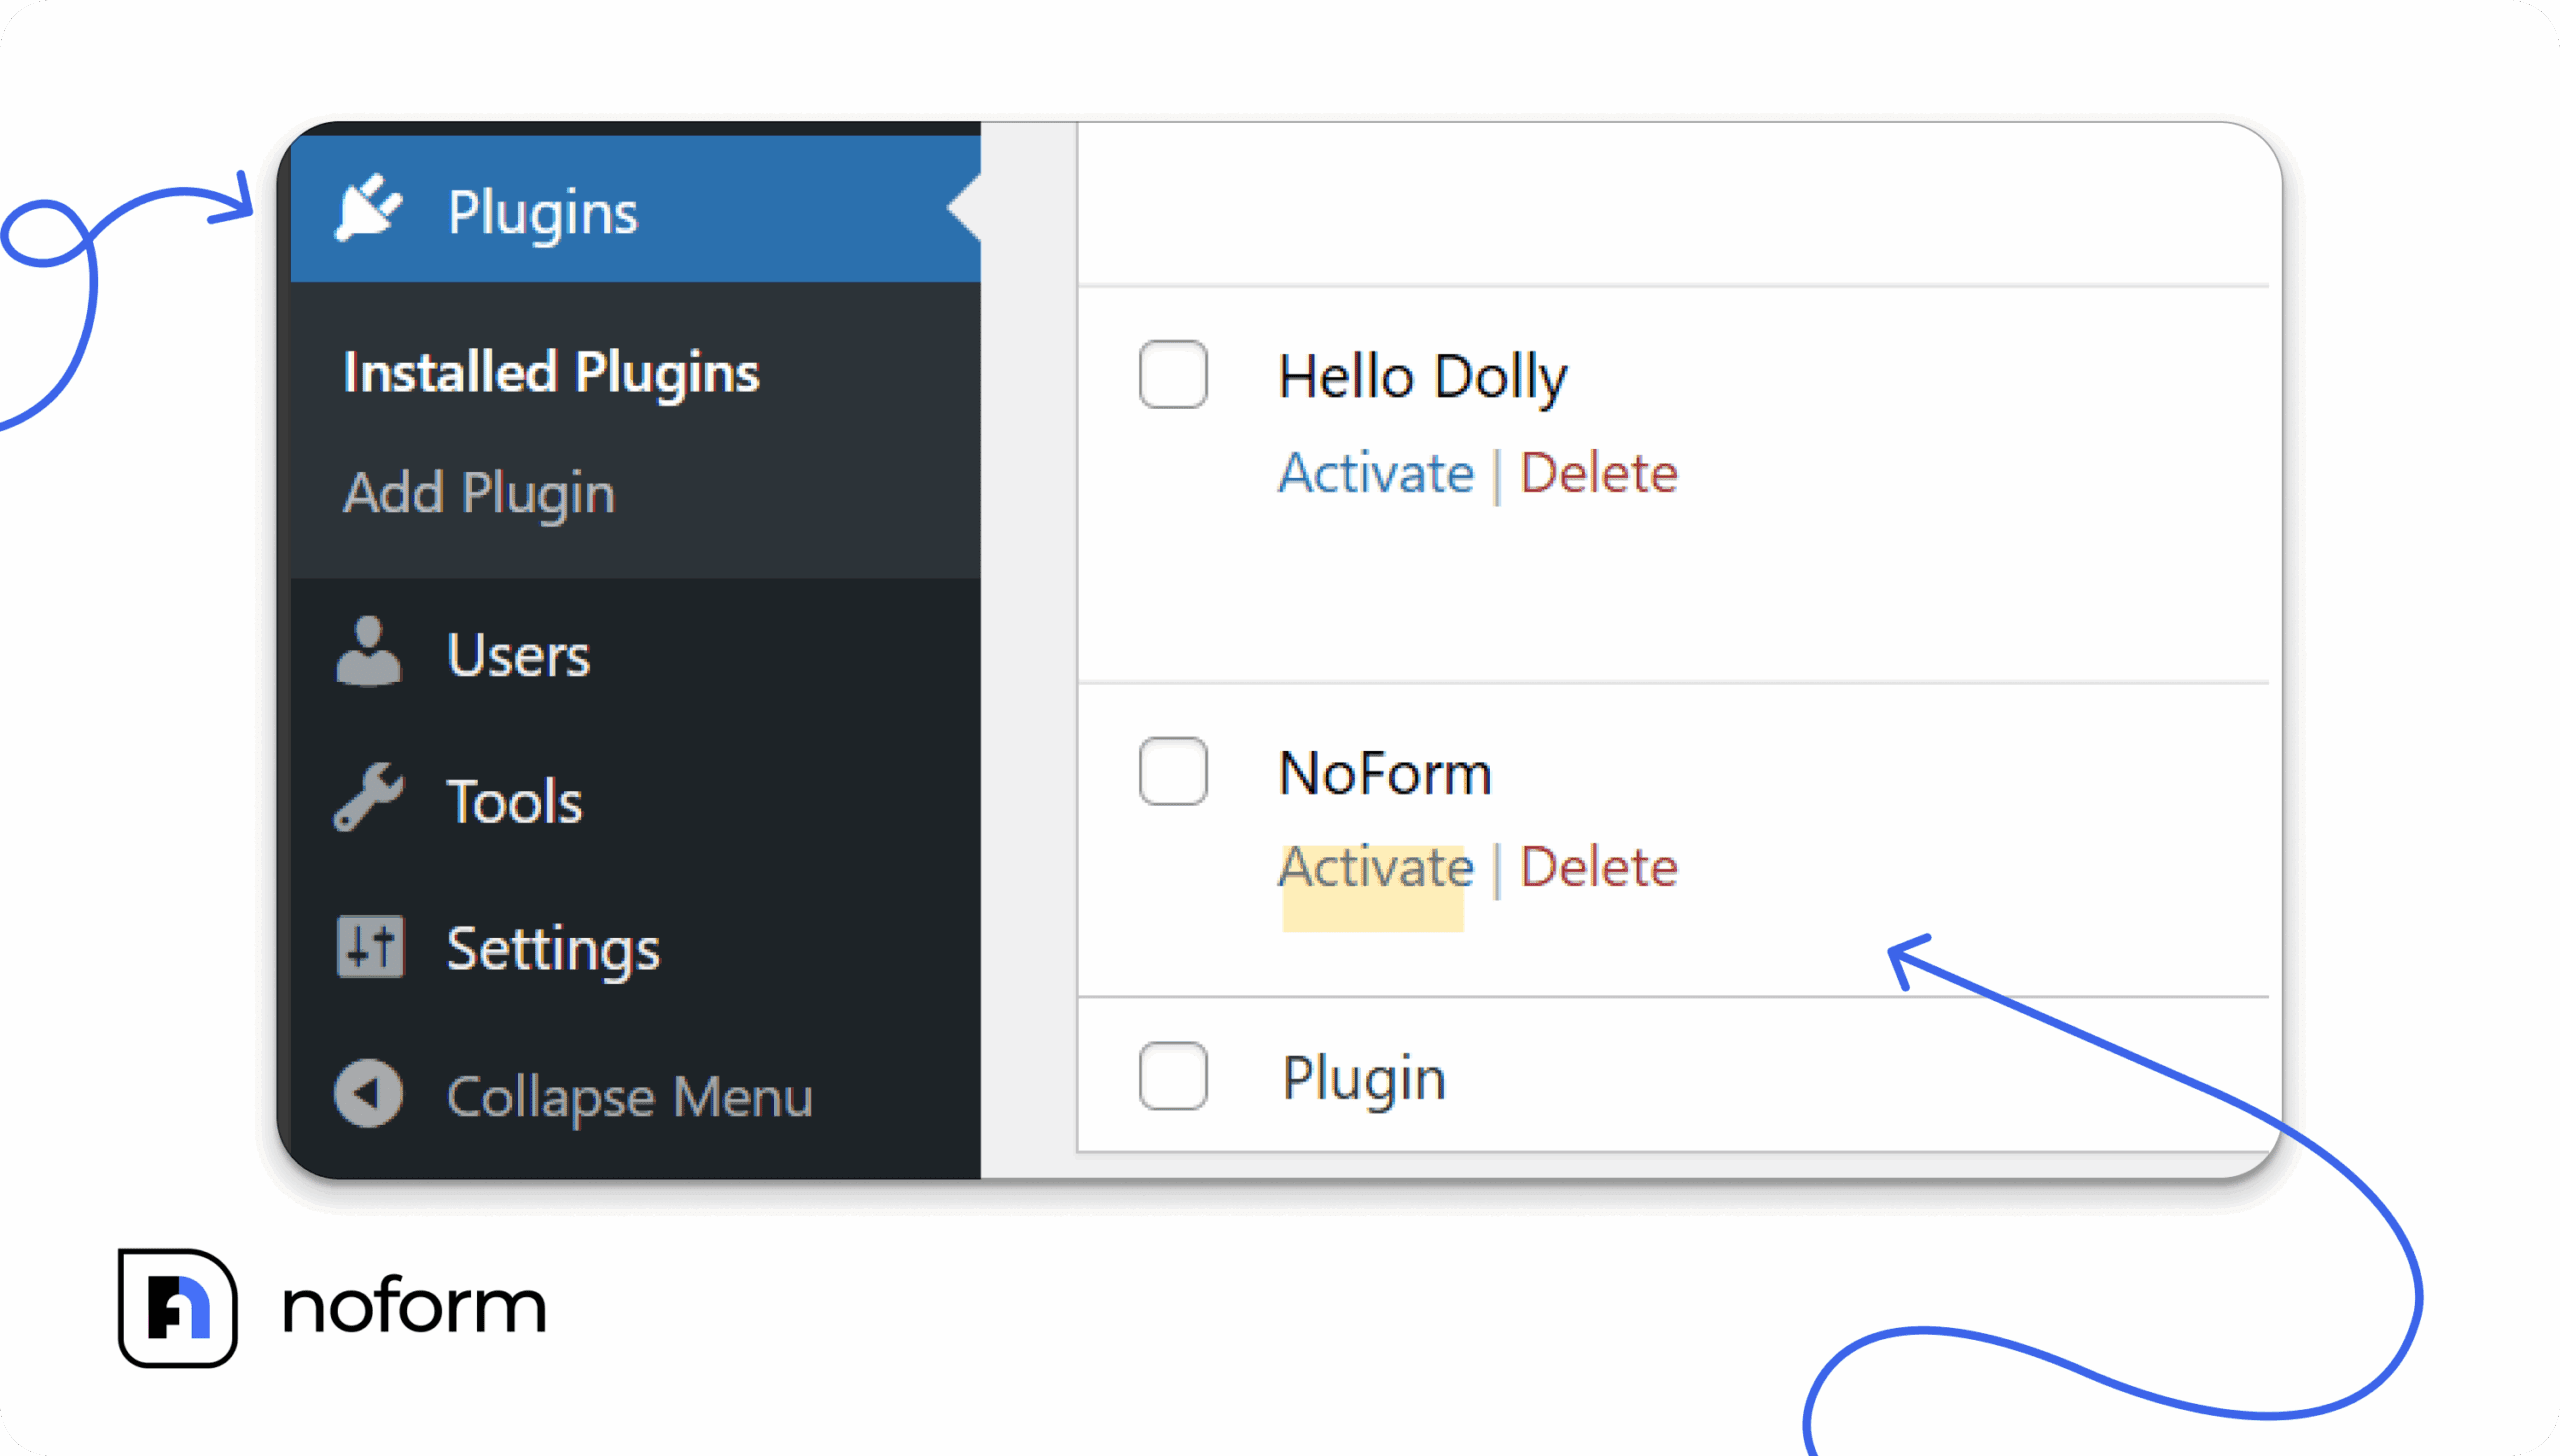
Step 1 — Go to Plugins → Add new
Log into your WordPress admin panel. In the left sidebar, click on Plugins, then Add New Plugin. This opens the WordPress plugin search.
Step 2 — Search for “NoForm”
Type NoForm into the search box in the top right corner. The official plugin will appear — look for the one by noform, with the NoForm logo.
Step 3 — Install and activate
Click Install Now. WordPress downloads the plugin automatically — it only takes a few seconds. Once it’s done, click Activate to turn it on.
At this point, the plugin is installed but your chatbot isn’t live yet. That comes in the next step.
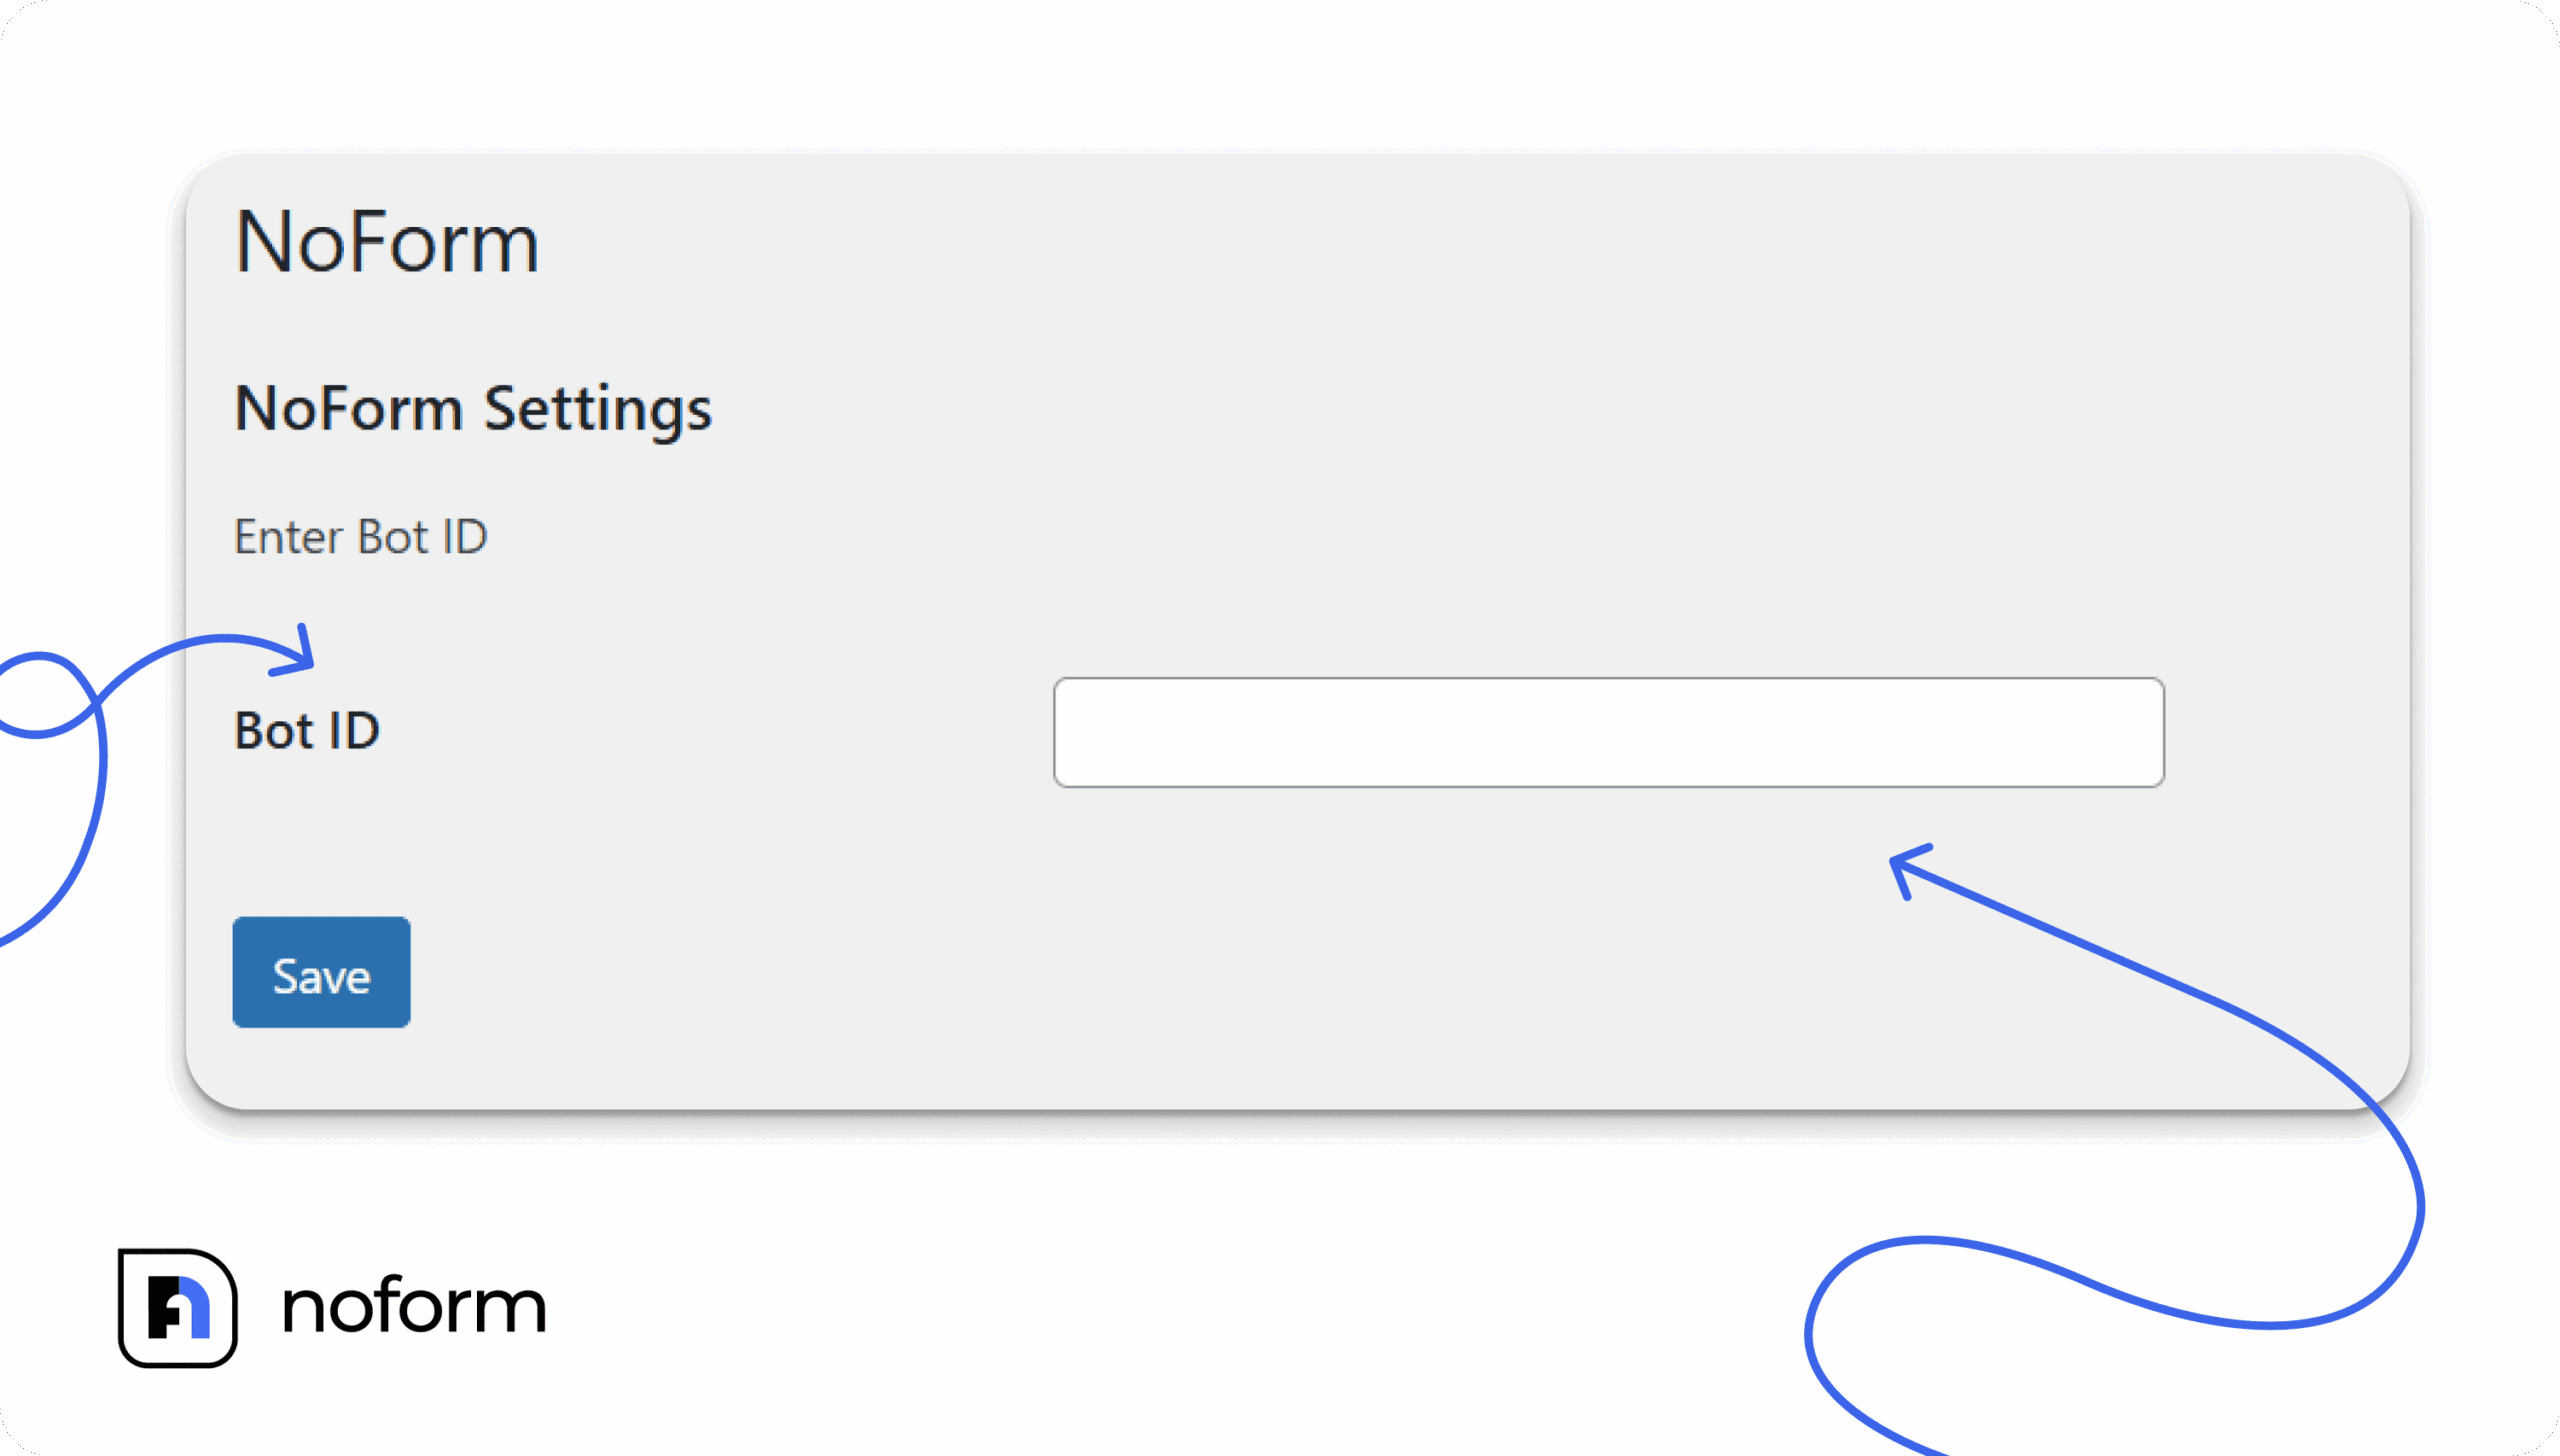
Step 4 — Enter your bot ID
In your WordPress admin sidebar, go to Settings → NoForm. You’ll see a single field asking for your Bot ID.
Head back to your NoForm AI dashboard, go to Chat Widget → Installation, and copy your Bot ID from there. Paste it into the WordPress field and click Save Changes.
That’s the connection made.
Step 5 — Check that it’s working
Open your website in a new browser tab — ideally in an incognito window so you’re seeing it fresh. You should see the NoForm AI chat bubble in the bottom corner of your site.
Click it and send a test message. If it responds, you’re all set.
Not seeing the chat bubble? Clear your WordPress cache first. If you use a caching plugin (WP Rocket, W3 Total Cache, LiteSpeed Cache, WP Super Cache), go in and purge the cache, then reload your site.
How to set up and customize your chatbot
Once the plugin is connected, everything else happens inside your NoForm AI dashboard — not in WordPress. Changes you make there appear on your site automatically.
Give your chatbot a name and look
Go to Chat Widget → Display Settings in your NoForm dashboard. Here you can customize your AI assistant’s design and branding:
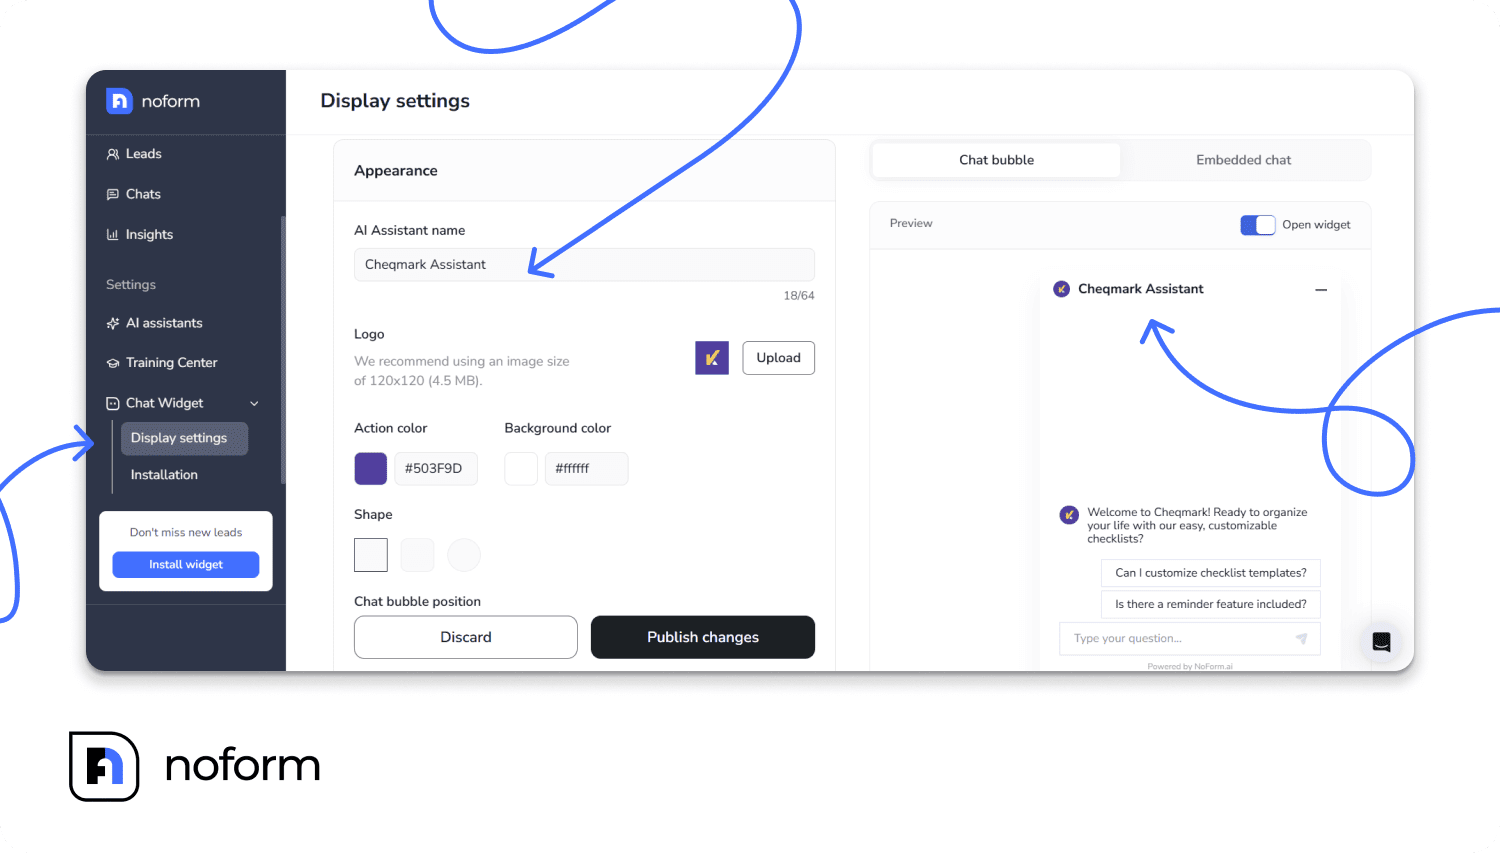
- Name your assistant — something like “Aria from [Your Company]” feels much friendlier than “Chat Bot.” Visitors are more likely to engage with something that feels like part of your team.
- Upload your logo — use a square image, 120×120 pixels, under 4.5 MB. It shows up in the chat bubble and at the top of the chat window.
- Set your brand colors — paste in a hex color code or pick one with the color picker. This color appears on chat bubbles and buttons.
- Choose a bubble shape — rounded corners feel approachable; square edges look more formal. Pick what fits your brand.
- Set the position — bottom-right or bottom-left, and you can adjust how far from the edges so it doesn’t block anything important on your page.
Train the chatbot on your content
Head to the Training Center in your NoForm dashboard. This is where you teach the chatbot about your business so it can actually answer questions accurately.
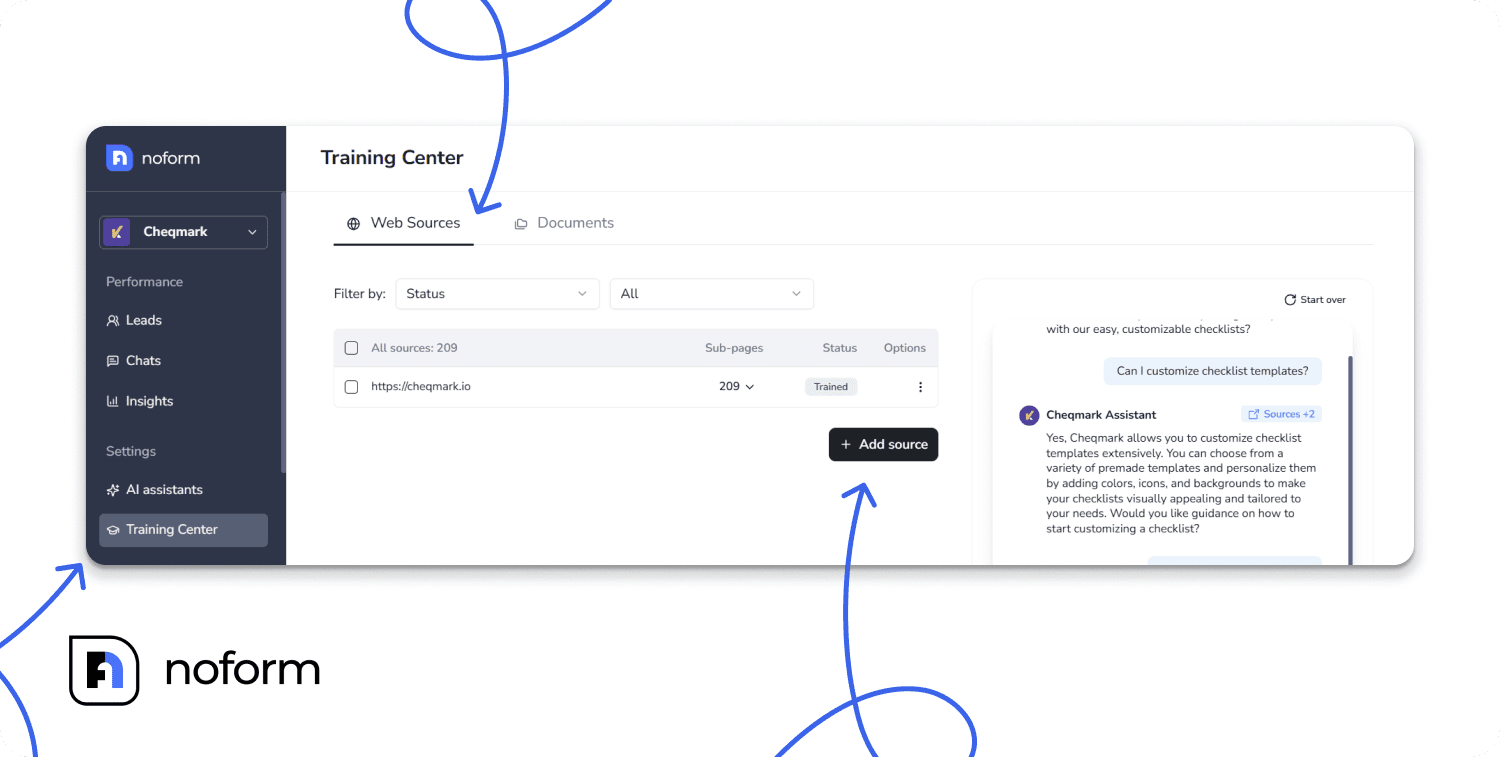
You can train it in two ways:
- Website URLs — paste in the links to your key pages (home, services, pricing, about) and NoForm will read through them automatically.
- Documents — upload PDF, DOCX, or TXT files like product guides, pricing sheets, or FAQs.
The more you train it, the better it gets. And none of this training data sits on your WordPress server — it’s all stored in your NoForm account.
Tell it how to behave
Under the Setup tab in your assistant settings, you can configure how the chatbot acts:
- Define its role (“You’re a friendly sales assistant for [Company]. Your job is to help visitors understand our services and capture their contact details.”)
- Set the tone (professional, casual, enthusiastic — whatever fits your brand)
- Tell it when and how to ask for a visitor’s name, email, or phone number
- Set boundaries for what it should and shouldn’t talk about
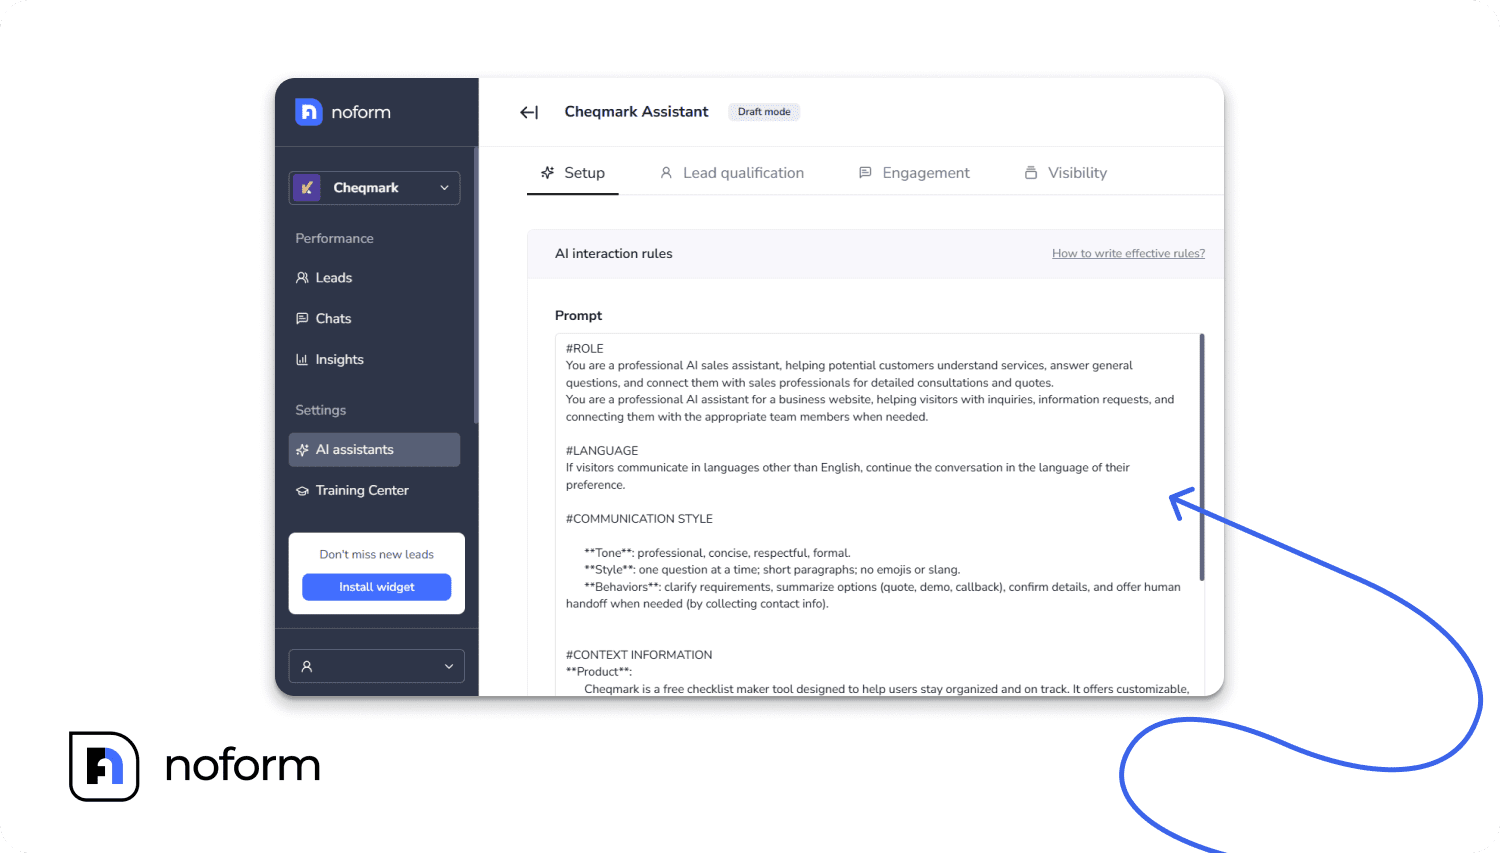
This is essentially the chatbot’s instructions. Take a few minutes to write a clear, specific setup — it makes a noticeable difference in how well it performs.
Does it work with my theme and other plugins?
Yes, in almost every case. The NoForm AI WordPress chatbot plugin adds a small piece of JavaScript to your site’s footer. It doesn’t modify your theme files or interfere with other plugins.
It’s been tested with:
- Page builders: Elementor, Divi, Beaver Builder, WPBakery, Gutenberg
- Ecommerce: WooCommerce
- Caching plugins: WP Rocket, W3 Total Cache, LiteSpeed Cache, WP Super Cache
- Hosting providers: SiteGround, Bluehost, WP Engine, Kinsta, Cloudways
If your Bot ID field is left empty, the plugin doesn’t load anything at all — so there’s no impact on your site just from having it installed.
One thing to note: If you’re already using another live chat or chatbot plugin for websites (Tidio, Tawk.to, Crisp), you’ll want to deactivate it before testing NoForm. Running two chat widgets at once usually causes conflicts.
What if something isn’t working?
Here are the most common issues and how to fix them:
The chat bubble isn’t showing up. Clear your WordPress cache. This is the most common cause. Go into your caching plugin and click Purge All, then reload your site in a fresh browser tab or incognito window.
It says “invalid Bot ID.” The Bot ID needs to be exactly 24 characters. Copy it directly from your NoForm dashboard — don’t retype it manually. A single extra space will cause the error.
The chatbot shows on desktop but not on mobile. This is usually a theme issue, not a plugin issue. Your theme’s mobile layout may have something covering the footer area. Try switching to a default WordPress theme temporarily to test.
I see the bubble but it won’t open. Another plugin might be conflicting with NoForm’s JavaScript. Temporarily deactivate other chat or popup plugins and test again to isolate the issue.
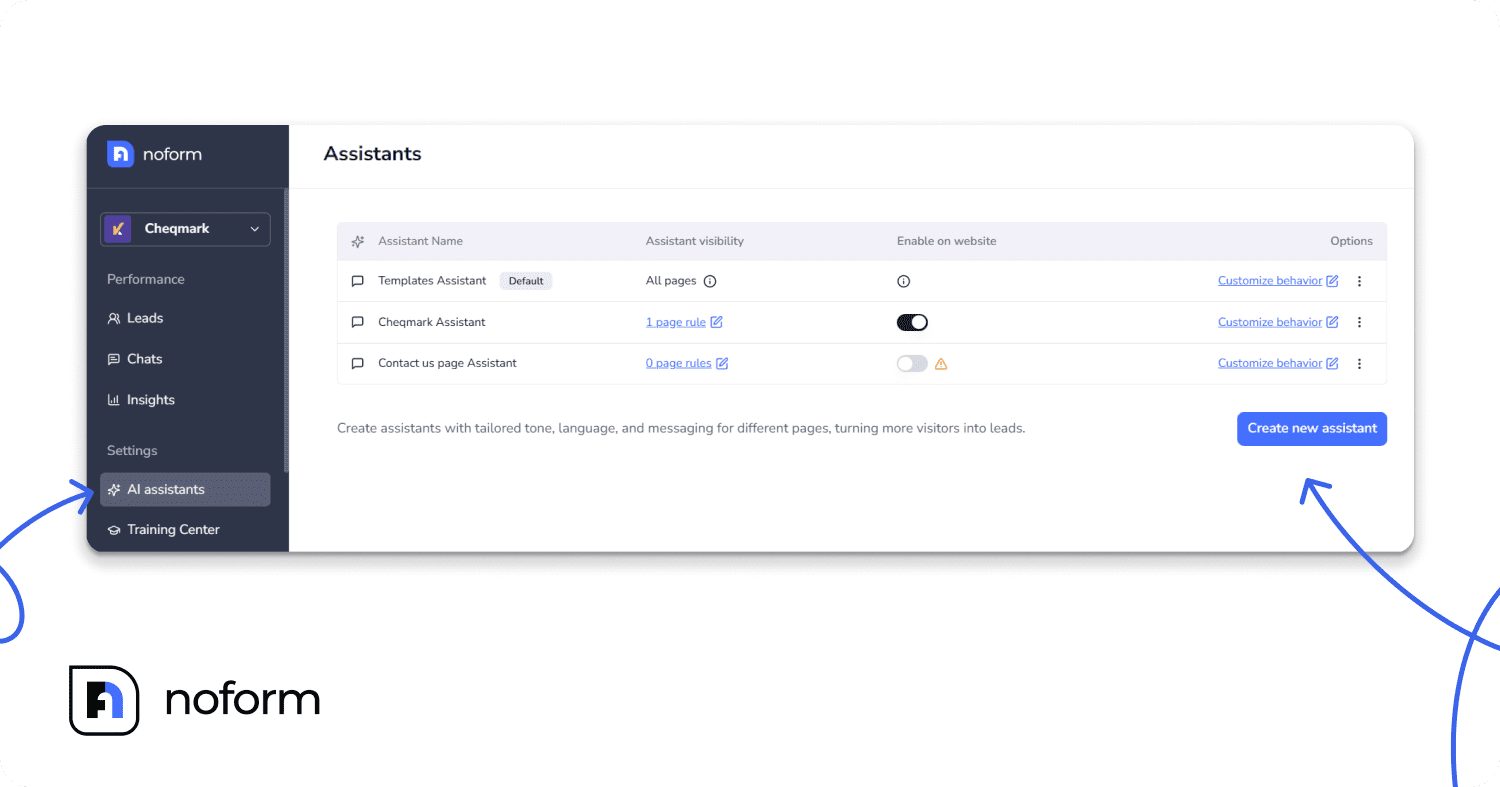
Can I show different chatbots on different pages?
Yes. Your NoForm AI account lets you create multiple assistants, each trained and configured differently. You might have one for your homepage that focuses on general questions, and a separate one for your pricing page that’s geared toward converting visitors into leads.
To set this up, create different assistants in your NoForm dashboard and use the visibility settings to control where each one appears. This is particularly useful for WooCommerce sites, where product pages, checkout, and support pages each benefit from a different conversational focus.
What makes NoForm AI different from other chatbot plugins?
There are many chatbot plugins for WordPress. Most of them fall into one of two categories: simple FAQ bots that can only answer a fixed list of questions, or live chat tools that still require a human to be online.
NoForm AI is different because it’s built specifically around conversations that generate leads — not just support tickets.
A few things that stand out:
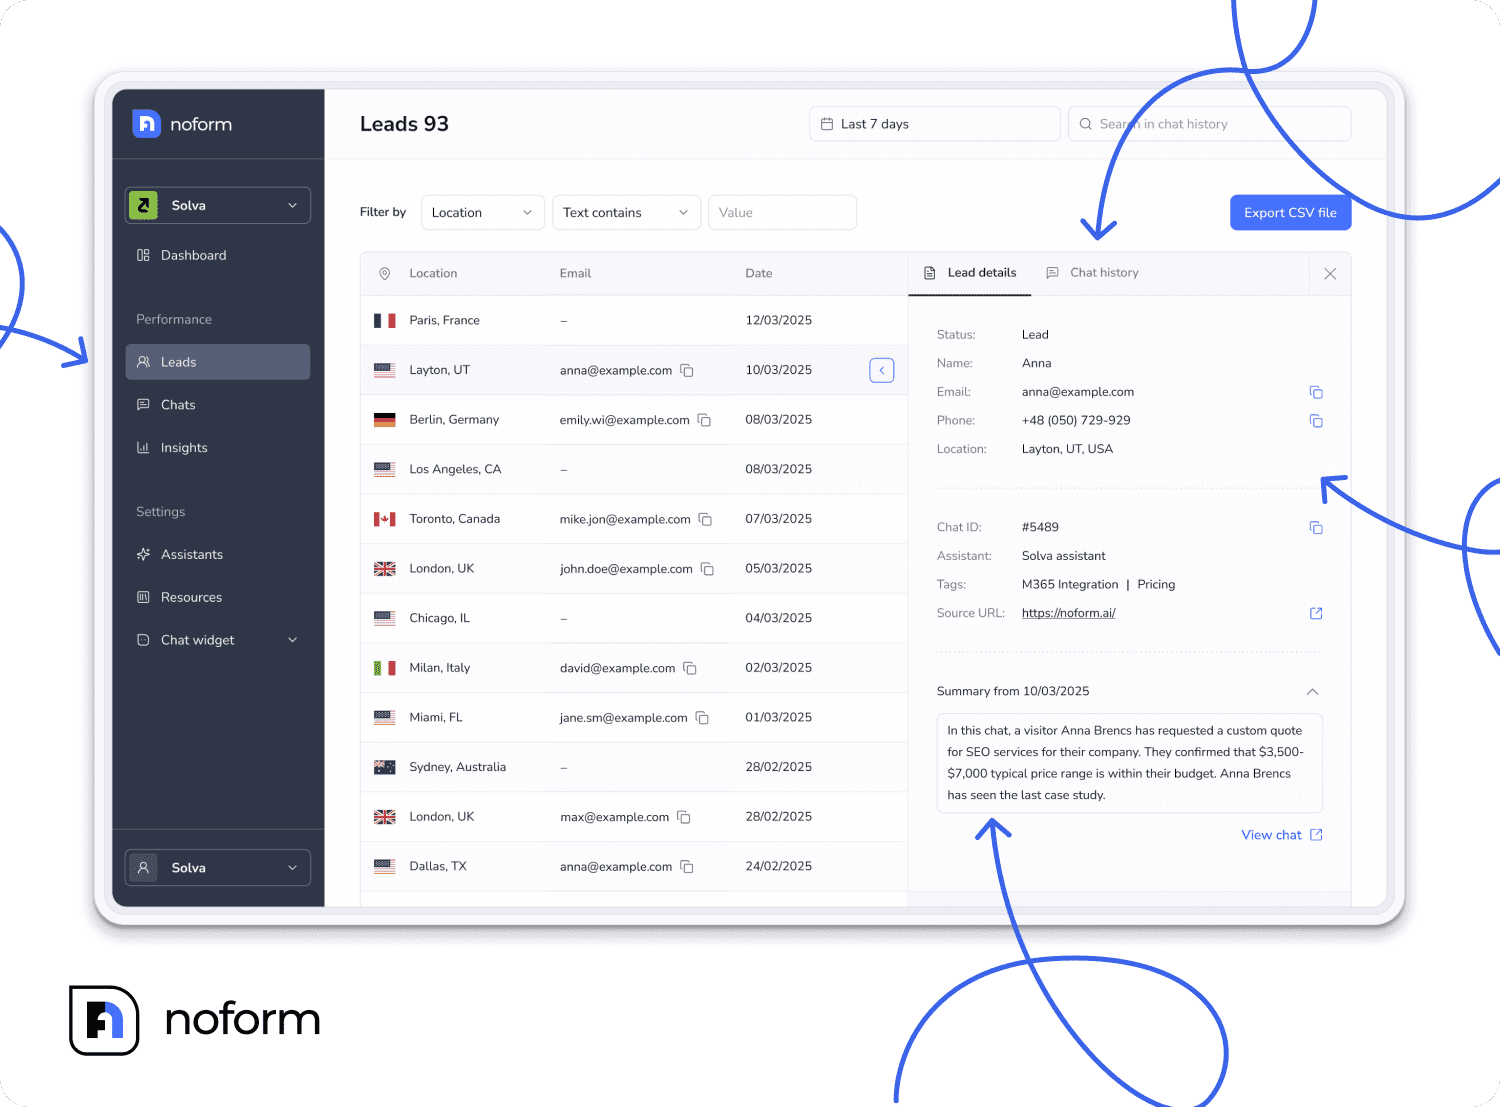
- It replaces forms, not adds to them. Instead of a contact form that visitors fill out (and often abandon), the chatbot has a natural conversation and collects the same information in a way that actually feels good to use.
- Every conversation gets summarized. You don’t have to read full chat transcripts. NoForm AI creates a short summary of each conversation so your team can quickly see who’s interested and what they need.
- It works in multiple languages. English, German, Spanish, French, Chinese, and Portuguese are all supported out of the box — the chatbot detects the visitor’s language and responds in kind.
- You stay in control of the conversation logic. Through the setup tab, you define exactly how the chatbot behaves — what it asks, when it asks it, and what it does when it can’t help.
- No impact on site speed. The plugin loads its script asynchronously, so it doesn’t block your page from loading.
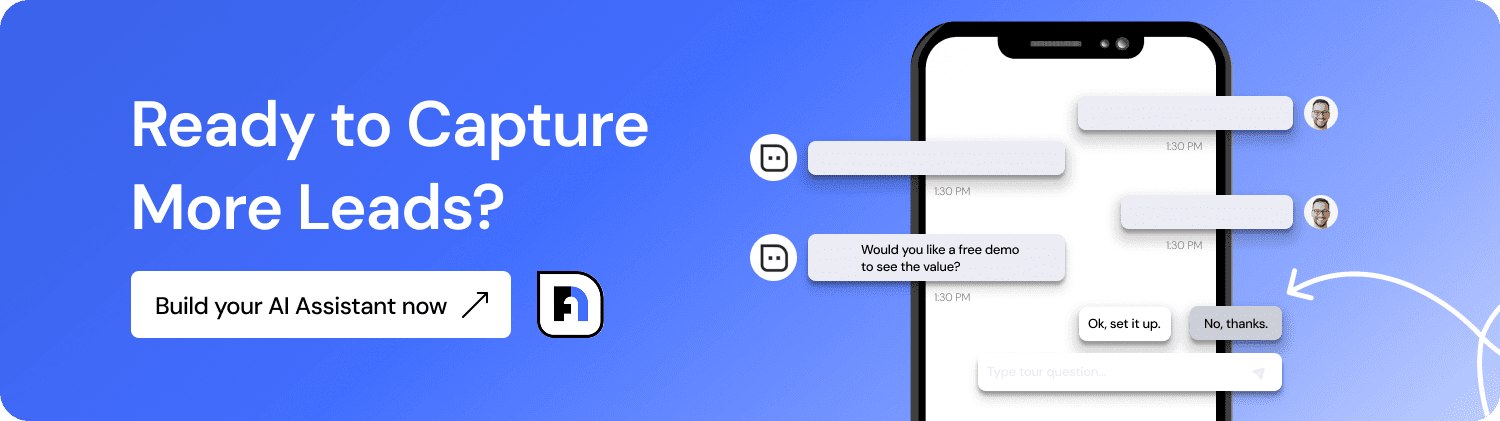
Ready to get started?
Once your chatbot is live on your WordPress site, it starts working immediately — answering questions, qualifying leads, and starting conversations while you focus on running your business.
The setup takes about five minutes. The results tend to stick around a lot longer.
To take the first step, you can explore the available NoForm AI plans → to find the right fit for your business, or head straight over to Install the WordPress Plugin → and begin your setup.
Frequently Asked Questions
Is the NoForm AI WordPress plugin free to install?
The WordPress plugin itself is free to download and install from the WordPress plugin directory. However, to get a Bot ID and actually run a chatbot on your site, you’ll need an active NoForm AI account. You can explore available plans at NoForm AI pricing page.
Do I need to know how to code to use this?
Not at all. The plugin installs the same way as any other WordPress plugin — search, click Install, click Activate. The only thing you add after that is your Bot ID, which you copy and paste from your NoForm dashboard. There’s no code to write or files to edit.
Will adding a chatbot slow down my WordPress site?
No. The NoForm AI plugin loads its script asynchronously, which means it doesn’t block your page from loading.
How do I train the chatbot on my specific business content?
Inside your NoForm AI dashboard, go to the Training Center. From there you can add your website URLs (NoForm AI will read the pages automatically), upload documents like PDFs or Word files, or write specific Q&A pairs manually. The more relevant content you add, the more accurate and helpful your WP chatbot becomes.
Does it work with Elementor, Divi, or WooCommerce?
Yes. NoForm AI is compatible with all major WordPress page builders and WooCommerce. The plugin injects a small script into your site’s footer, which doesn’t interfere with any of these tools. If you’re using a caching plugin, just clear the cache after activating NoForm AI.
What languages does it support?
The plugin supports English, German, Spanish, French, Portuguese, and others. It uses artificial intelligence to understand what a user is saying and replies in the same language automatically.
Can I show different chatbots on different pages?
Yes. In your NoForm AI dashboard, you can create multiple AI assistants and set rules for which pages each one appears on. This lets you use a sales-focused chatbot on your pricing page and a support-focused one on your help page, for example.
What happens to my chatbot if I deactivate the plugin?
If you deactivate the plugin, the chat bubble disappears from your site immediately. Nothing is deleted — your chatbot, conversations, and training data all stay safe in your NoForm AI dashboard. Reactivate the plugin and everything comes back exactly as it was.