Someone visits your website, finds a service they like, and has one question before contacting you. Maybe they want to know the cost, whether you serve their area, or which product fits their needs.
If they can’t find the answer, they might leave and visit another website. In fact, about 98% of website visitors leave without doing anything.
Adding a chatbot to your website gives visitors another way to get the information they need. Instead of searching through pages or waiting for an email response, they can ask a question and receive an answer directly on your site. Because 78% of customers buy from the first company that responds, a chatbot ensures you never miss that window.
Modern AI chatbots can do more than answer FAQs. They can use your website content to respond to visitors, ask follow-up questions, collect contact details, and help potential customers take the next step.
The best part? You don’t need to build a chatbot from scratch or hire a developer to get started. With a no-code tool such as NoForm AI, you can create an AI sales assistant, train it on your business content, customize its appearance, and add it to your website with a small code snippet.
This guide explains how to add a chatbot to your website, choose the right solution, and turn website conversations into qualified leads.
What does it actually mean to add a chatbot to your website?
Adding a chatbot to a website means adding a chat window so visitors can get instant help from an automated assistant. Usually, this looks like a small bubble in the corner of the screen that opens when clicked, though you can also embed the chat directly into a specific page.
There are several types of website chatbots.
- Rule-based chatbots. These are the old-school bots that force visitors to click pre-set buttons or follow rigid menus. They work well for simple tasks but usually break when visitors ask questions in their own words.
- AI-powered chatbots. These actually understand natural language. Instead of following a script, they learn your website content and answer questions naturally. The best ones go beyond just answering FAQs. They act as active sales assistants that help visitors evaluate products, ask smart follow-up questions, and collect contact details to hand off a warm lead to your team.
NoForm AI falls squarely into that second category. It’s built to engage your visitors, answer their specific questions using your exact business content, and capture qualified leads around the clock.
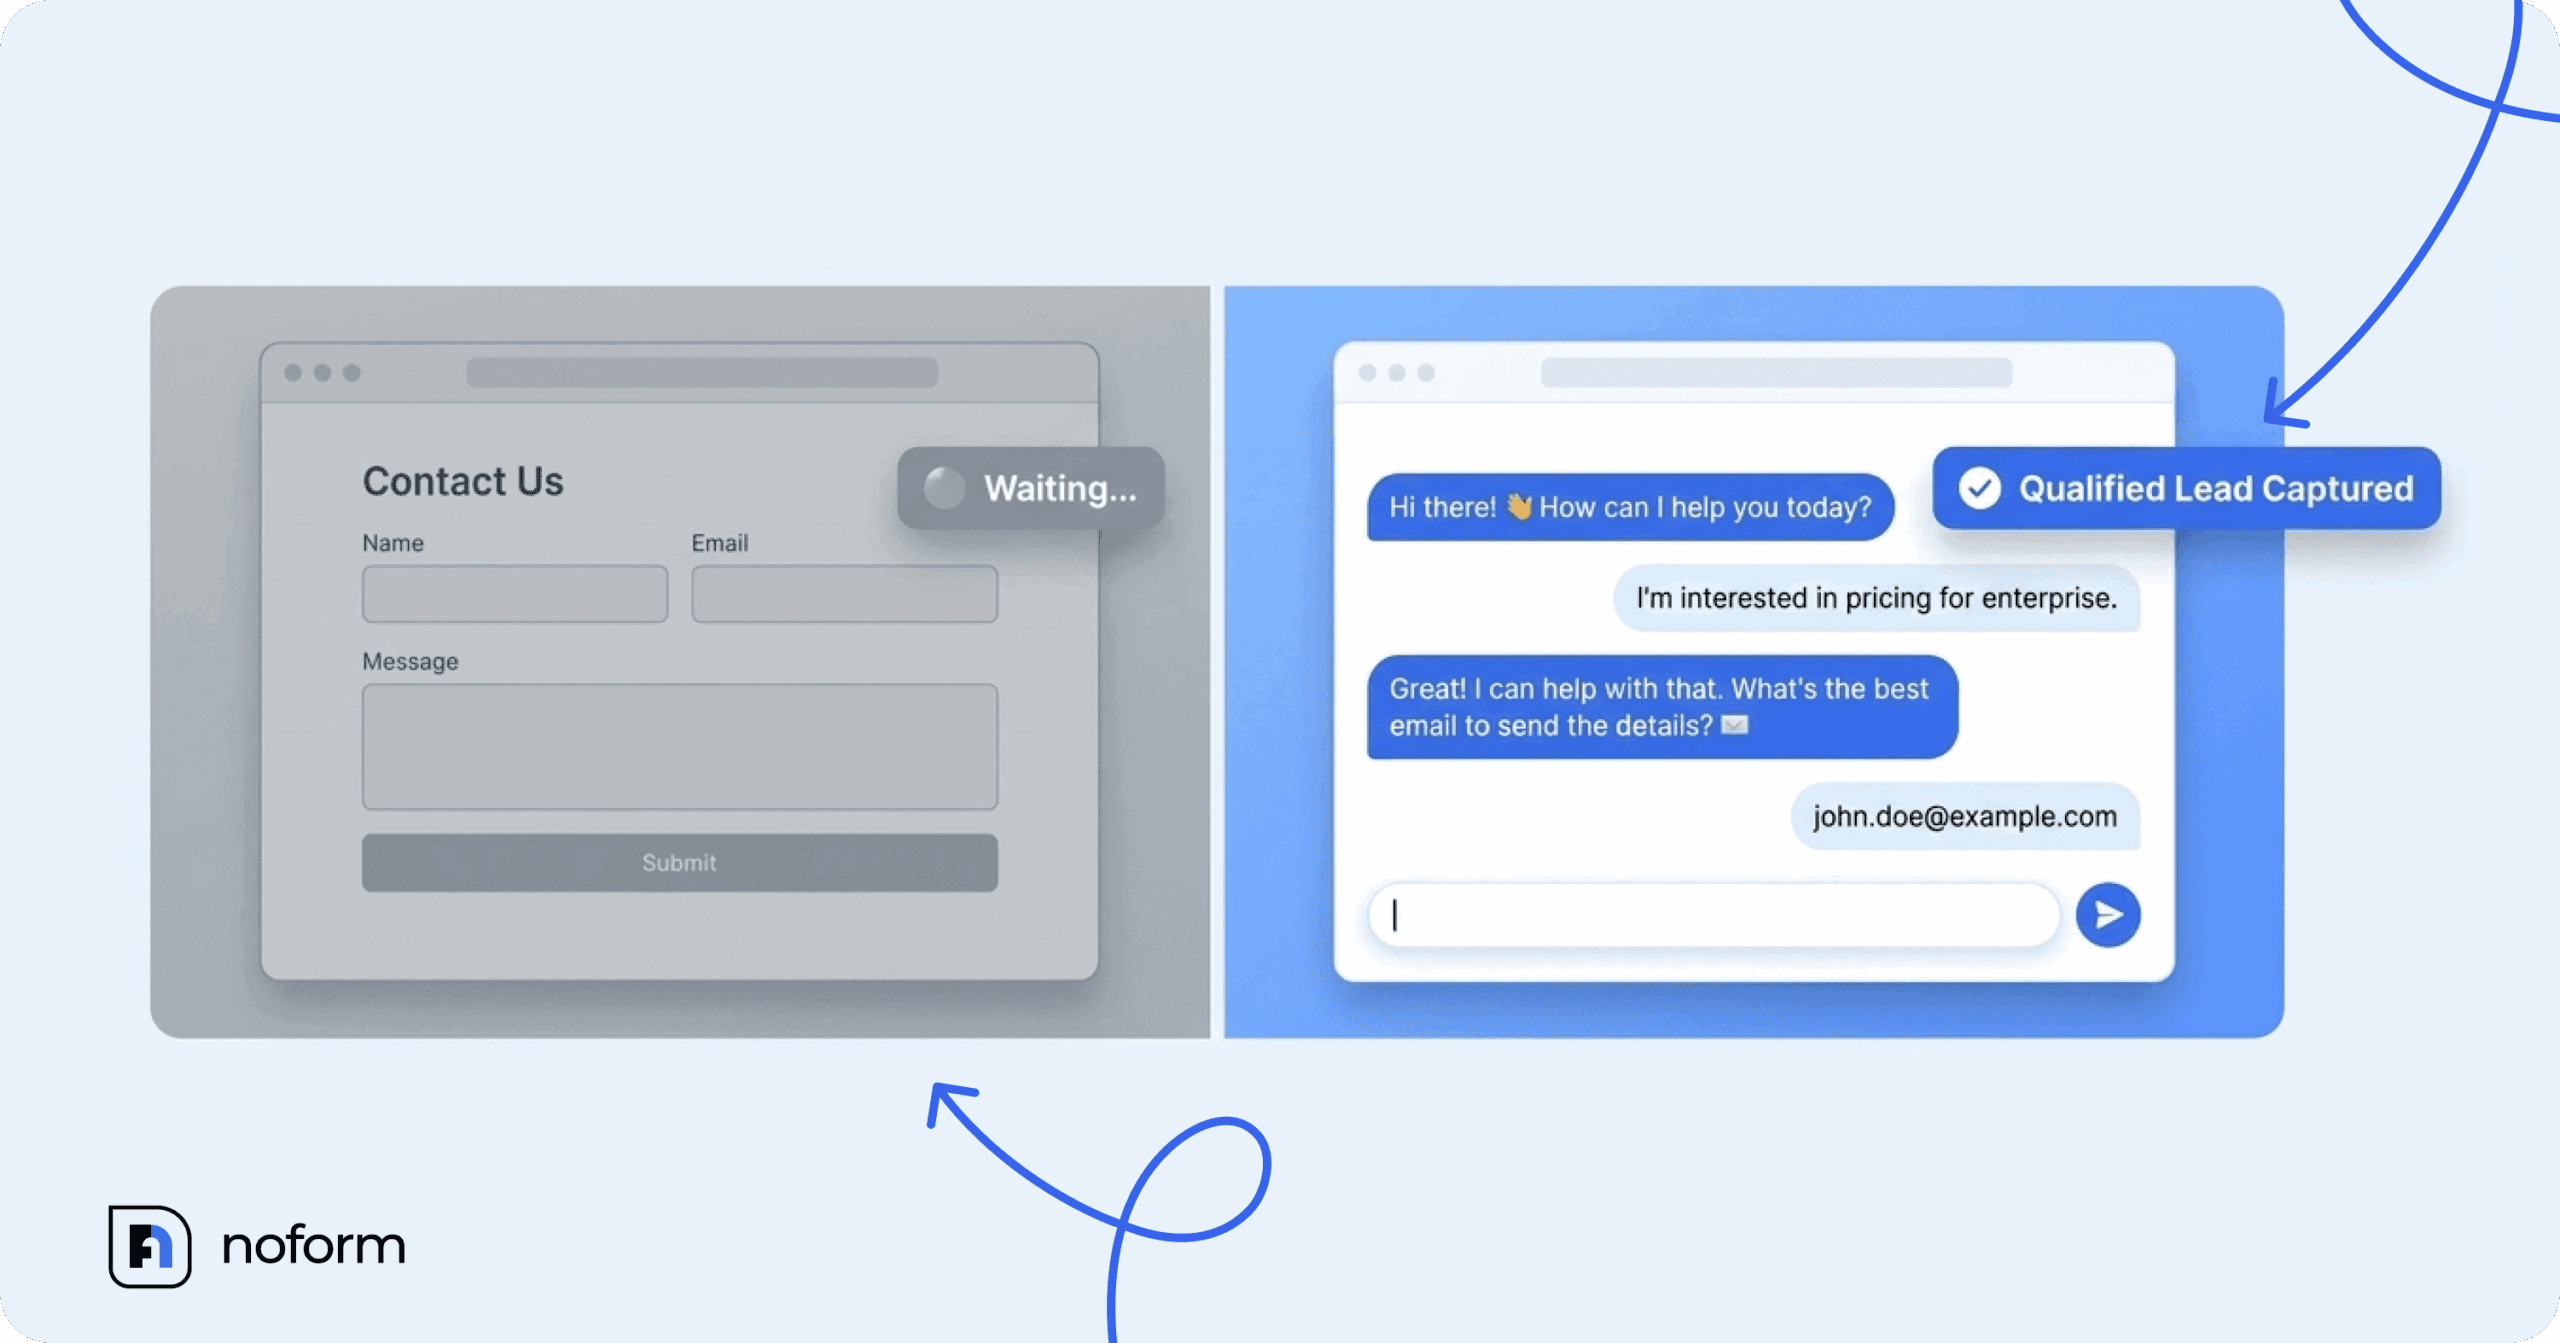
Why add a chatbot to your website?
A chatbot is most useful when it solves a problem that your website already has. For many businesses, that problem is the gap between a visitor having a question and someone from the company being available to answer it.
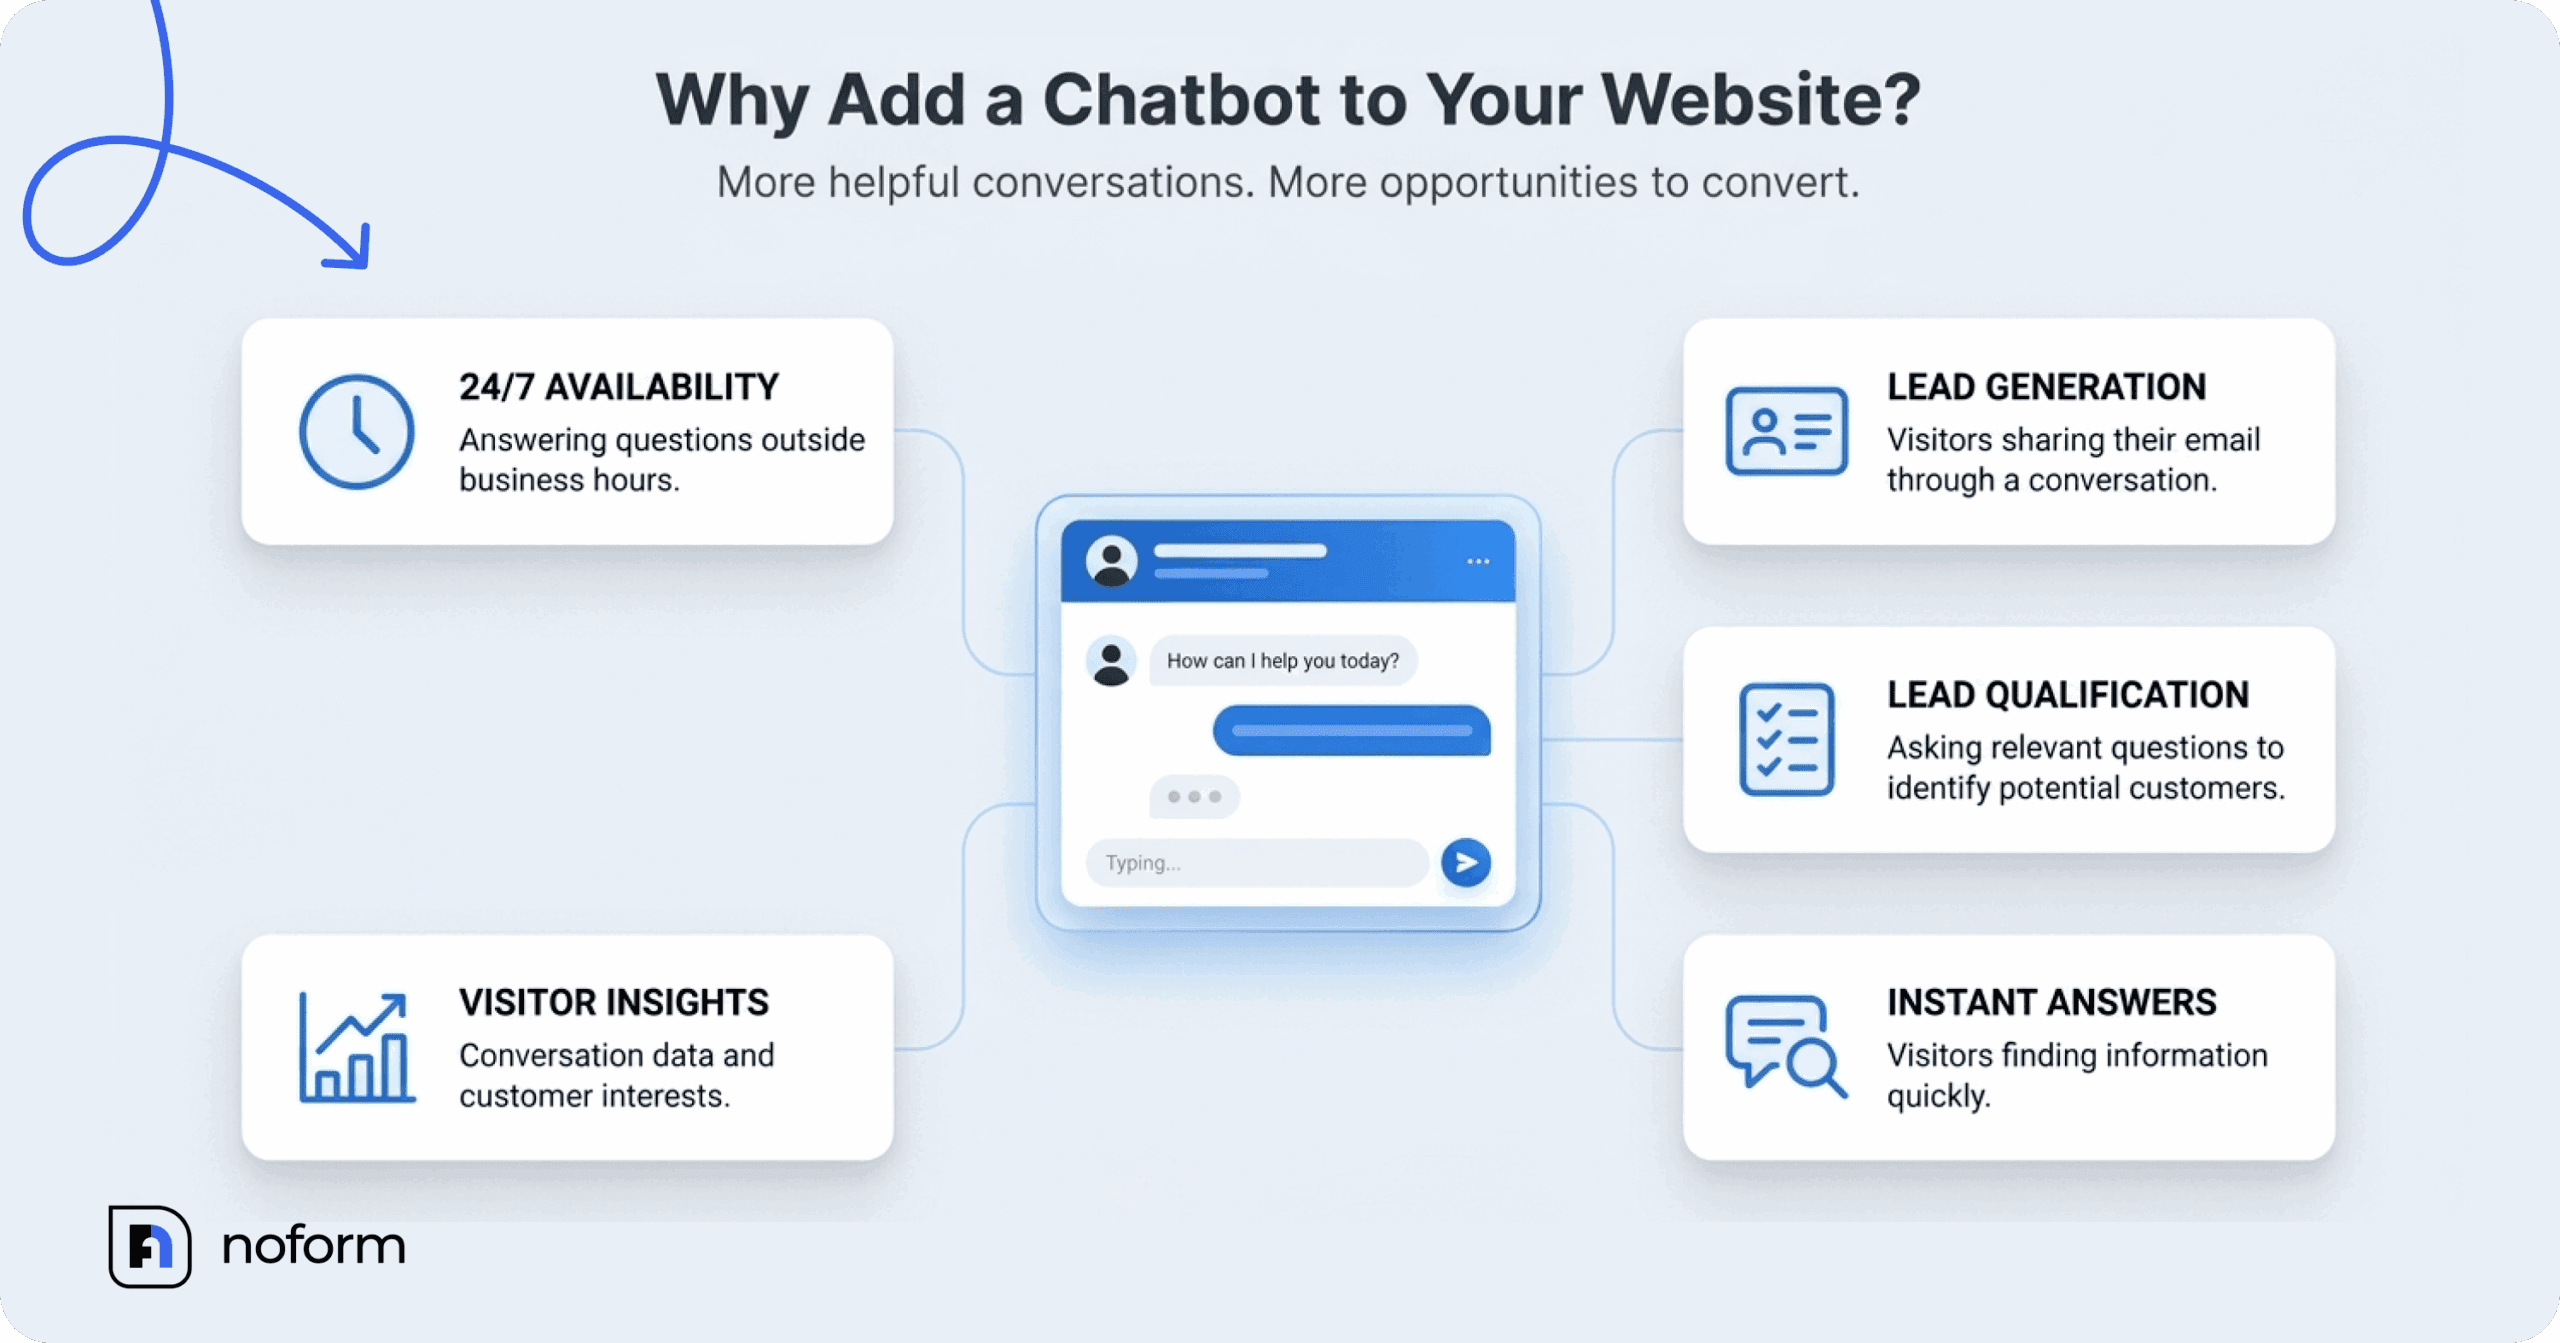
Answer questions outside business hours
Your website never sleeps, but your sales team does. An AI chatbot handles questions about products, pricing, and services even when the office is closed, so prospects aren’t stuck waiting for a morning email reply.
Turn more website visitors into leads
A contact form asks visitors to stop what they’re doing and fill in fields. A chatbot can collect the same essential contact information naturally, via conversation.
For example, someone asking about a home renovation service might first want to understand the available options. The assistant can answer their question, learn more about the project, and invite the visitor to share their email address or phone number if they want to discuss it further.
Qualify prospects automatically
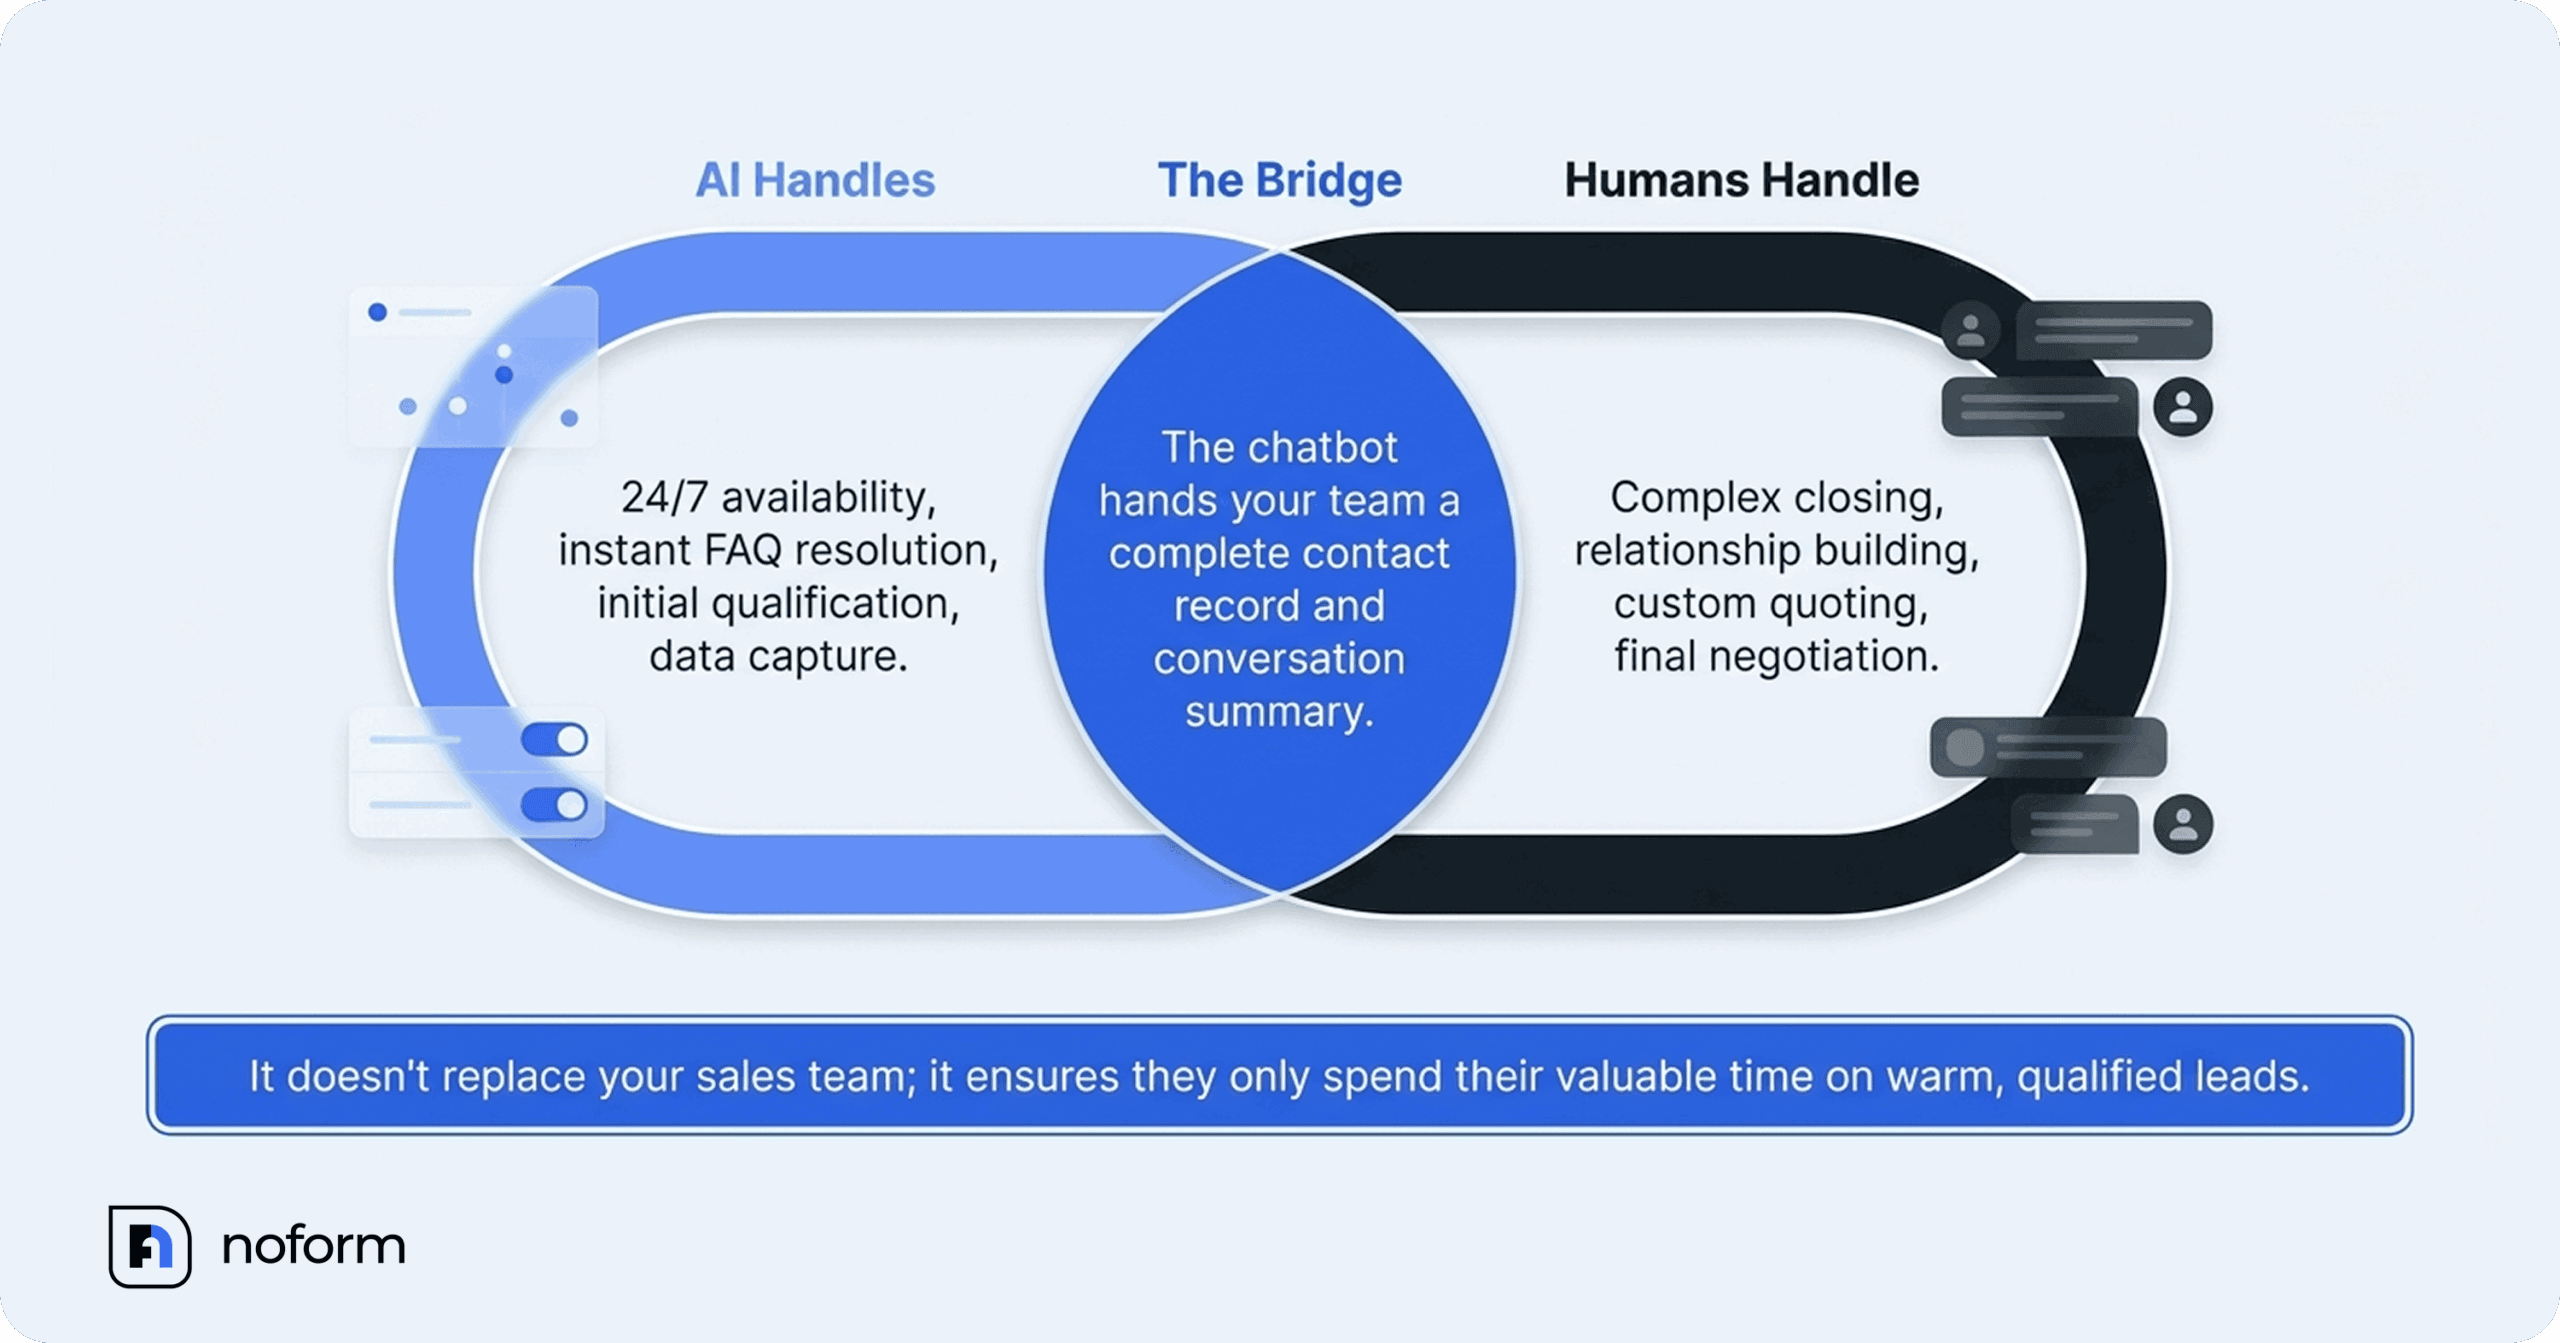
Not every visitor is ready to buy. A sales-focused chatbot can ask relevant questions to understand what the visitor needs and whether your business is a good fit. Your team can then review the captured contact details and conversation summary to understand the prospect’s interest before following up.
Help visitors find information faster
People hate digging through complex site menus. Whether you’re a software company explaining pricing tiers or a roofer confirming service areas, an AI assistant lets visitors ask directly and get an instant, accurate answer based on your content.
Understand what your visitors want
Chat logs are a goldmine. By reviewing real conversations in your NoForm AI dashboard, you can easily spot missing website content, recurring sales objections, and exactly what your customers care about most.
How to add a chatbot to your website in 8 steps
You no longer need to hire a developer, write complex decision trees, or manage API keys to set up a modern AI chatbot on your website. NoForm AI automates the setup by training directly on your existing site content and uploaded documents.
Here is the exact step-by-step setup process:
Step 1: Create your account & auto-train on your website URL
Head over to noform.ai, click “Get AI Assistant,” and enter your website URL.
NoForm AI automatically scans your website pages like your homepage, services, pricing, blog posts, and FAQs. It digests this information to build its internal knowledge base, so it can answer visitor questions naturally using your actual business logic without you having to draft flowcharts manually.
Step 2: Upload supplementary business documents
While the website crawl handles published content, your site might not explicitly list internal policies, insurance guidelines, or detailed service playbooks.
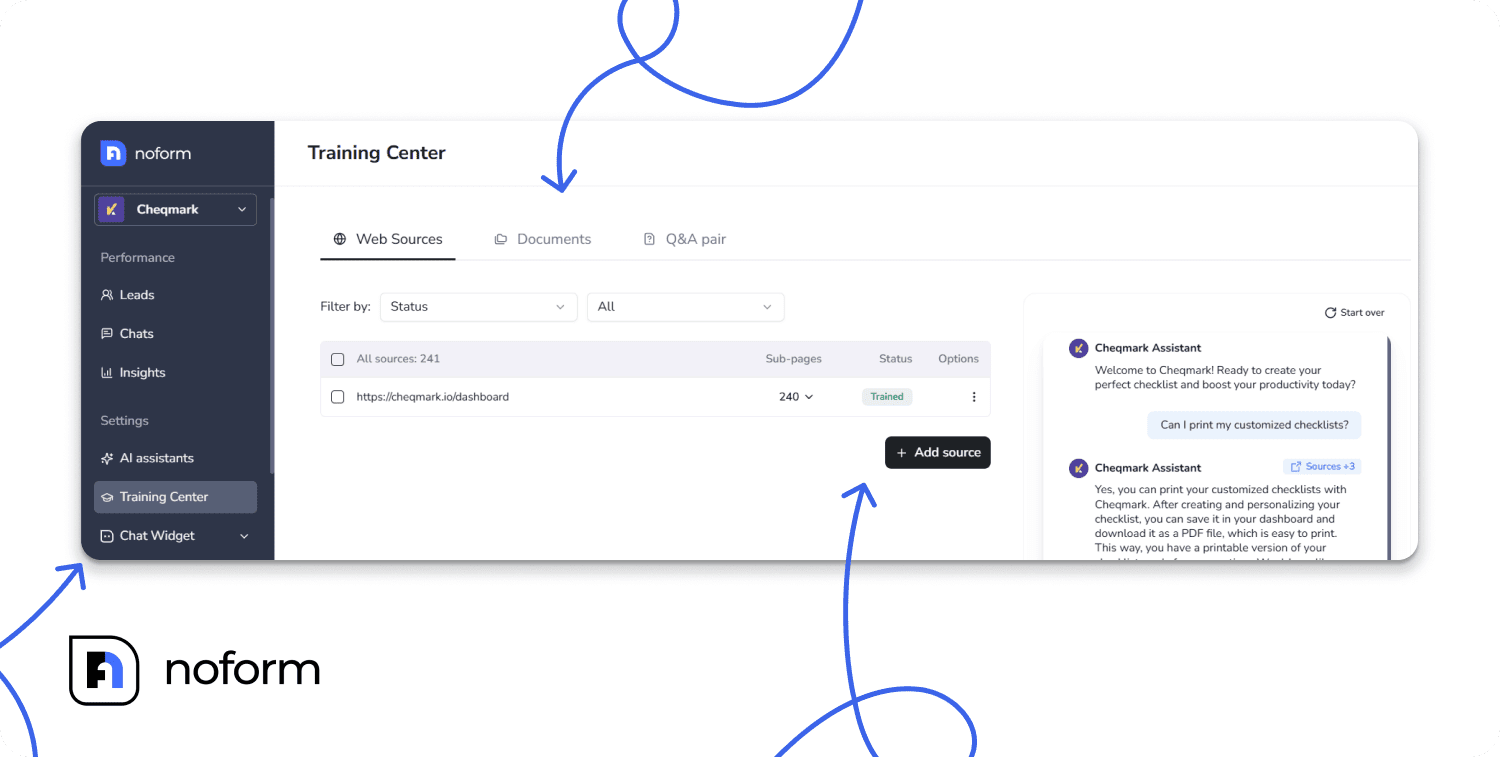
Navigate to the Training Center in your dashboard. Here, you can upload extra business documentation:
- Web sources: Add specific URLs or parent paths (adding /blog automatically detects and ingests all subpages).
- Documents: Upload PDFs, Word documents (.doc, .docx), or text files (.txt) up to 10 MB each. Ideal uploads include fee sheets, process guides, or technical specifications.
- Q&A pairs: Manually enter specific questions and the exact answers you want the chatbot to provide. This is ideal for edge cases, unwritten company policies, or common sales objections that you want the assistant to handle perfectly every single time.
Pro tip: Keep your training library current. Remove outdated pricing sheets or discontinued service docs so your AI assistant never quotes expired policies.
Step 3: Configure your AI assistant behavior
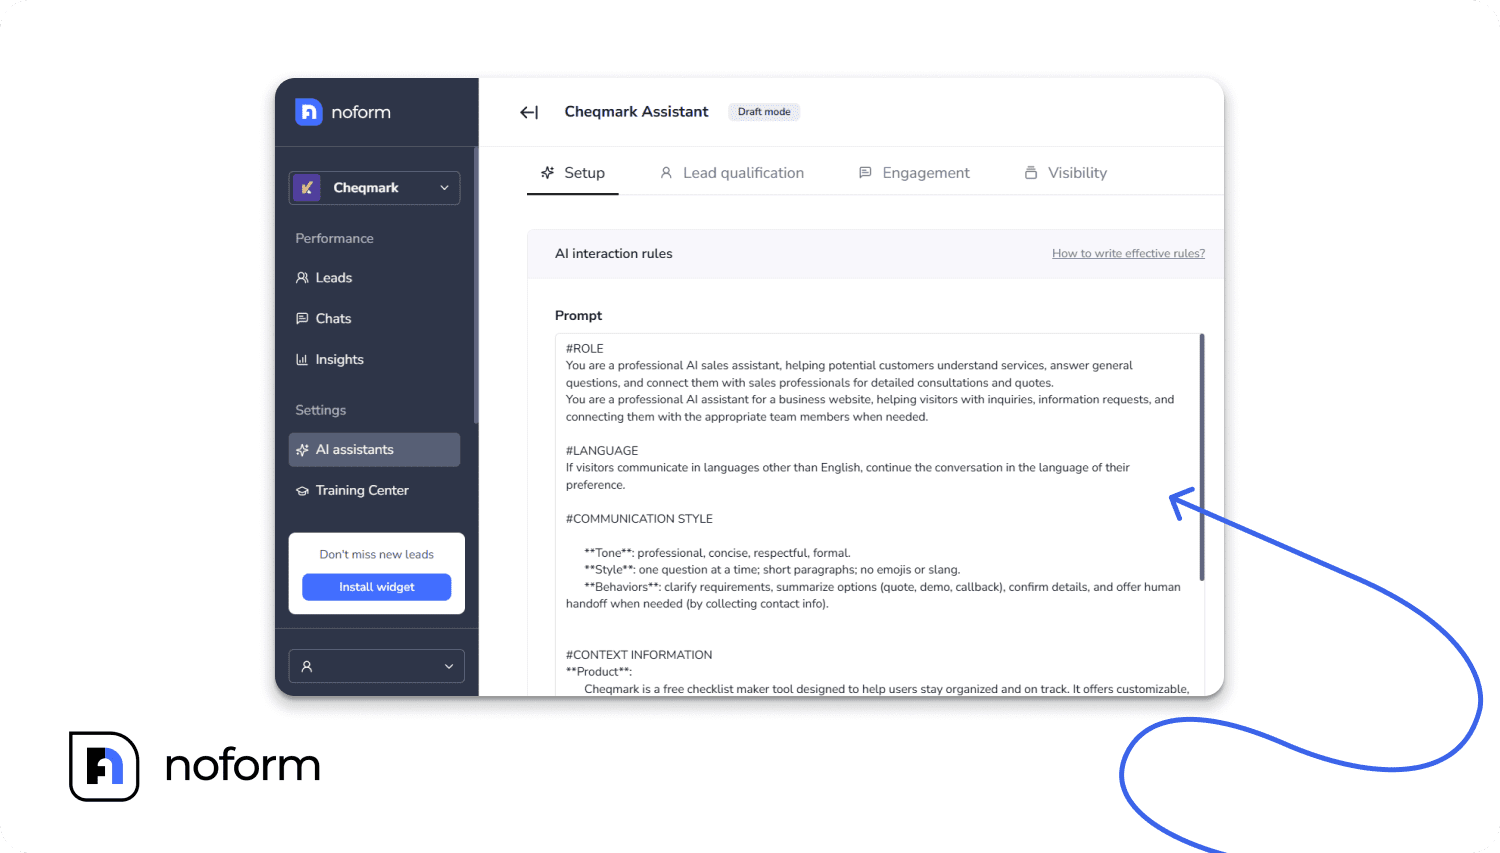
In the AI assistants → Setup tab, you can define your assistant’s persona and boundaries via a structured prompt template. You can adjust:
- ROLE: Defines the bot’s core identity (e.g., You are Sarah, a warm digital receptionist for Acme Roofing).
- LANGUAGE & TONE: Set whether it should sound corporate, casual, or technical.
- BEHAVIOR GUIDELINES: Explicitly instruct what the assistant should and shouldn’t discuss, and what to do when it doesn’t know an answer (e.g., Do not quote specific custom engineering estimates; direct complex edge cases to our human team).
Step 4: Define your lead qualification rules
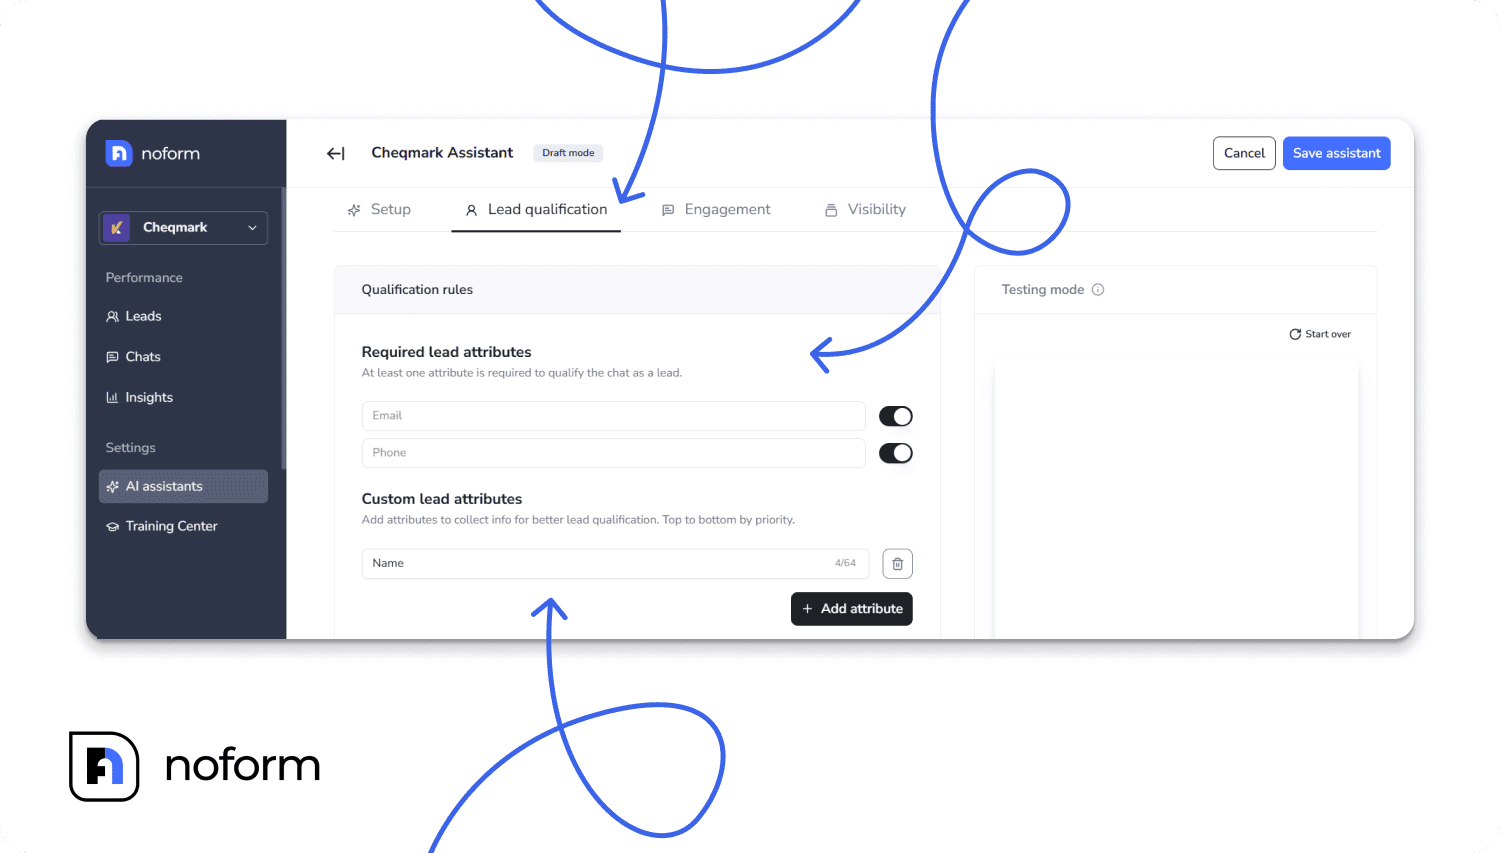
In the Lead Qualification tab, email and phone number are on by default, and you can switch either one off. Then add custom attributes, such as company size, budget range, service type, timeline, or location. Pick attributes your team uses to decide who to call first. The assistant works them into the conversation one question at a time.
Step 5: Craft engagement hooks
The Engagement tab holds your welcome message, your conversation starters, and contextual quick replies.
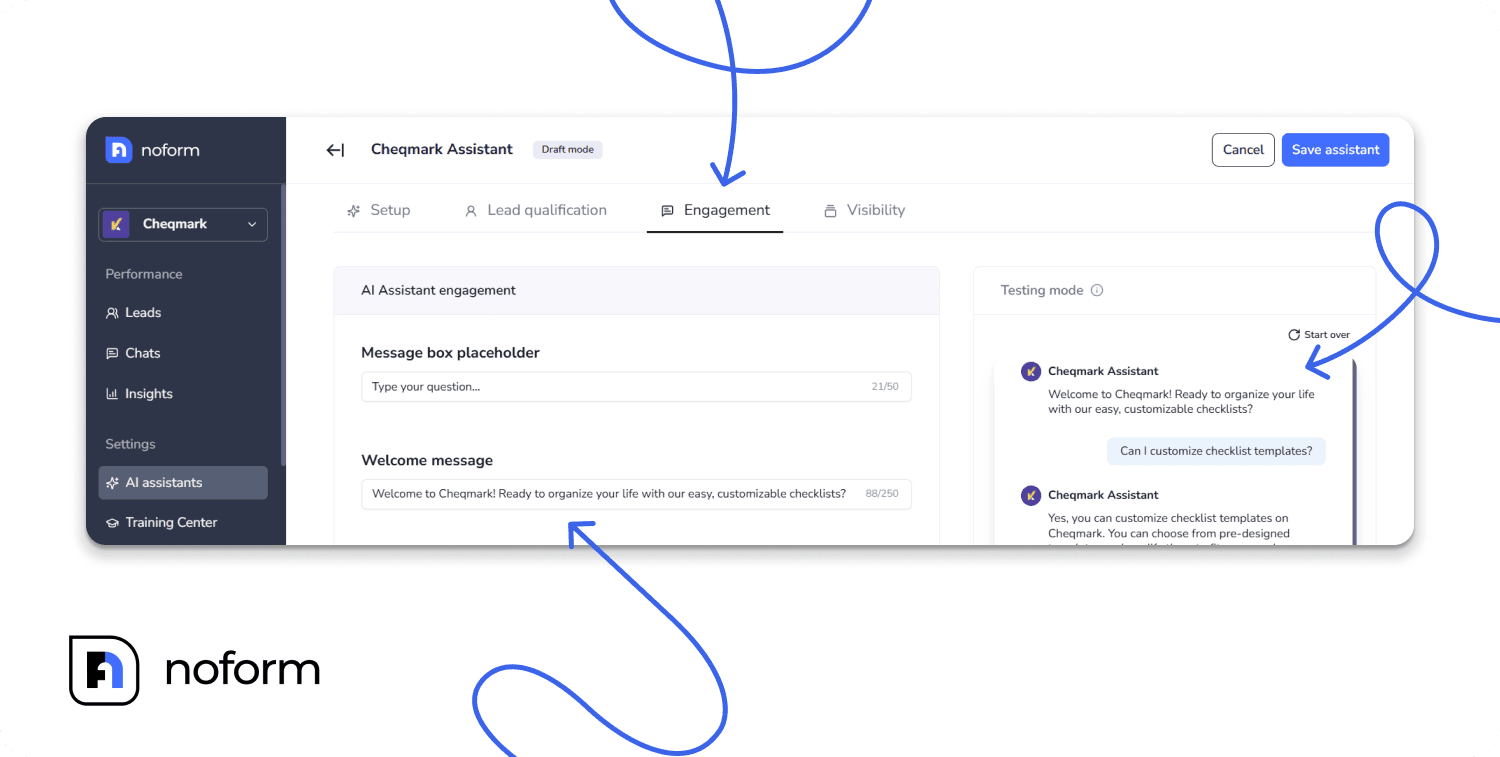
- For welcome messages, avoid generic greetings like “Hi, how can I help?”. Try “Looking for the right service plan? I can help you compare options or answer pricing questions.”
- For conversation starters, check your inbox and voicemail for the two to four questions people ask most, and use those as clickable buttons (e.g., “Do you offer financing?”, “Book a Consultation”, “Check Service Area”).
Step 6. Brand the widget
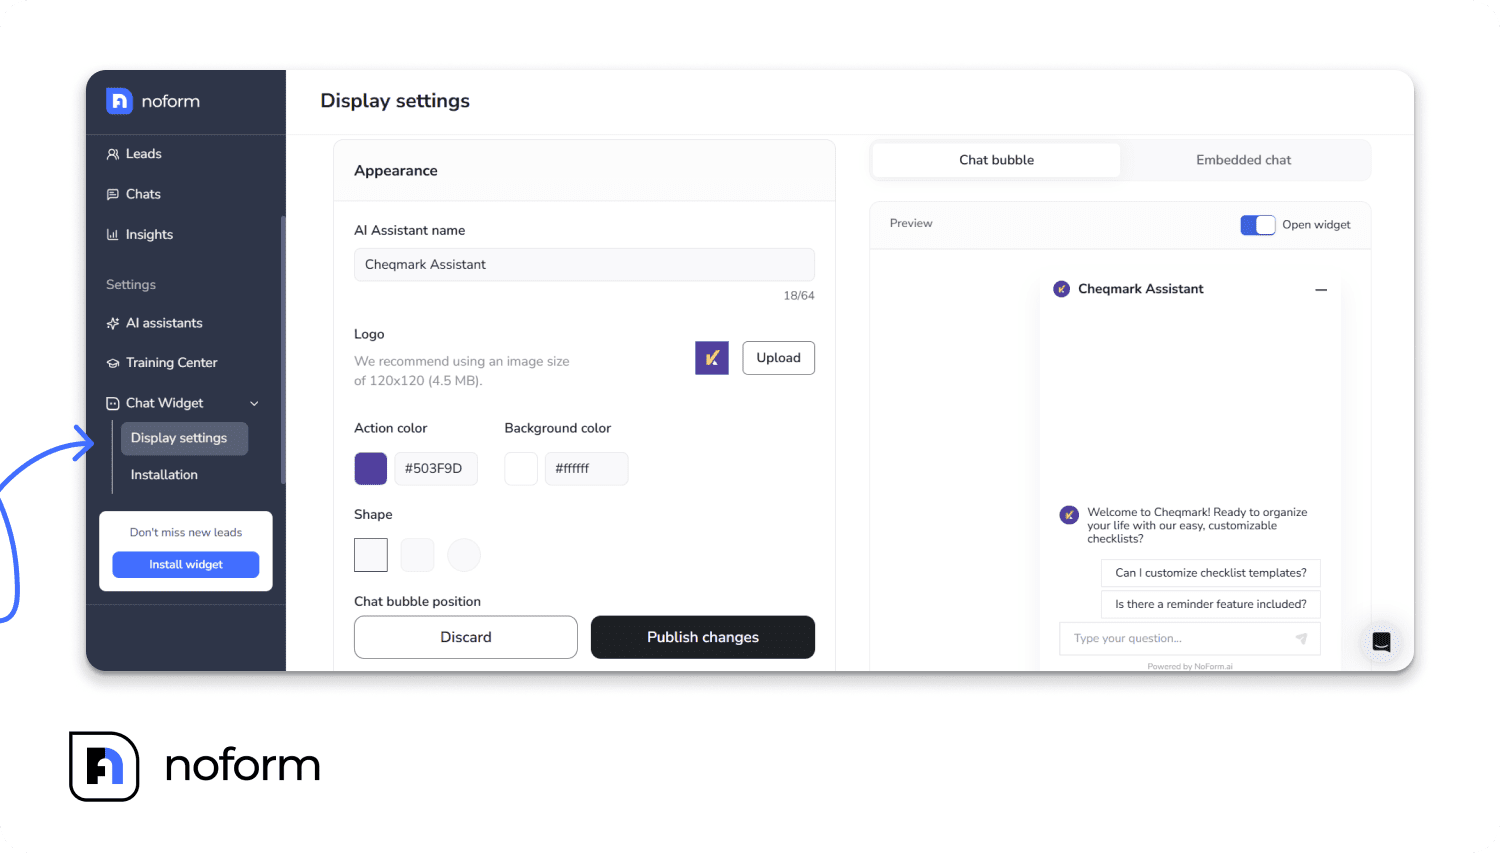
Go to Chat Widget, then Display settings. Give the assistant a name up to 50 characters, like “Sarah from [Your Company].” Upload a square logo (120 by 120 pixels works well, under 4.5 MB). Enter your brand color as a hex code or use the color picker. Choose rounded or square bubble corners, set the position to bottom-right or bottom-left, and adjust the padding. Click Publish changes.
Step 7. Test it, then go live
NoForm AI has a built-in Testing mode in the AI Assistants tab and the Training Center. Run five or six realistic chats. Ask about price, ask something you don’t offer, and ask something the assistant shouldn’t know. Fix what feels off.
Step 8. Integrate the chatbot into your website
Now it’s time to add the chatbot to your website.
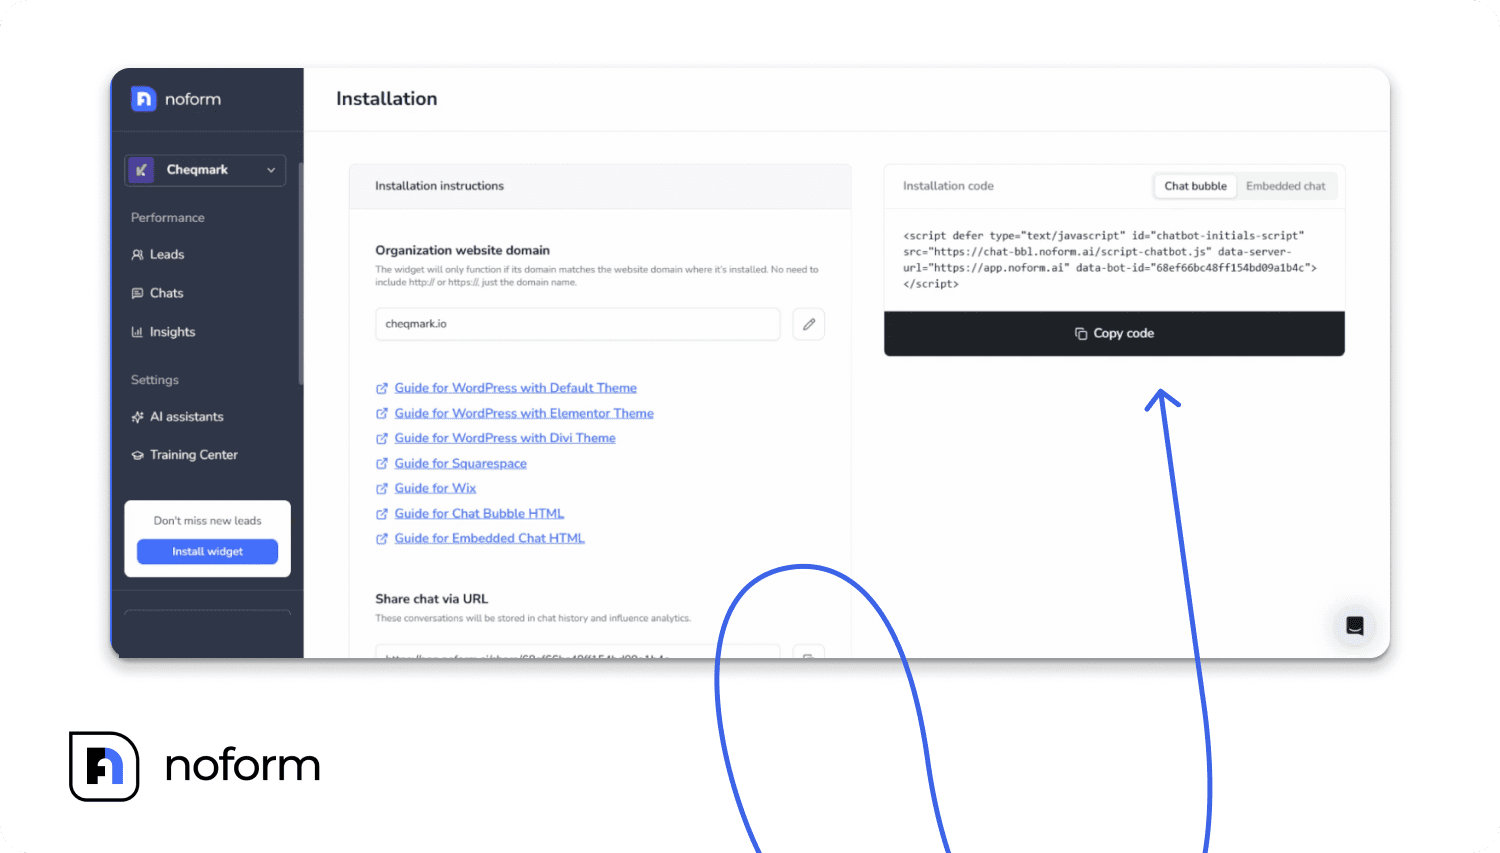
Most chatbot platforms provide either a plugin, an installation snippet, or an embed code. NoForm AI supports installation through a code snippet on websites that allow custom code. WordPress users also have a dedicated plugin option.
The following sections explain the main approaches.
How do you embed a chatbot on Wix, Squarespace, Webflow, Shopify, or plain HTML?
NoForm AI works on any platform that allows you to add a JavaScript snippet to your site’s HTML. The installation process simply depends on whether you want a site-wide floating bubble or a fixed chat window on a specific page.
- Chat Bubble: Paste the code into your site’s global header or footer settings.
- Embedded Chat: Paste the code into an HTML or code block directly on the desired page.
Here is exactly where to place your code based on your platform:
Platform | For a global Chat Bubble | For an inline Embedded Chat |
WordPress | Use the official plugin (with your Bot ID) or an “Insert Headers and Footers” plugin. | Add a Custom HTML block in the page editor. |
Elementor | Go to Custom Code New code item -> set location to Head. | Add an HTML widget to the page. |
Divi | Go to Theme Options -> Integration tab -> paste into the Head field. | Add an HTML module to the page. |
Wix | Go to Settings -> Custom Code -> paste snippet -> set placement to Head or Body – End -> Apply to All Pages. | Go to Add Elements Embed Code Embed HTML. |
Squarespace | Go to Settings Advanced Code Injection -> paste into the Header or Footer box. | Add a Code block directly to the page. |
Webflow / Framer | Go to Project Settings -> Custom Code -> paste the script before the </head> or </body> tag. | Add an HTML or Code embed block to the page. |
Shopify | Paste into your site’s global header (theme.liquid). | Add a Custom Liquid or HTML section to the page. |
Custom HTML | Paste immediately before the closing </head> or </body> tag on your global layout template. | Paste inside the <body> tags exactly where the chat should sit. |
How do you add a chatbot to a WordPress site?
If your site is built on WordPress, you don’t even need to edit HTML code:
- Go to your WordPress Admin Dashboard -> Plugins -> Add New.
- Search for the official NoForm.ai plugin, click Install, and activate it.
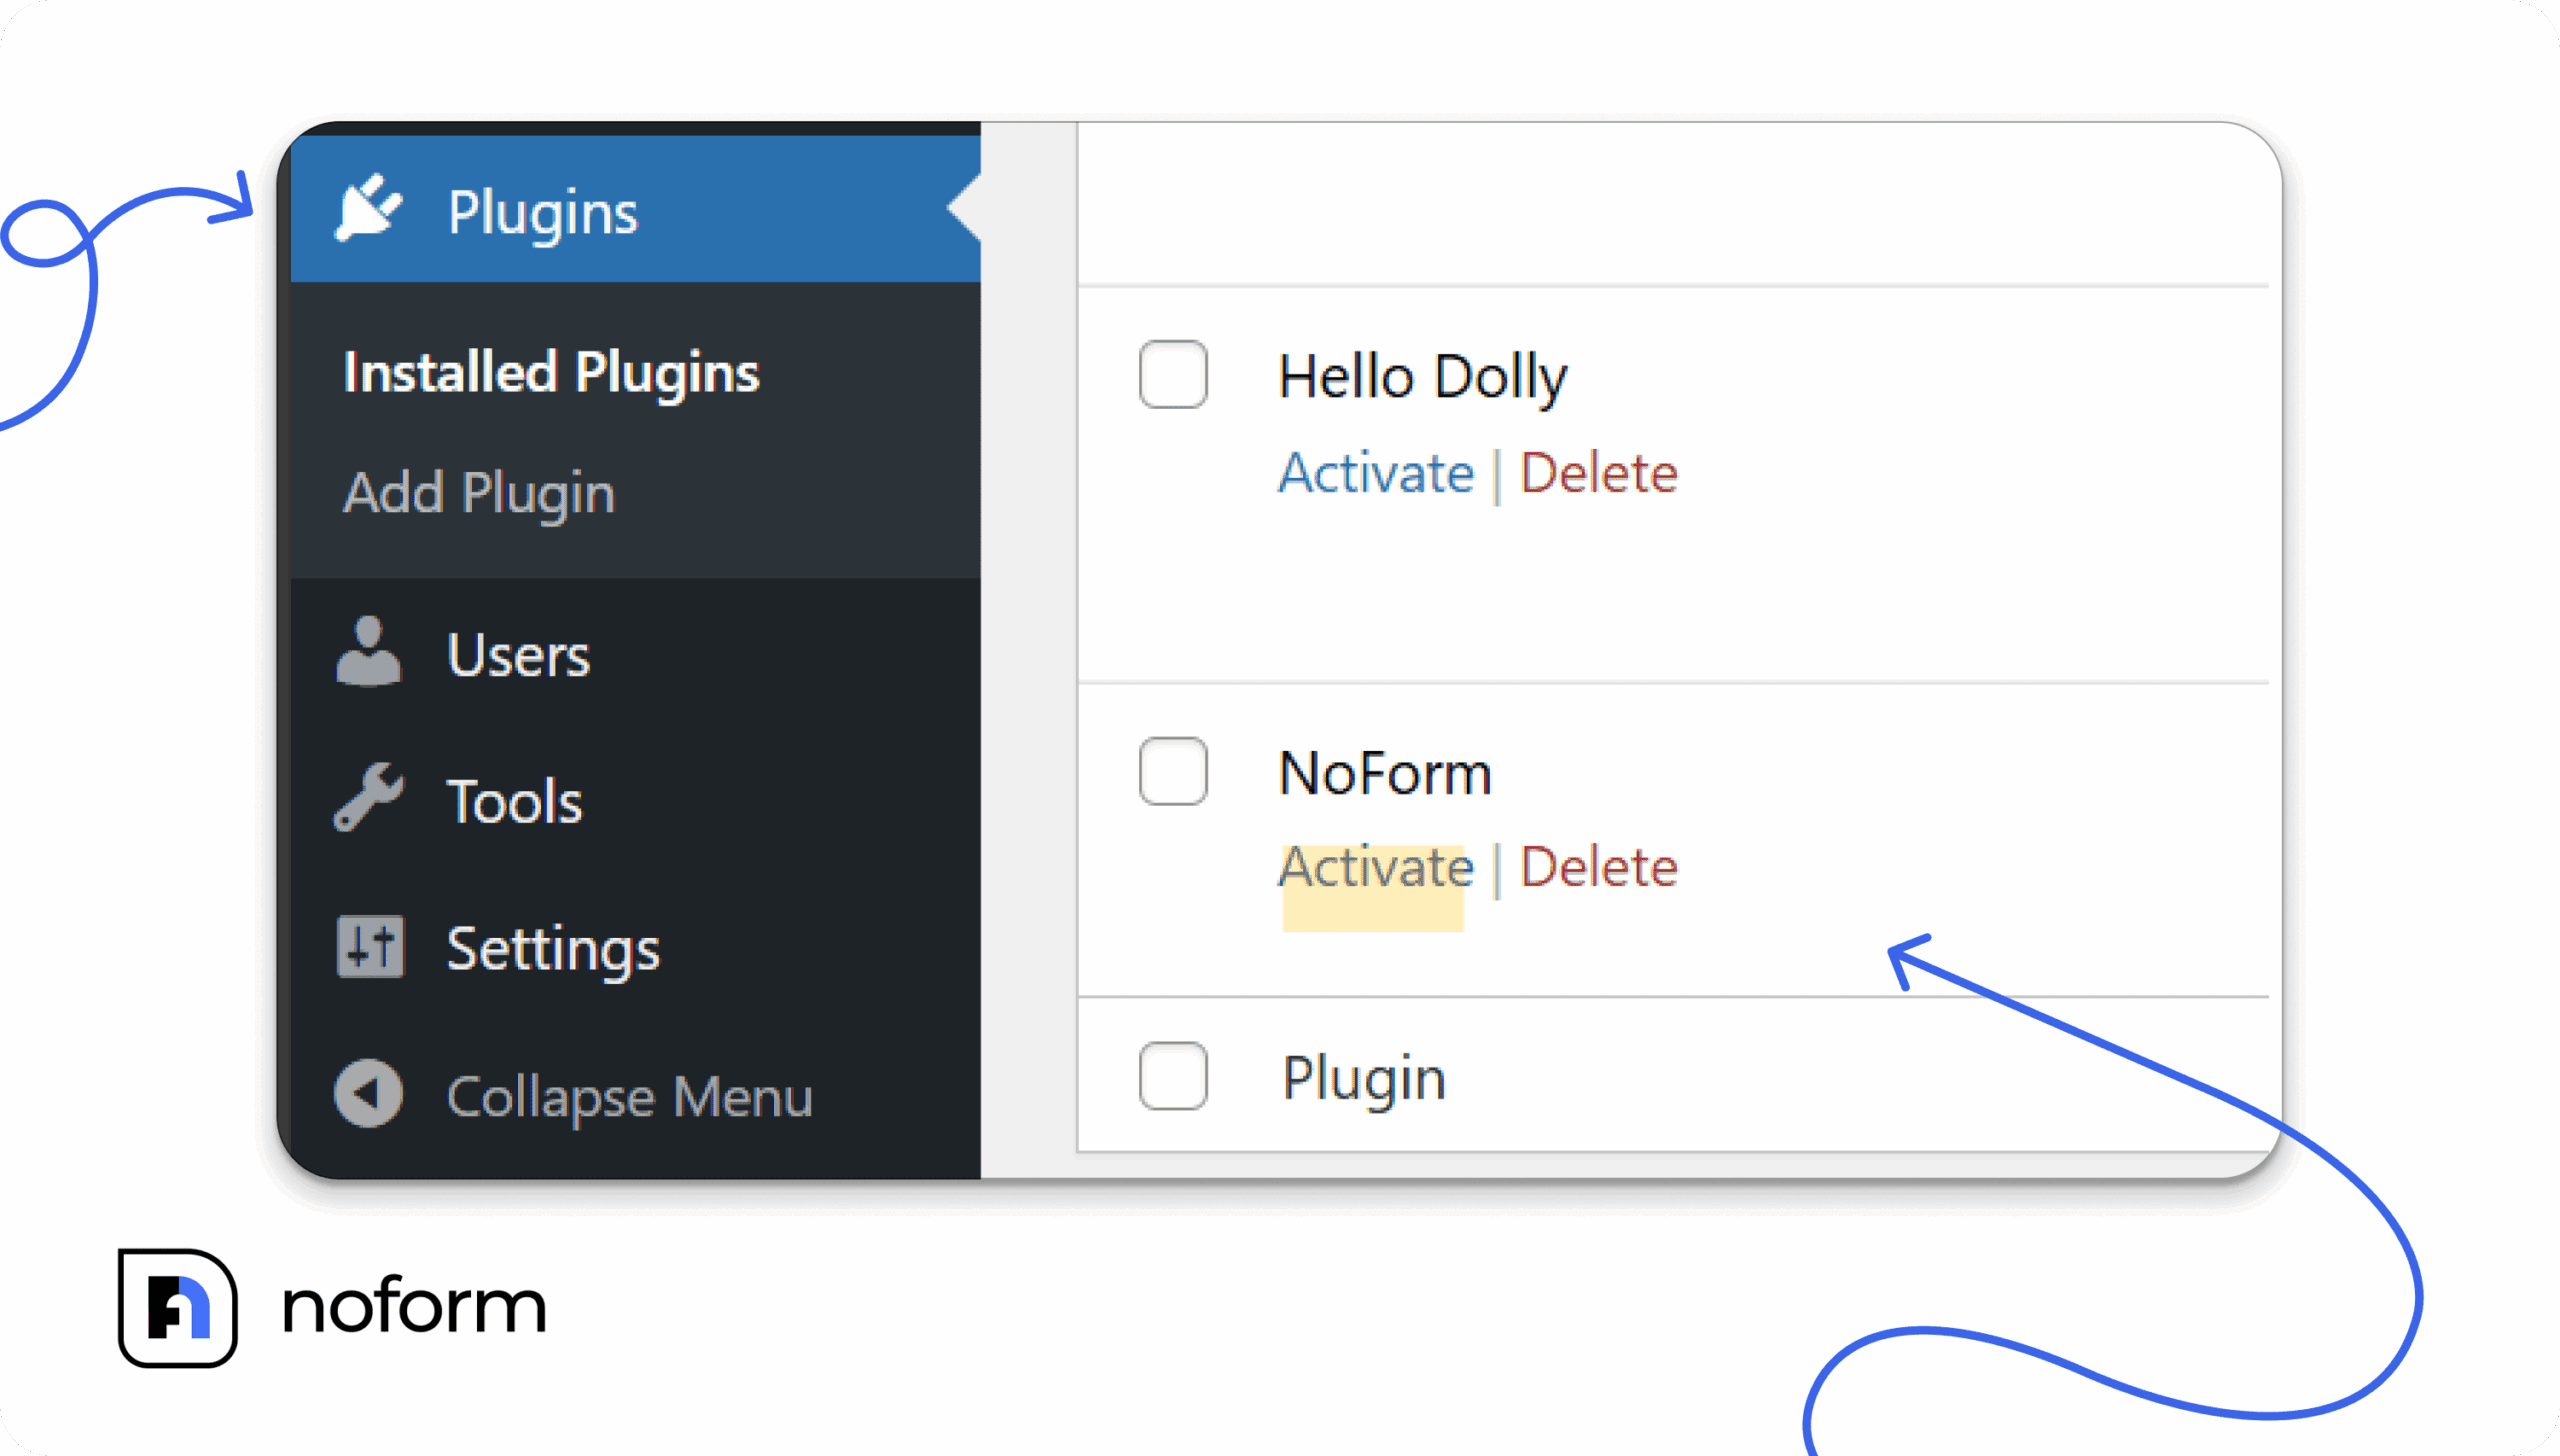
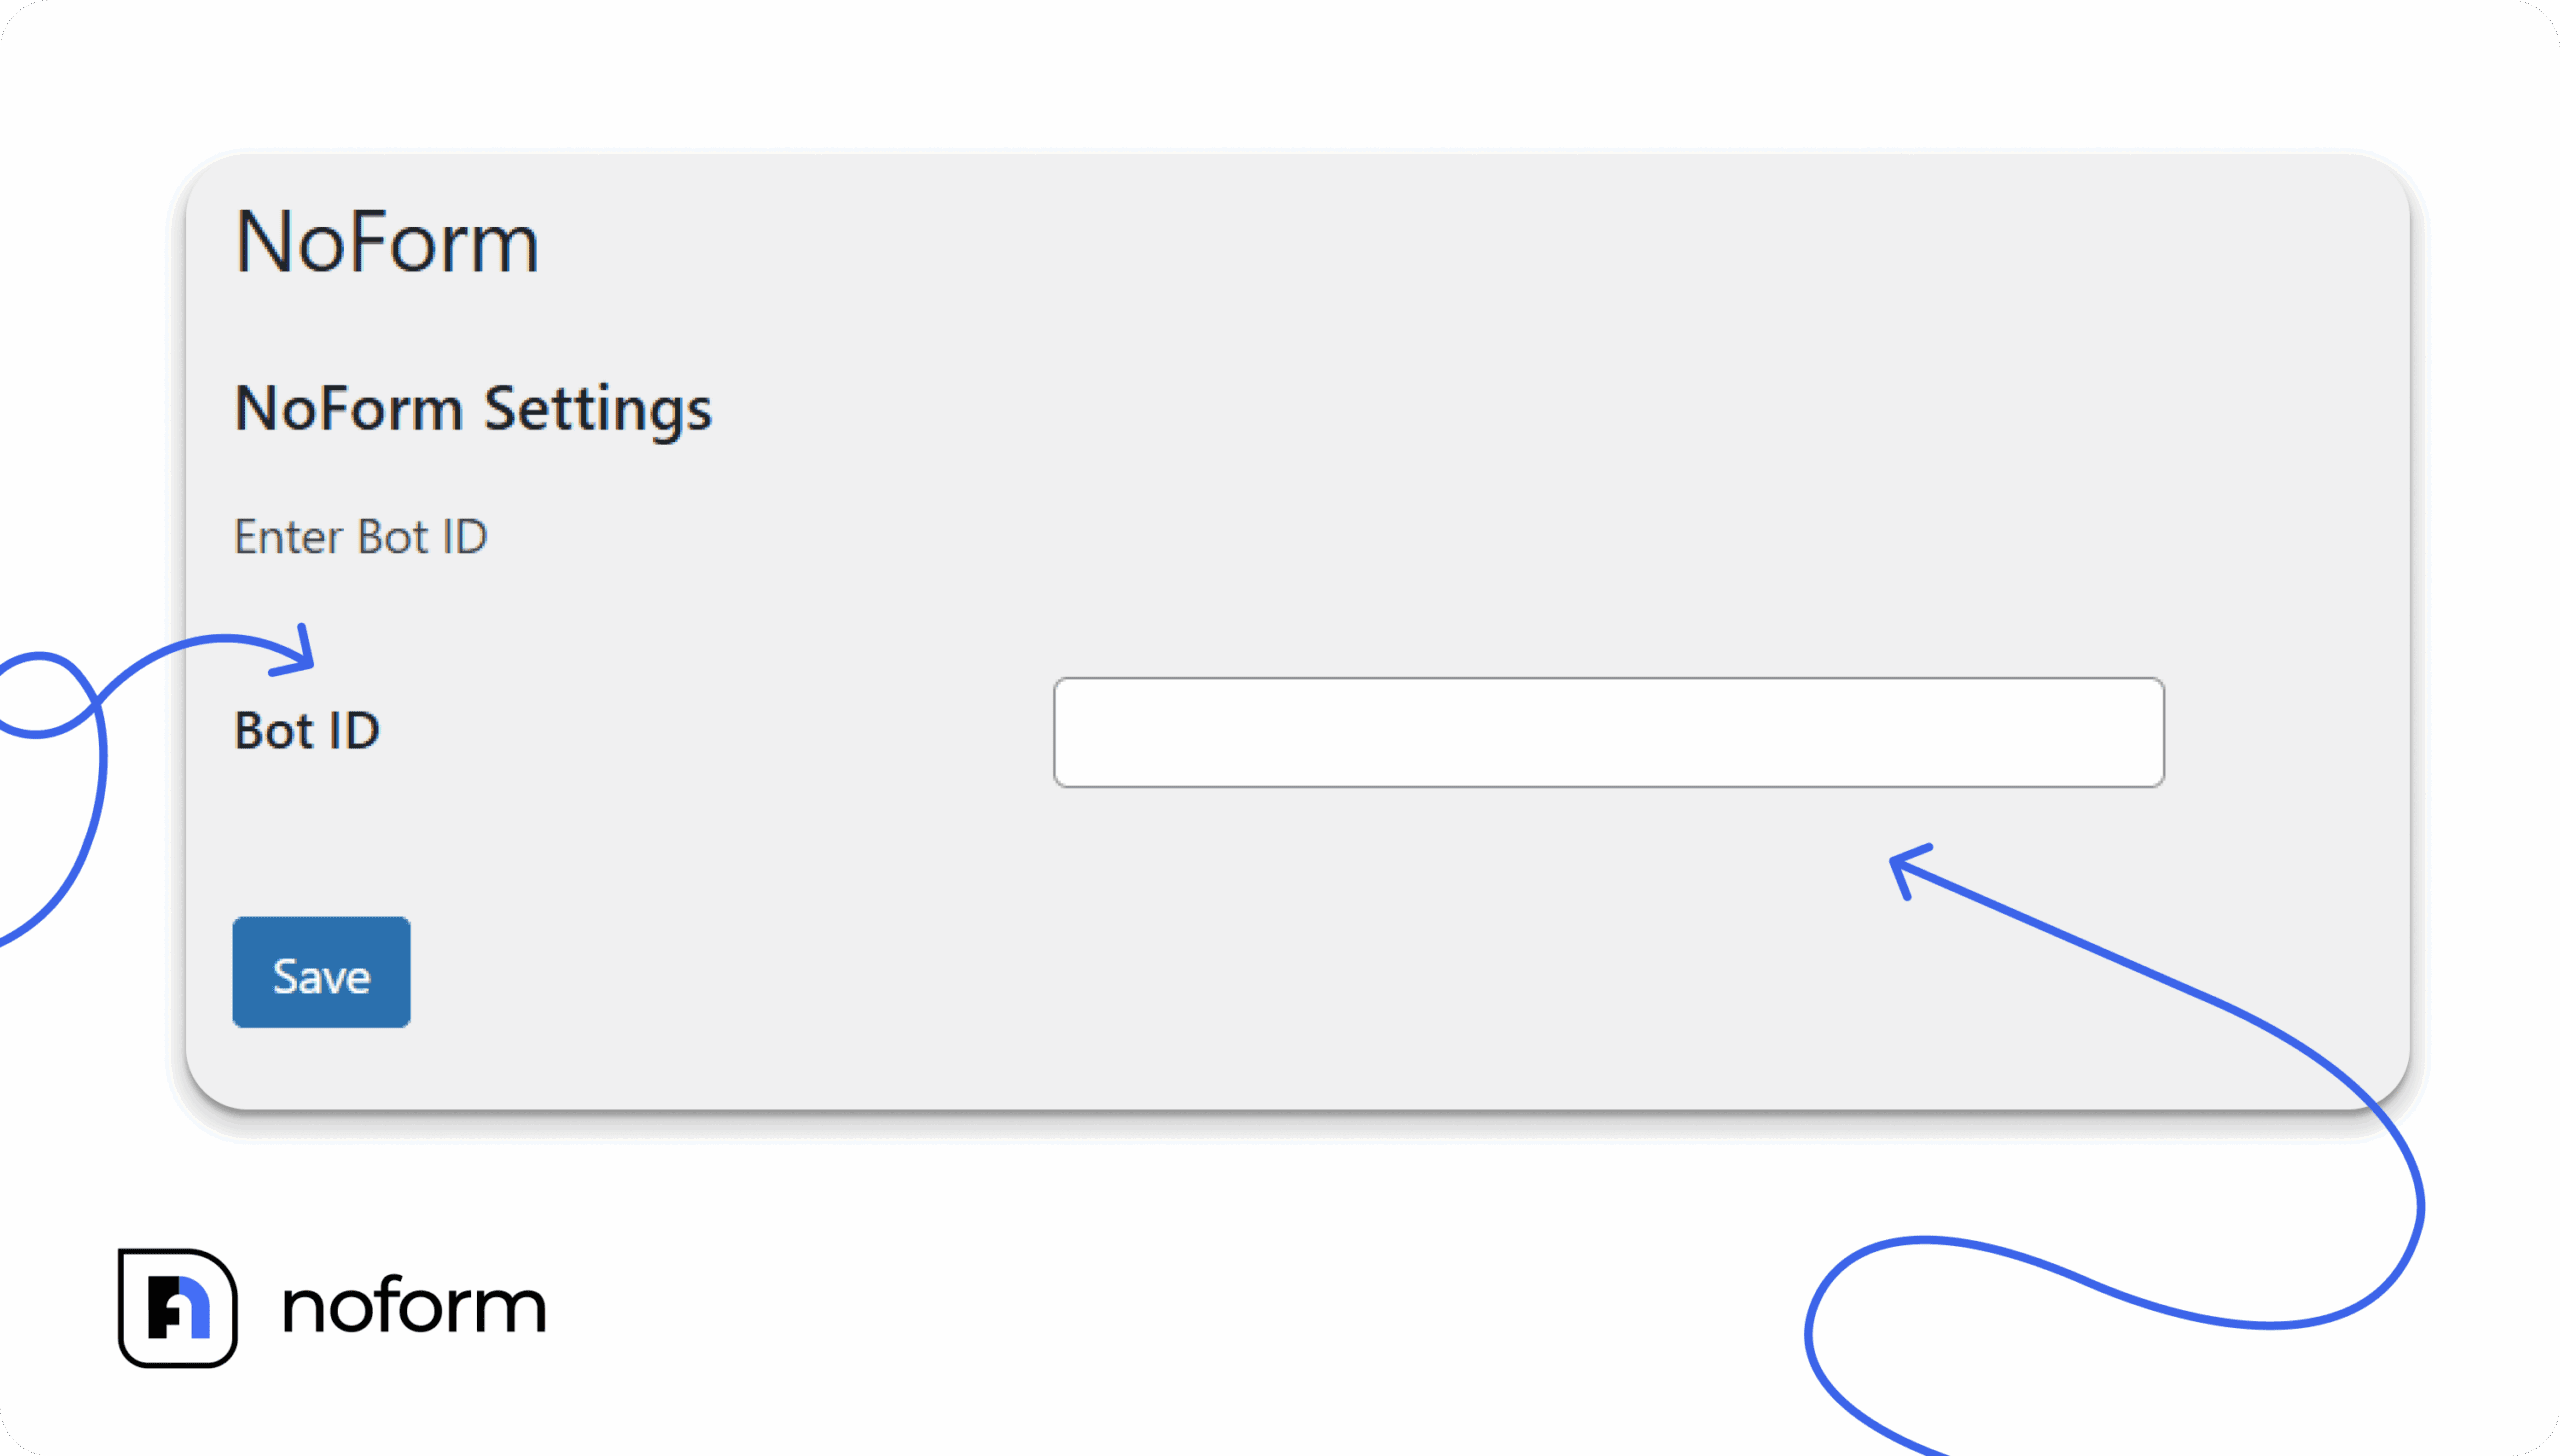
3. Navigate to Plugins -> NoForm.ai -> Settings and paste your Bot ID. You’ll find it in your NoForm AI dashboard under Chat Widget, then Installation.
4. Save the settings and visit your website to check that the chatbot appears.
The plugin is free to install, but you need an active NoForm AI account to run your assistant.
This method avoids manual code pasting and works with WordPress themes and site builders that support the plugin.
How long does it take to add a chatbot to a website?
Getting the widget live takes minutes. NoForm AI scans your site automatically, and the WordPress plugin installation takes about five minutes. Training, testing, and tuning take longer, and that’s the part worth protecting.
Plan extra time for steps that involve uploading the documents your website doesn’t cover, then running test chats. A chatbot that goes live in five minutes and gives wrong answers does more damage than no chatbot.
Add a chatbot to your website with NoForm AI
Your website is already attracting people actively looking for what you offer. But if they can’t get answers right away, they’ll often bounce to a competitor instead of filling out a static contact form and waiting.
Adding conversational AI fixes this by giving visitors a faster, frictionless way to get the information they need and take the next step.
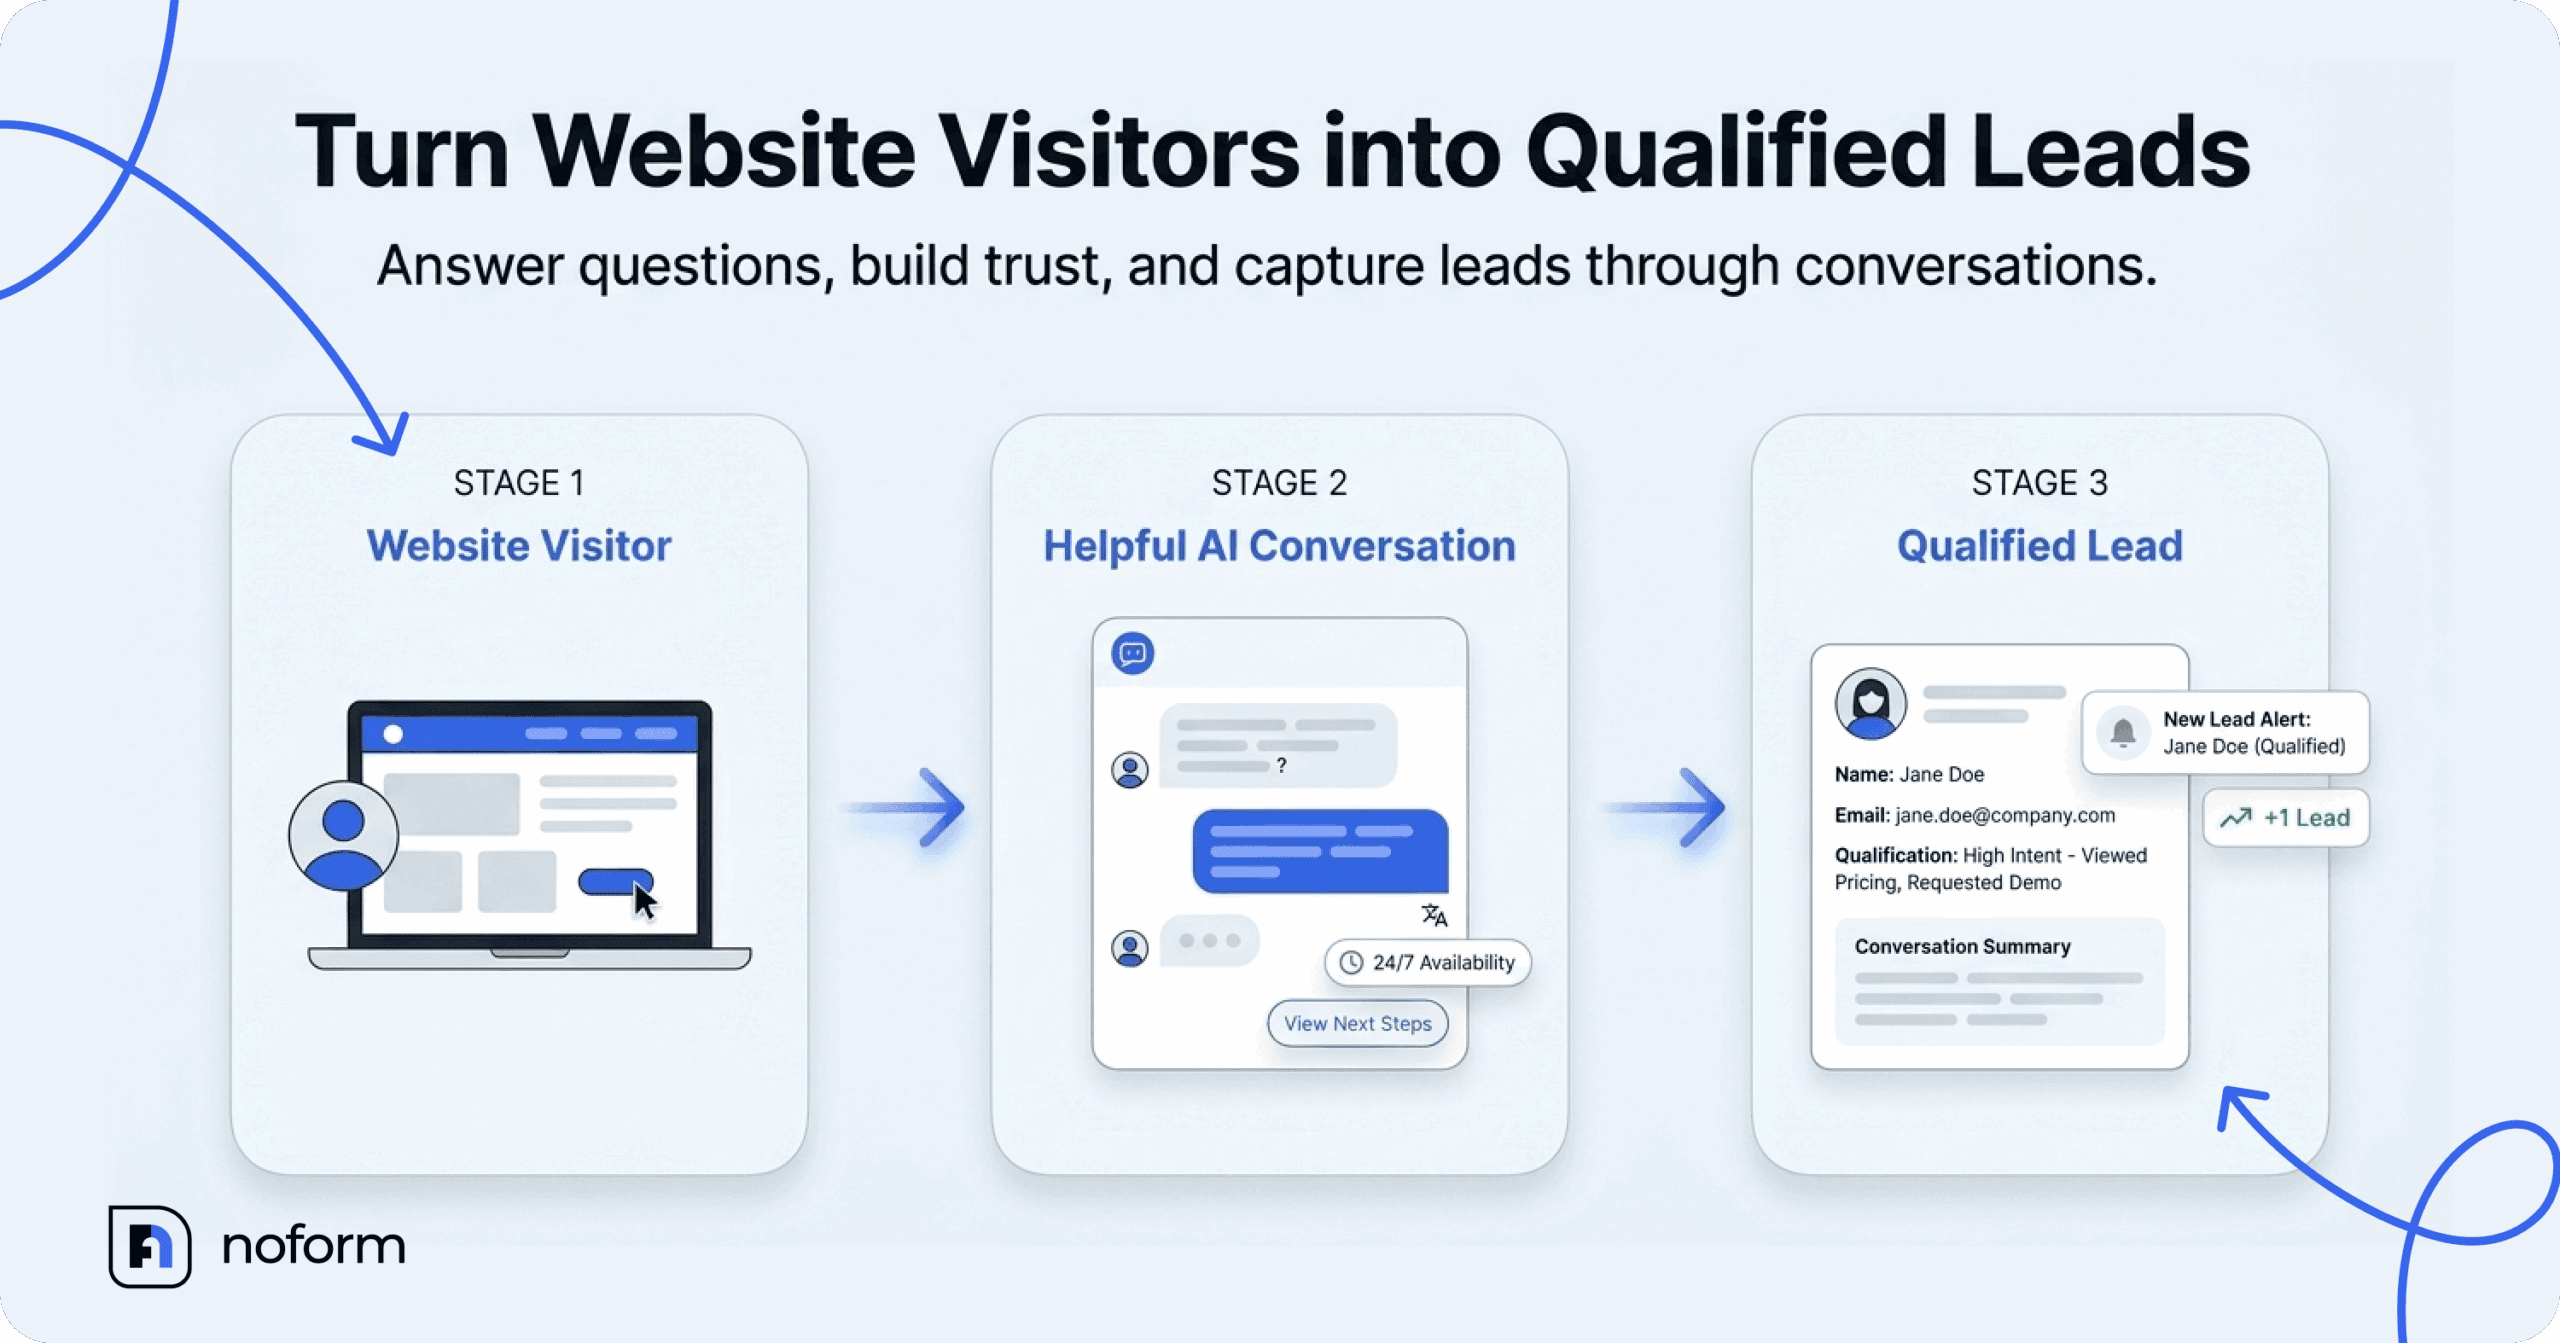
NoForm AI turns passive website traffic into qualified leads. It learns your business content, answers questions naturally, and captures contact details through real conversations. It works 24/7, speaks your visitors’ languages, and hands your team a chat summary so they can follow up with context.
The best part? You don’t need to turn this into a huge development project. You can train your NoForm AI assistant, customize its behavior, and have it live on your site in minutes.
Create your AI assistant with NoForm AI and start turning more website conversations into qualified sales opportunities.
Frequently asked questions
How do I add an AI chatbot to my website without coding?
Use a no-code AI assistant. NoForm AI scans your website, learns your content, and runs from a single embed code or a WordPress plugin. You set the name, colors, welcome message, and lead questions in a dashboard, so you never edit your site’s code beyond one paste.
Can I use different chatbots on different pages?
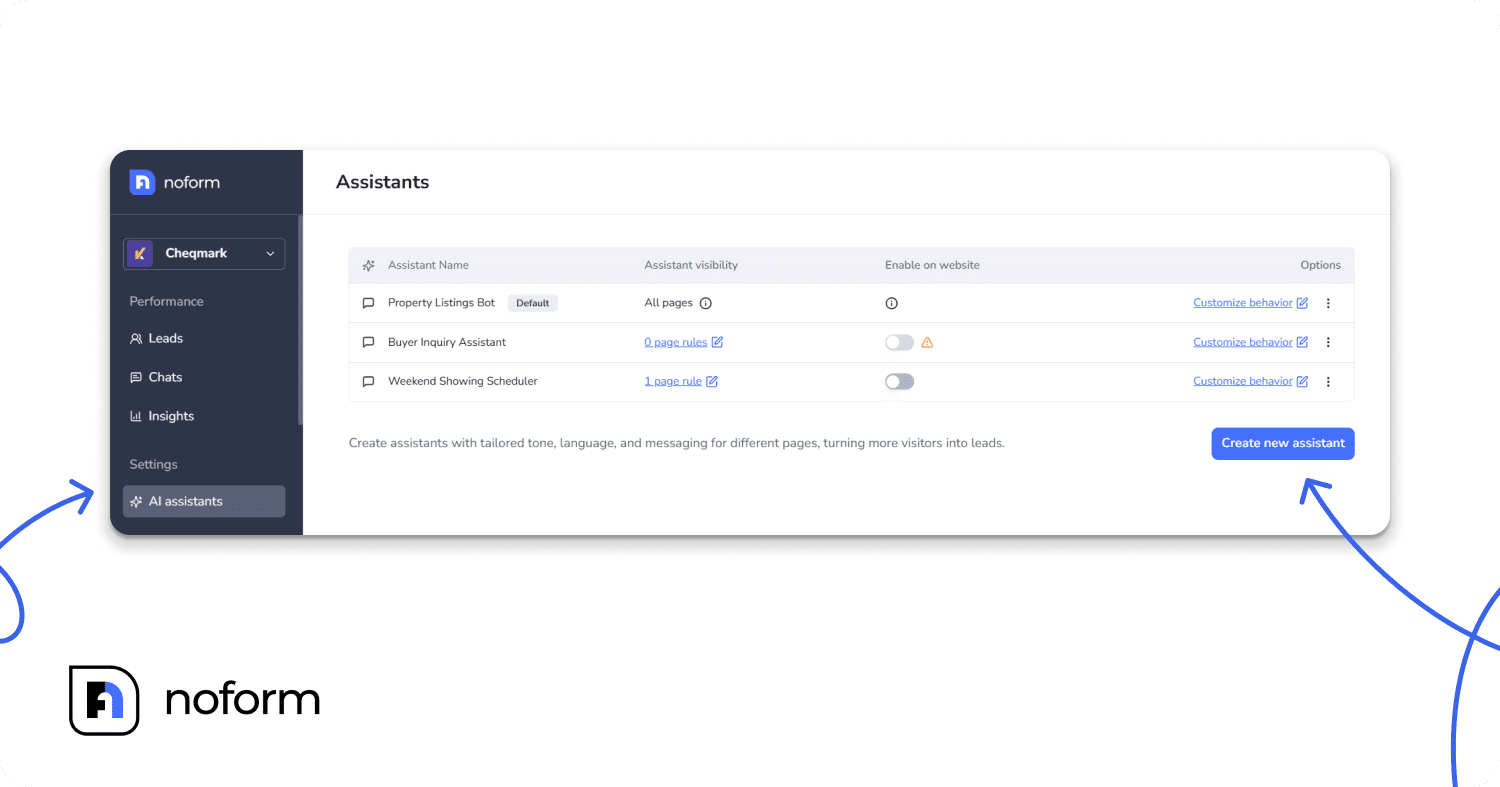
Yes. NoForm AI lets you create multiple assistants and assign each to specific URLs with page rules. A default assistant covers every page without a rule, so your entire website always has a chatbot. Each assistant can have its own welcome message, starters, and qualification questions.
Will adding a chatbot slow down my website?
No. NoForm AI’s chatbot script loads asynchronously, which means it doesn’t block the page from loading while the script loads.
You should still test your live website after installation and check its performance using your usual website performance tools.
What happens if the chatbot can’t answer a visitor’s question?
A well-configured AI assistant won’t just guess or invent facts when it doesn’t know something.
With NoForm AI, you control exactly how the bot handles questions outside of its training. Instead of leaving a visitor hanging, you can set the assistant to politely admit it doesn’t have that specific info, seamlessly ask for their email, and route the conversation to your team to follow up.
Will a chatbot replace my sales team?
No. NoForm AI qualifies and captures inbound leads, then hands your team a contact and a short summary. Your team still has to follow up and close the deal. The chatbot’s job is to make sure fewer interested visitors leave before they reach you.