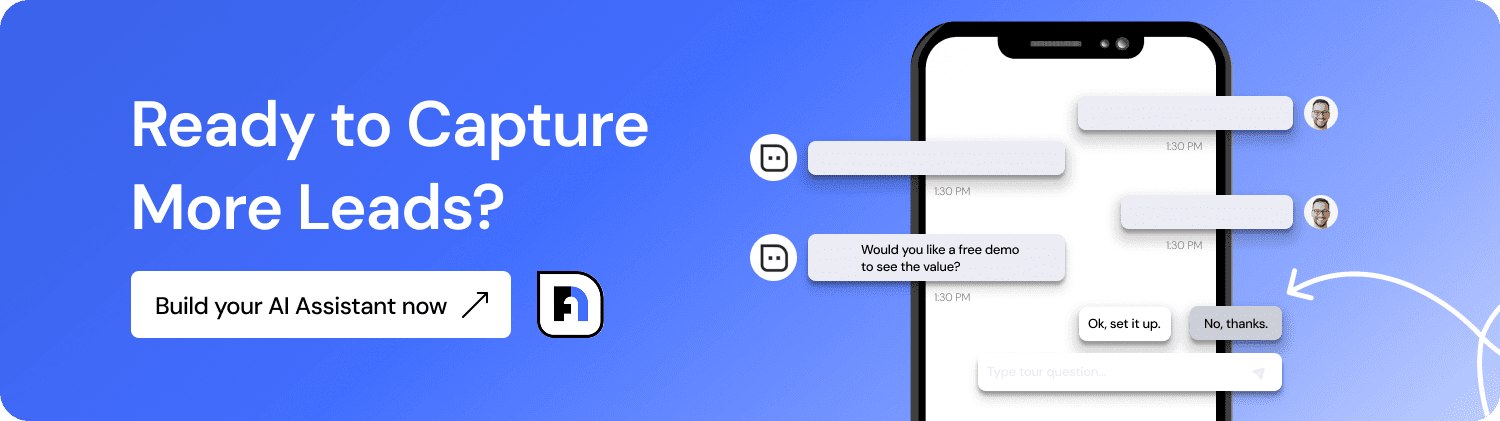
Your NoForm AI Assistant can do more than just answer basic questions — it can become a true expert on your business, products, and services. By training it with your own documents, PDFs, and website pages, you give it access to the same knowledge your team relies on every day.
The result? An AI that stops reading from a script and starts knowing your business. Smarter conversations, more accurate answers, and customers who feel like they’re talking to a true expert.
Businesses that train their AI see measurable results: Cheqmark, a checklist platform, saw conversion rates increase by up to 200% on key pages after training their AI on their template library.
In this guide, we’ll walk you through exactly how to train your AI Assistant inside NoForm’s Training Center.
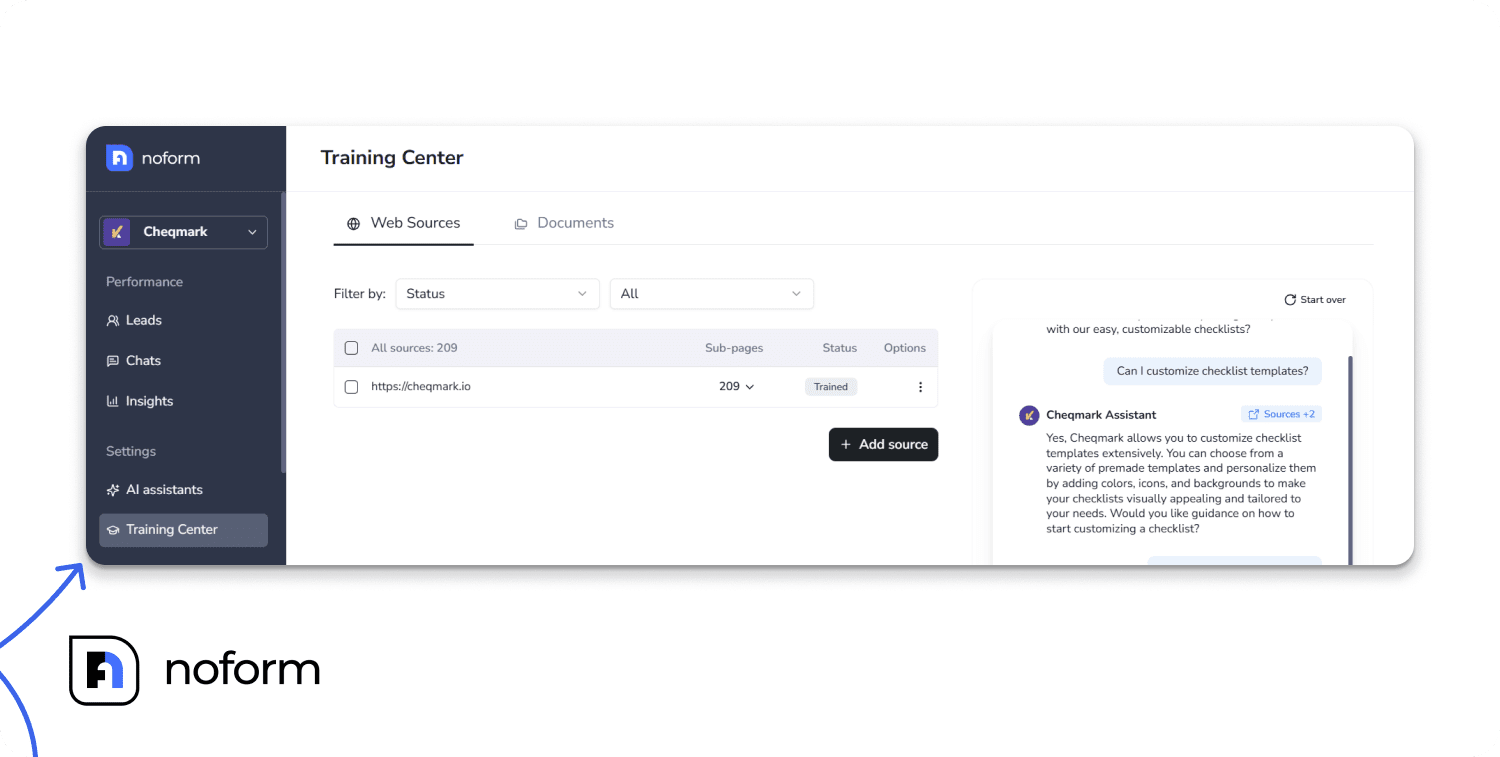
Accessing the Training Center
The Training Center is the heart of your AI’s knowledge base. It’s where you upload files and provide website links—like web pages, support articles, pricing pages, or internal manuals—to teach your Assistant everything about your business.
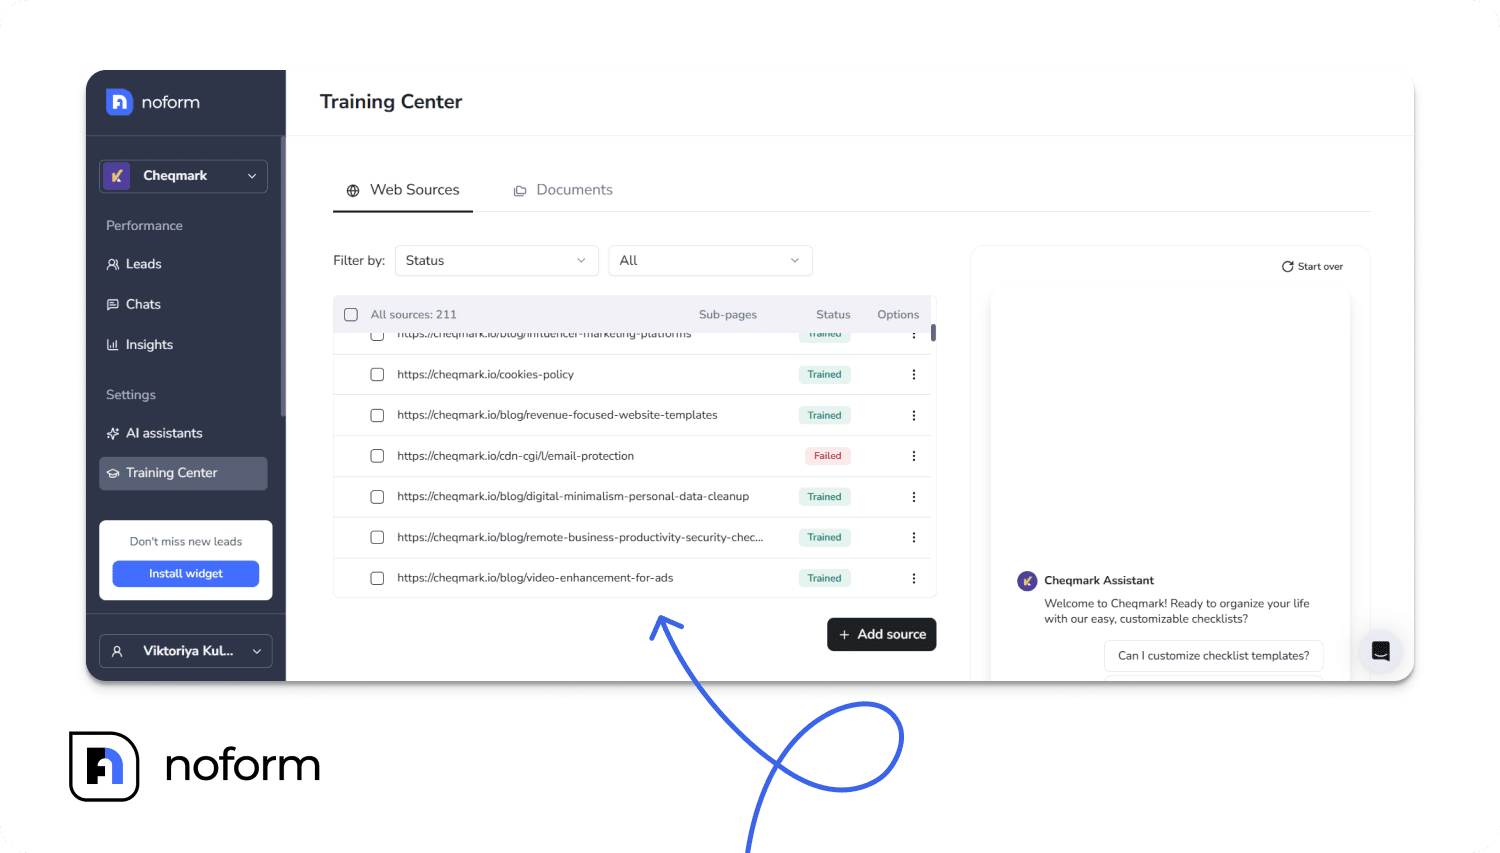
To start, simply navigate to the Training Center tab in your NoForm dashboard.
From here, you can train your AI Assistant in two main ways:
- Web Sources — Add pages from your website
- Documents — Upload files like PDFs, Word docs, and text files
Step-by-step: Adding training sources
You have two main ways to upload knowledge: Web Sources or Documents.
Training on Web Sources
If your key information is already published online (like FAQs, blog posts, or detailed product pages), this is the fastest way to train your AI.
Steps:
- Go to the Web Sources tab
- Click the + Add source button
- Enter the web page URL — you can skip the https://
- Click to add the source
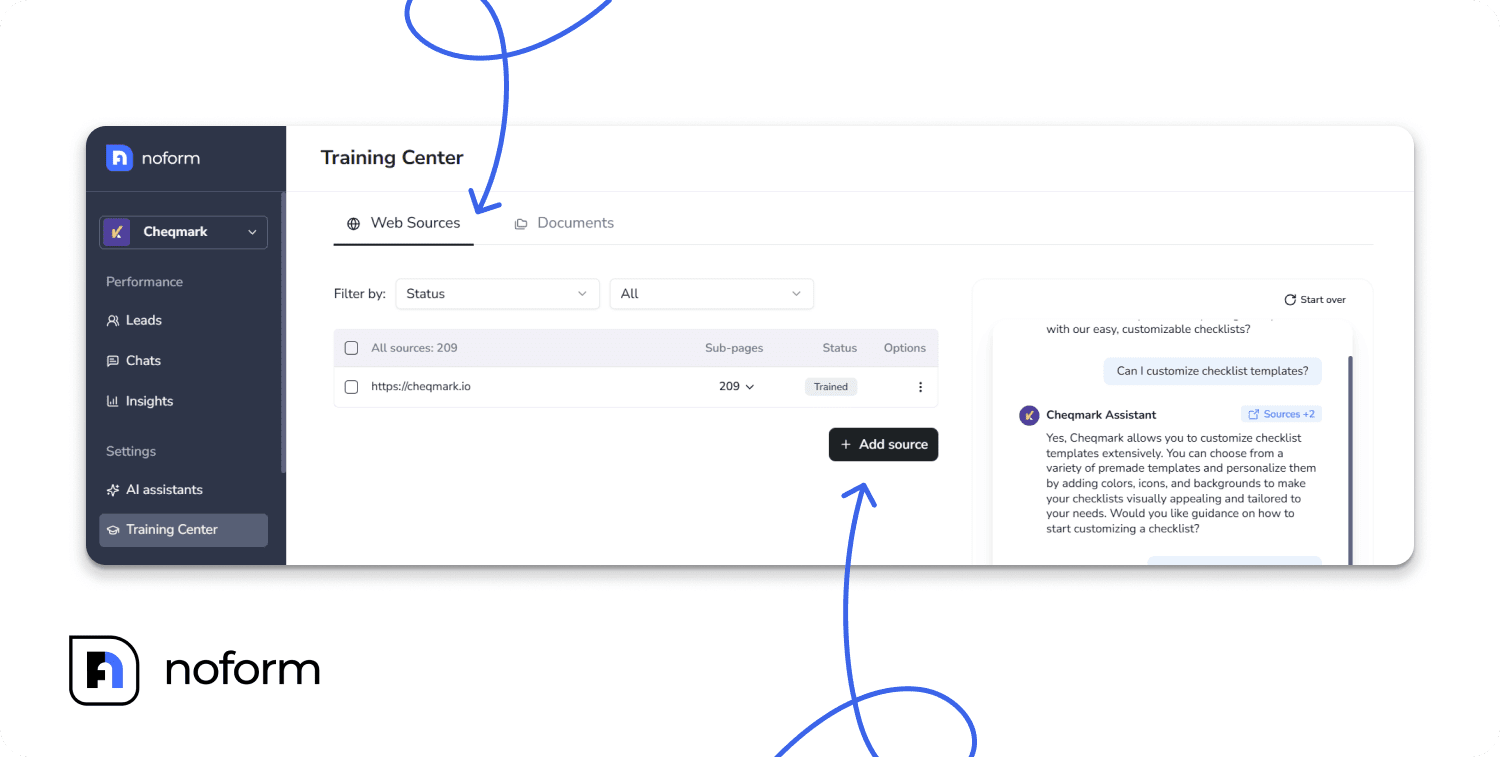
Automatic detection is a powerful feature here. If you add a main page, all the ‘child links’ (subpages) connected to that parent page will be automatically detected and added for training.
For example, if you add yourwebsite.com/blog, the Assistant can learn from every post under that section.
Once added, the AI begins processing. You can always remove or manage specific pages later if needed.
Pro tip: Start by adding key pages like your product descriptions, pricing page, your company’s FAQs, detailed service offerings, or case studies — these often contain the most valuable information your customers ask about.
Training on Documents and Files
If you have detailed product manuals, internal guides, or large PDFs, you can upload them directly.
Steps:
- Switch to the Documents tab
- Click the + Add document button
- Select and upload your files

Note: To ensure smooth processing, make sure your files meet these requirements:
- Accepted formats: .doc, .docx, .txt, and .pdf
- Maximum size: 10 MB per file
Pro tip: Upload things like product manuals, service playbooks, troubleshooting guides, or internal FAQs — anything that helps your Assistant give more specific and confident answers.
Dog Gone Taxi trained their AI on pet transportation regulations, documentation requirements, and booking procedures, enabling 24/7 customer support without adding staff.
Depending on the file size or number of pages, training can take anywhere from a few seconds to several minutes. The status will automatically update when your source is ready.
What NOT to upload
To keep your AI’s knowledge base clean and effective, avoid uploading:
- Outdated materials — Old pricing sheets, discontinued product info, or expired policies will confuse your AI
- Duplicate content — If the same information exists in multiple files and on your website, choose the most current, authoritative version
- Poorly scanned documents — Blurry PDFs or image-only scans without text recognition won’t train properly
- Password-protected or encrypted files — These will fail during processing
- Confidential information — Remember, your AI may reference this content with customers. Don’t upload anything you wouldn’t want shared publicly
- Unstructured content — Random notes, internal chat logs, or poorly formatted files make training less effective
Quality over quantity. It’s better to upload 10 well-organized, current documents than 100 outdated or redundant files.
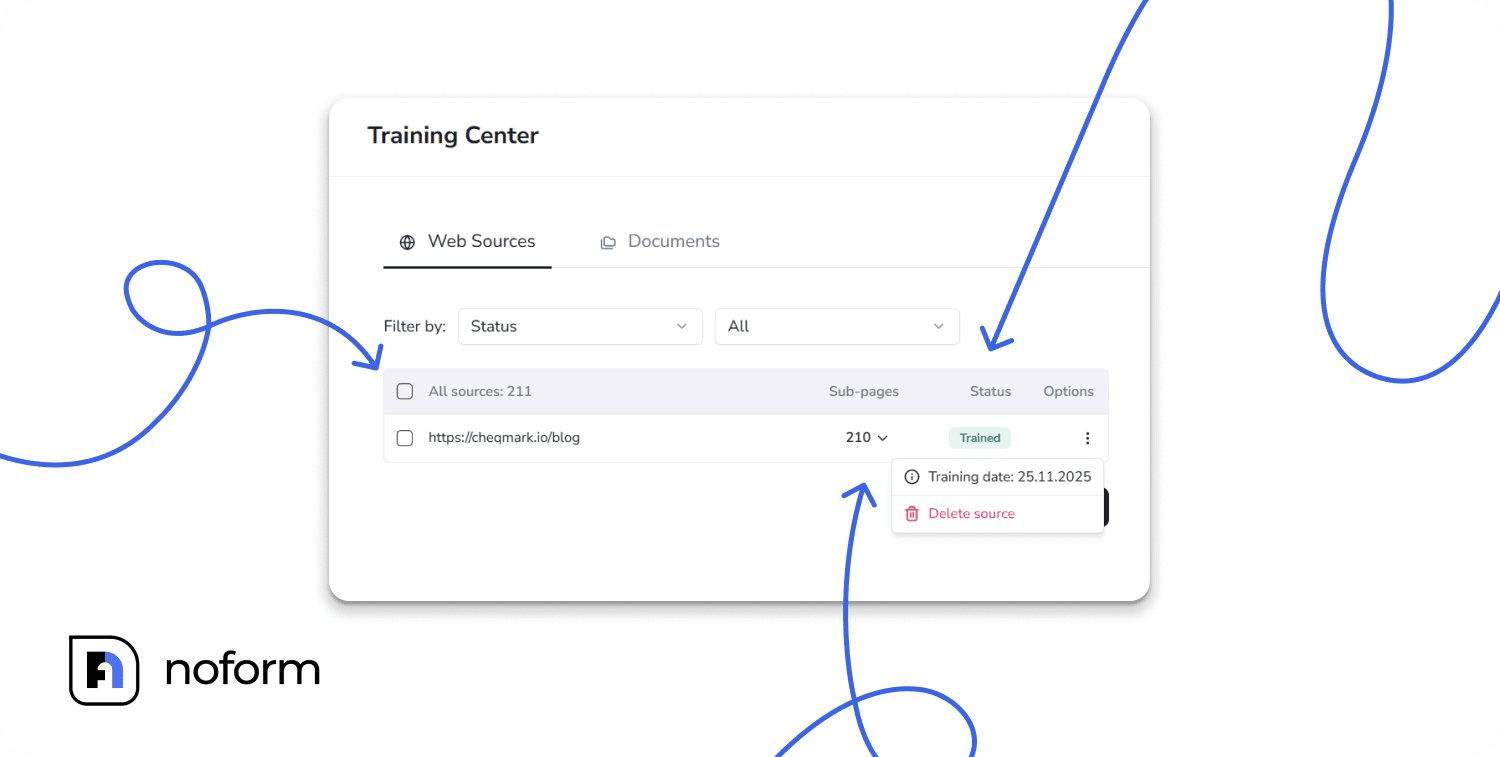
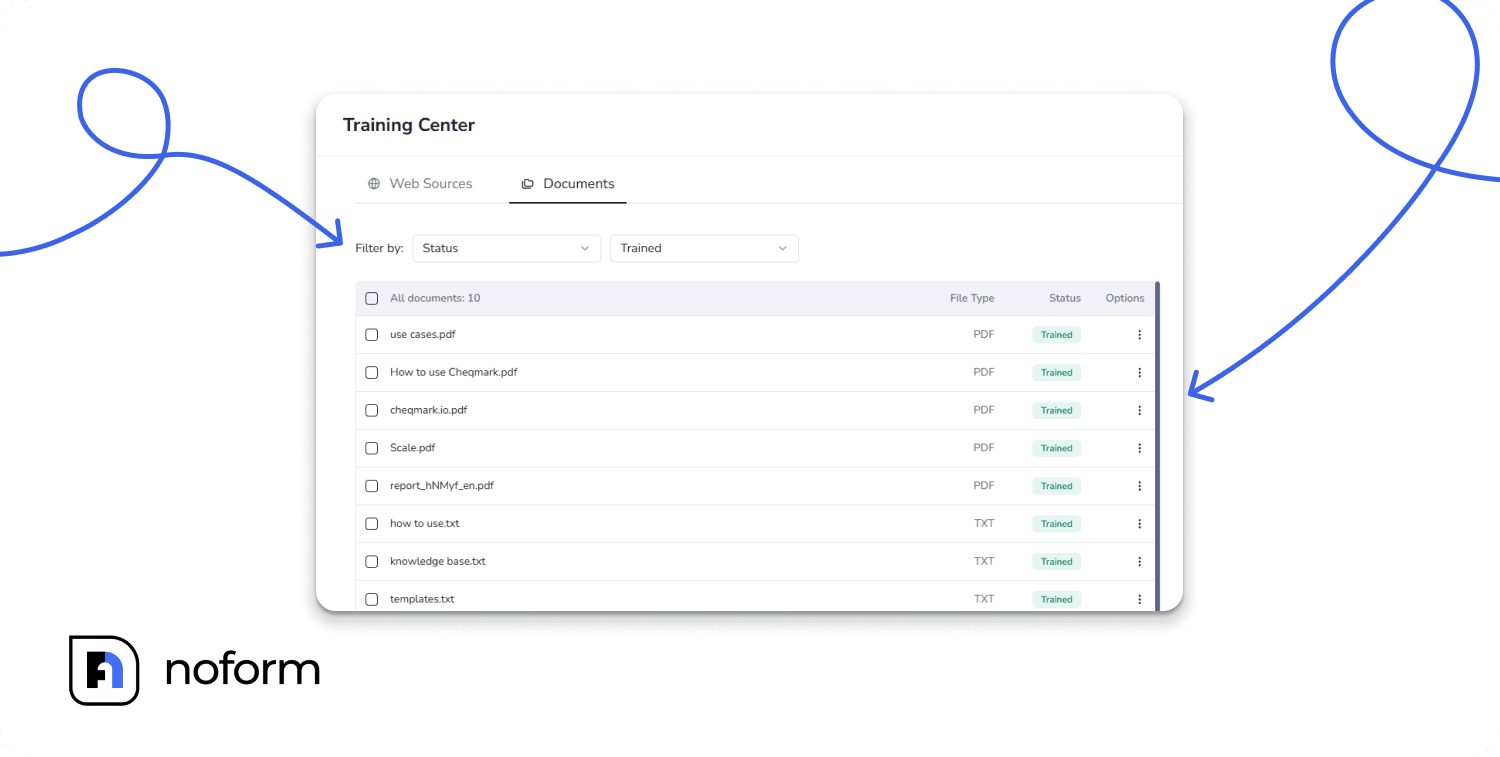
Monitoring & managing trained sources
Once you’ve added sources, they’ll appear under your All Sources or All Documents list. This is where you track their status and manage your knowledge library.
Understanding the list view
- Source: The file name or URL you added
- Status: Whether the source has been processed and is ready to use (Trained, Training, Up next, Failed)
- Training date: When the source was added or last trained
- Type (Documents only): The file format — pdf, doc, docx, txt
Status indicators explained
- Trained: Successfully processed and ready to use — your AI can now reference this content
- Training: Currently being processed — check back in a few minutes
- Up next: Queued to be trained soon — your source is in line
- Failed: Couldn’t be processed
Managing individual sources
You can manage each source using the three-dot menu:
- Delete source. Remove pages or documents if you no longer want the Assistant to use that information
- Download document (Files only). Download the original document you uploaded
Troubleshooting Failed sources
If a source shows ‘Failed’ status, here’s what to check:
Common reasons for failure
For web sources:
- The URL is broken, or the page no longer exists
- The page is password-protected or behind a login
- The website blocks automated access (bot protection)
- The page returned an error when accessed
For documents:
- The file is corrupted or unreadable
- It’s a scanned PDF without text recognition (image-only)
- The file is password-protected or encrypted
- The content exceeds processing limits
How to fix failed sources
- Check the URL or file: Make sure the link is publicly accessible or the file opens correctly on your computer
- Try a different format: If a PDF fails, try converting it to a .txt or .docx file
- Re-upload with a specific page: Instead of a parent directory, try adding the exact page URL
- Remove and retry: Delete the failed source, fix the issue, and add it again
Tip: Use the Failed filter to spot all sources that need attention quickly.
Advanced management: using filters in the training center
When your AI’s knowledge base grows, the filters become essential tools for organization, troubleshooting, and keeping content fresh.
Filtering Web Sources
In the ‘Web Sources’ tab, you can use these filters to manage links in bulk:
Filter by Source (URL)
This lets you search by the website address. You can filter by URL or domain using several options:
- URL text is exactly (find one specific URL)
- URL text contains (for example, type /blog/ to see only blog posts)
- URL text does not contain (exclude certain sections)
- URL text starts with (find all pages from a subdomain (e.g., support.yoursite.com)
- URL text ends with (filter by file type or page suffix (e.g., .pdf or /pricing))
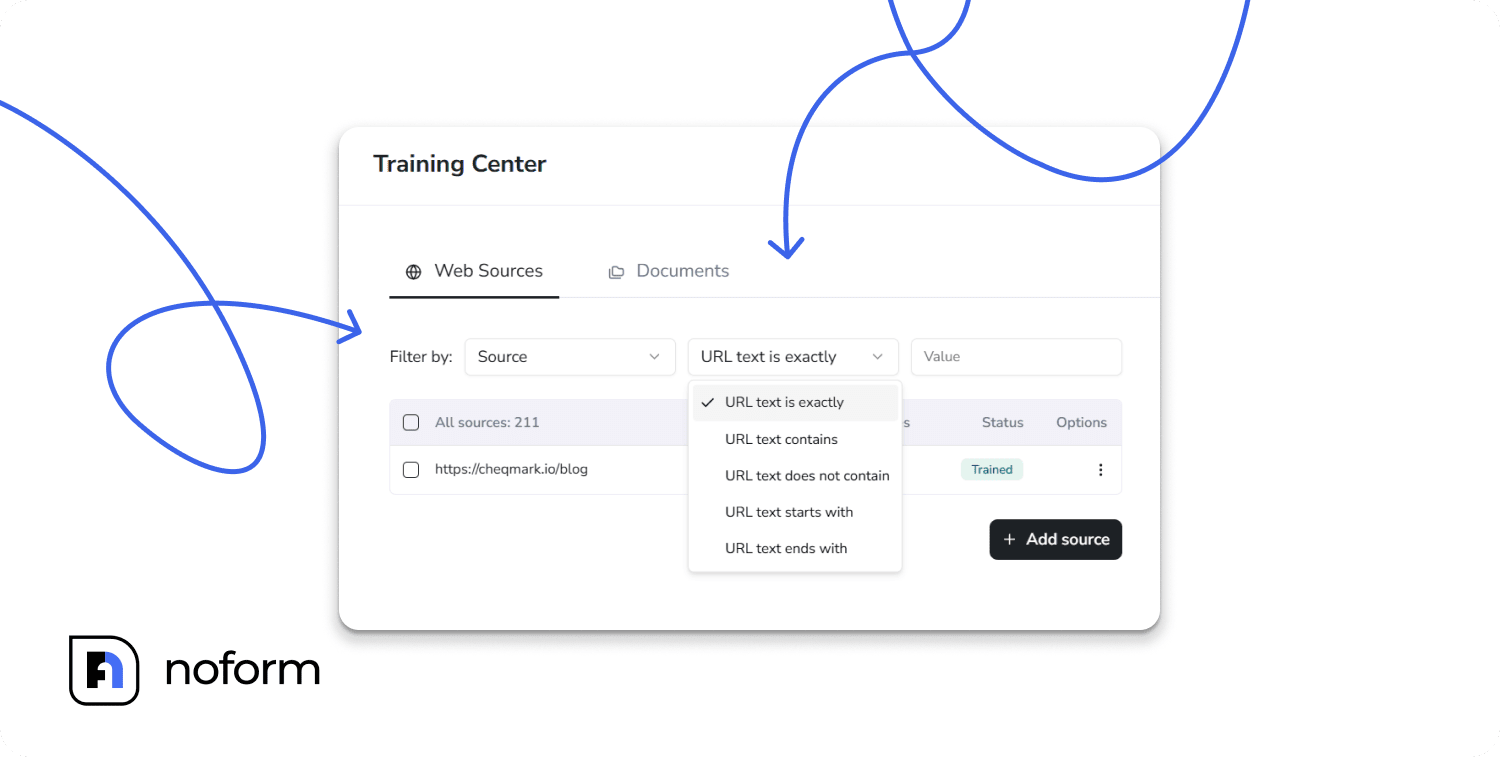
For example, filter using ‘URL text contains’ and type /support/ to quickly see all your support articles and check when they were last trained.
Filter by Status
- All: Every source, regardless of status
- Trained: Successfully processed and ready to use
- Training: Currently being processed
- Up next: Queued to be trained soon
- Failed: Couldn’t be processed
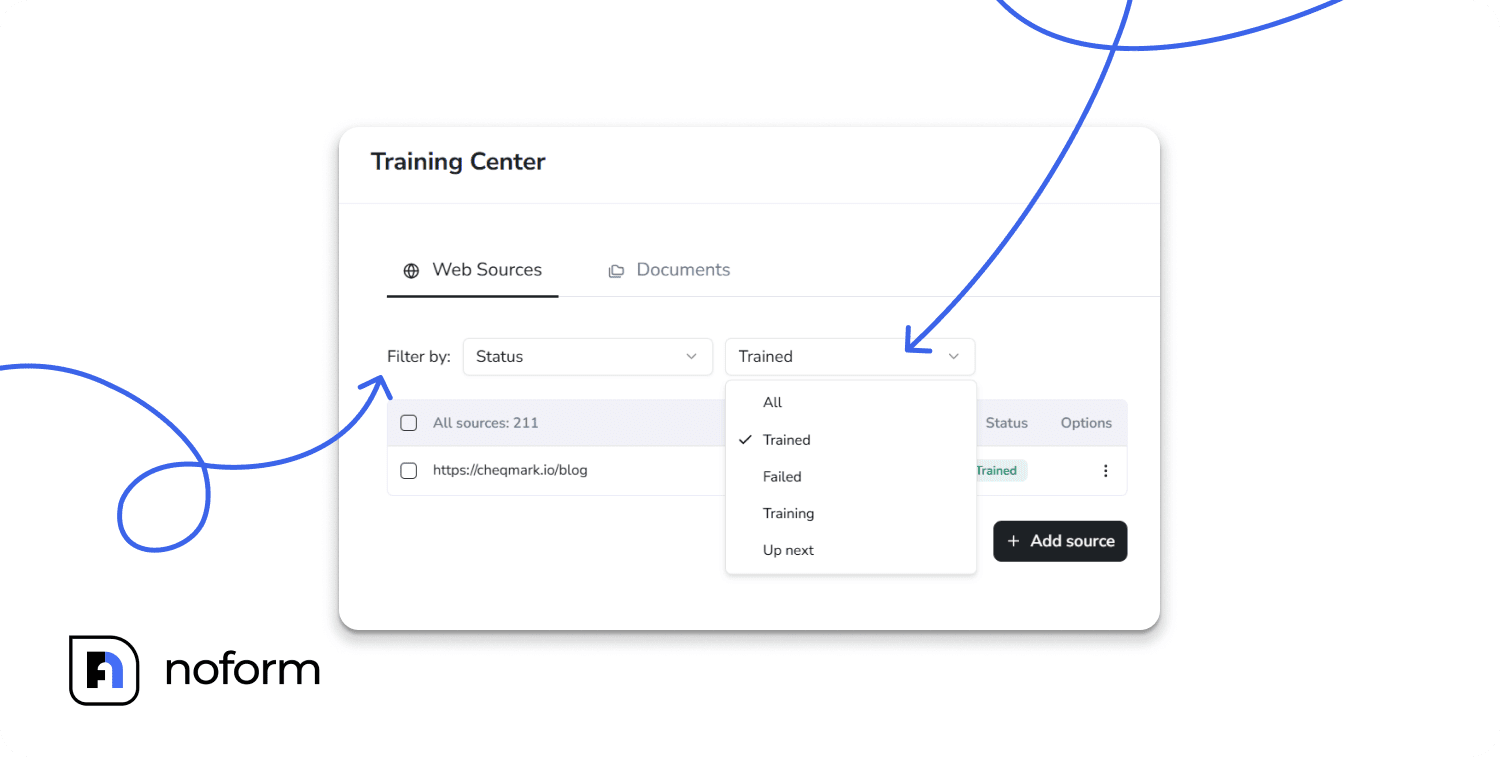
Tip: This is essential for tracking progress or fixing errors. Use the Failed filter to quickly spot any links that couldn’t be processed, investigate the issue, and retrain them with one click.
Filter by Training date
Keep your Assistant’s knowledge fresh by tracking how old each source is. Filter by:
- 1 week, 2 weeks, 1 month, 3 months, 6 months, 1 year, or more than 1 year.
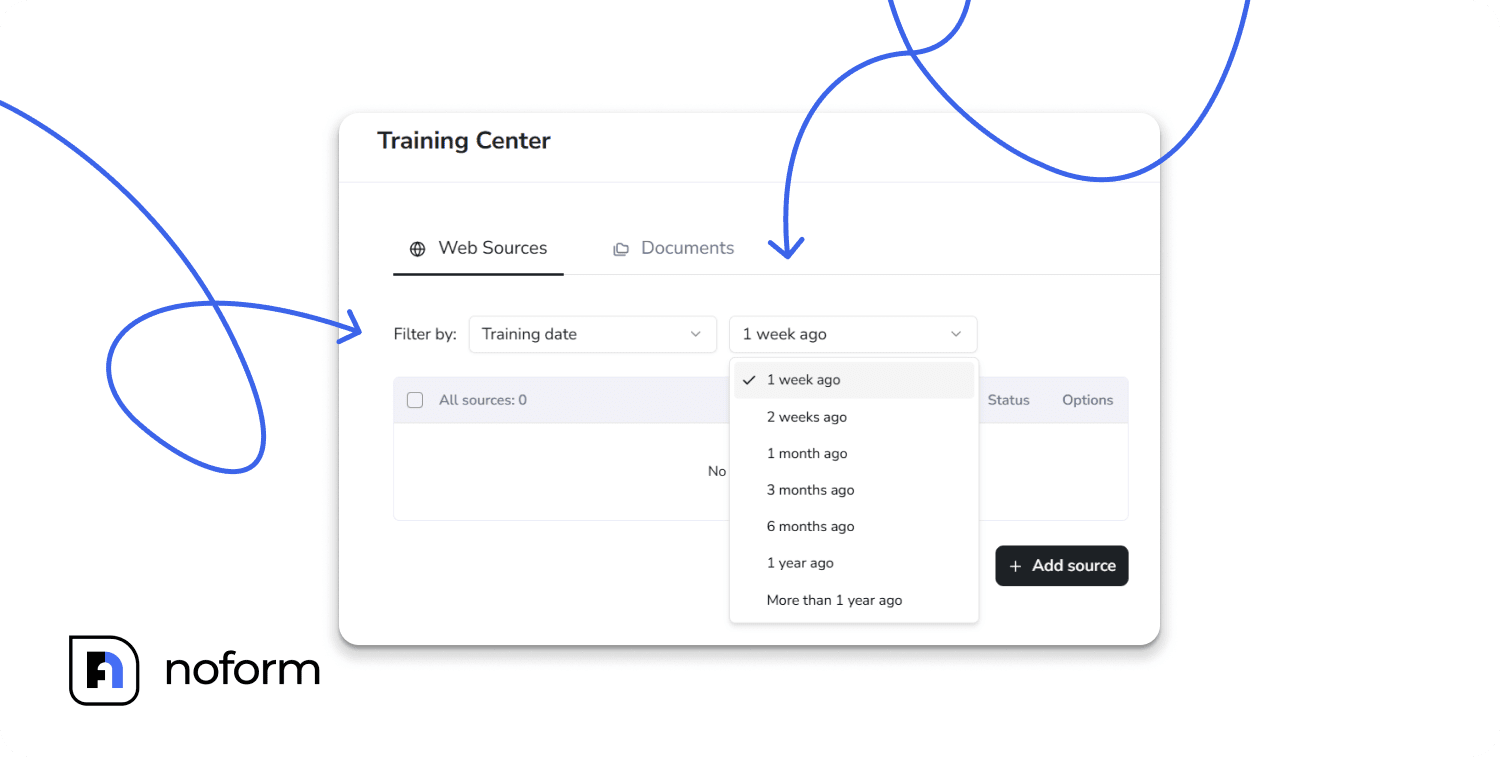
Tip: Set a calendar reminder every 3 months to use the Training Date filter. Find sources older than 6 months and retrain or replace them. This ensures your Assistant always uses the most accurate, up-to-date information — especially important for pricing, policies, and product details that change regularly.
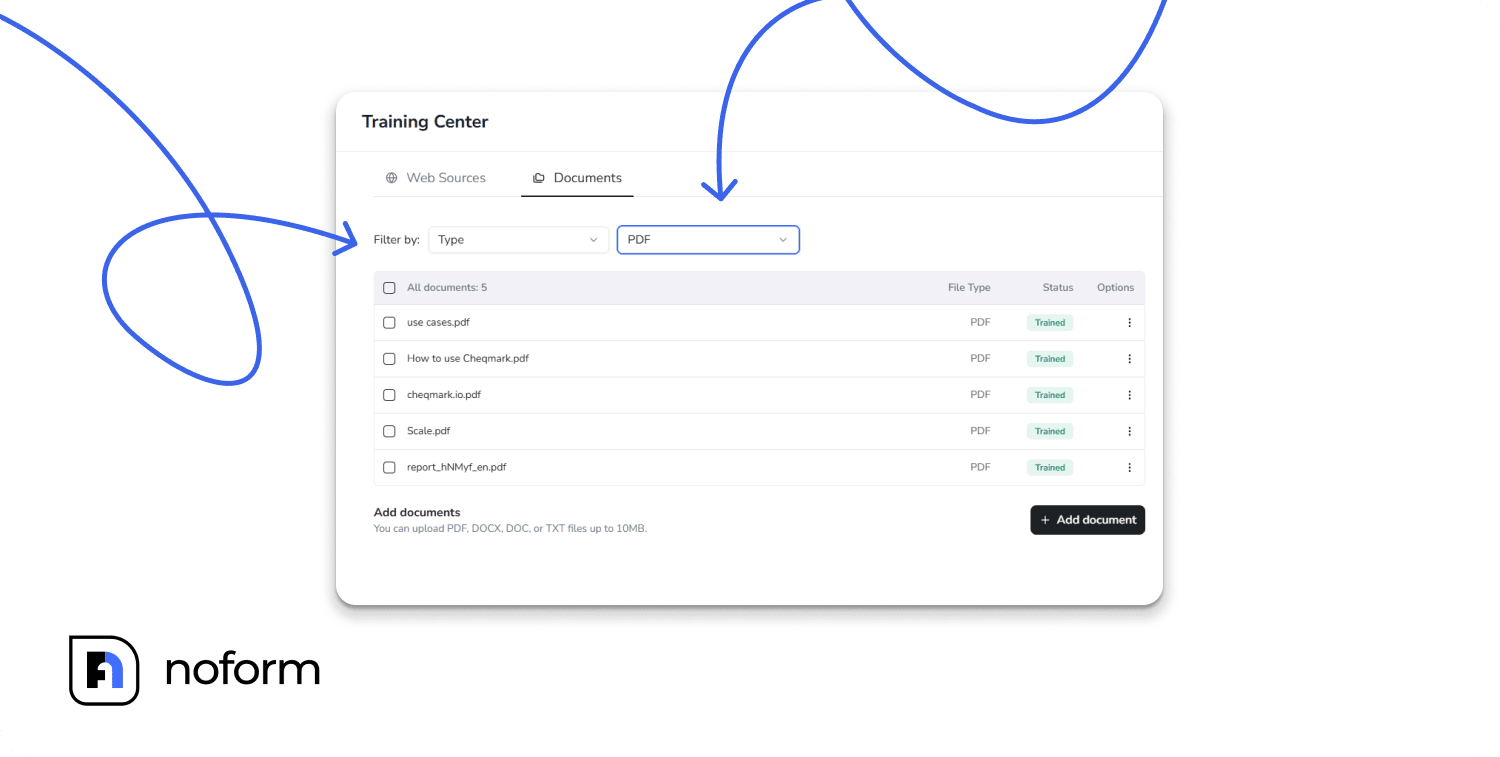
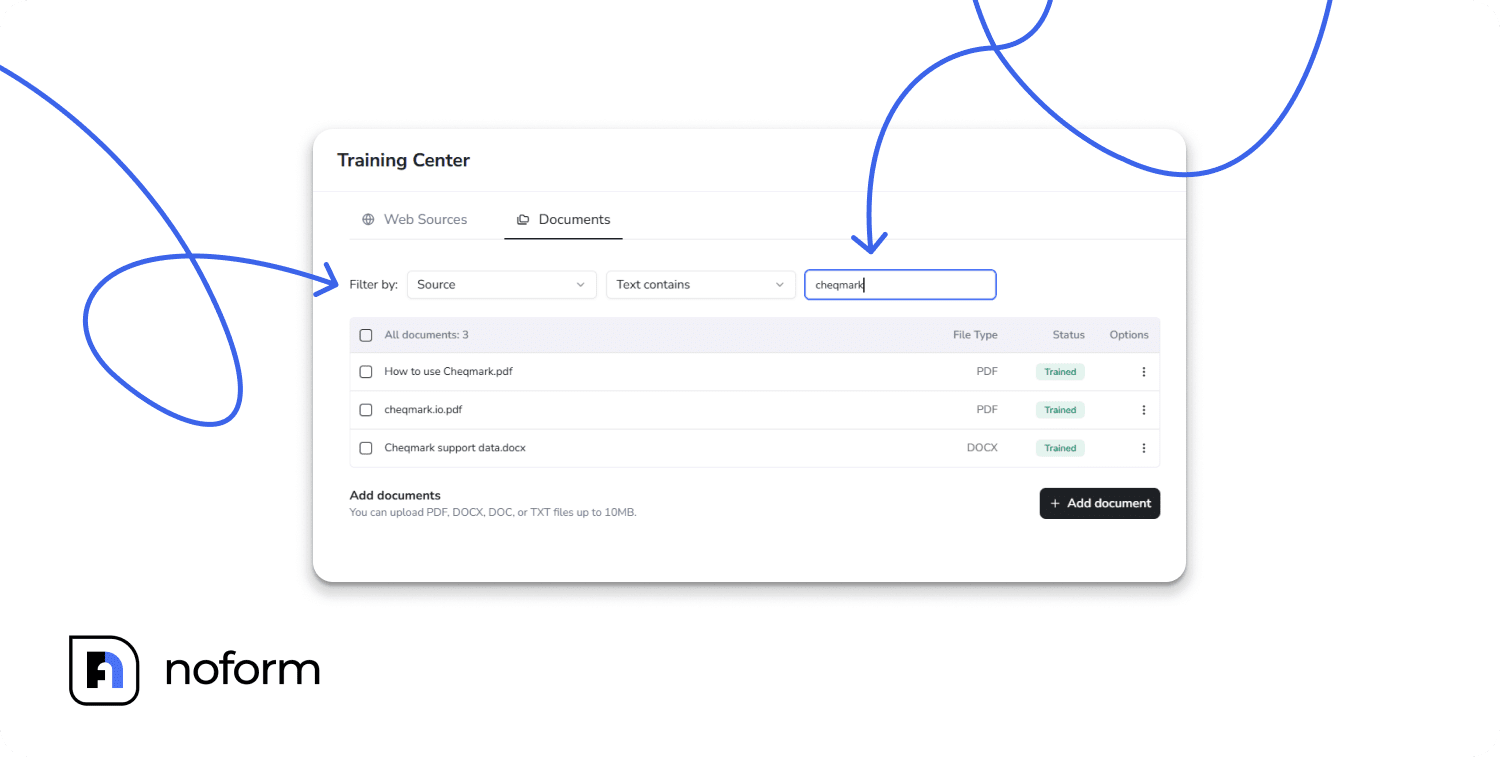
Filtering Documents
In the Documents tab, you can filter by:
Filter by Status
Check if your uploaded documents are Trained or if any Failed to upload.
Filter by Type
Find documents quickly based on their format: pdf, doc, docx, txt.
Filter by Source (file name):
- Search for documents by keywords in their file names. For example, search for ‘Q3 Report’ or ‘Manual’ using the ‘Text contains’ option.
- You can search by ‘text contains,’ ‘starts with,’ or ‘ends with.’
Why training your AI assistant matters
Training your AI Assistant on your own materials does more than just fill a knowledge gap — it transforms how effectively it represents your business.
Without training, your chatbot can only rely on default instructions and general AI knowledge.
Customer: “What’s your refund policy for custom orders?”
AI: “I don’t have specific information about that. Please contact support.”
Once trained with your real materials — like a Custom Order Policy PDF — the experience changes completely:
Customer: “What’s your refund policy for custom orders?”
AI: “For custom orders, you have 14 days to request a refund if the product arrives damaged or doesn’t match your specifications. Please email [email protected] with your order number and photos of the issue.”
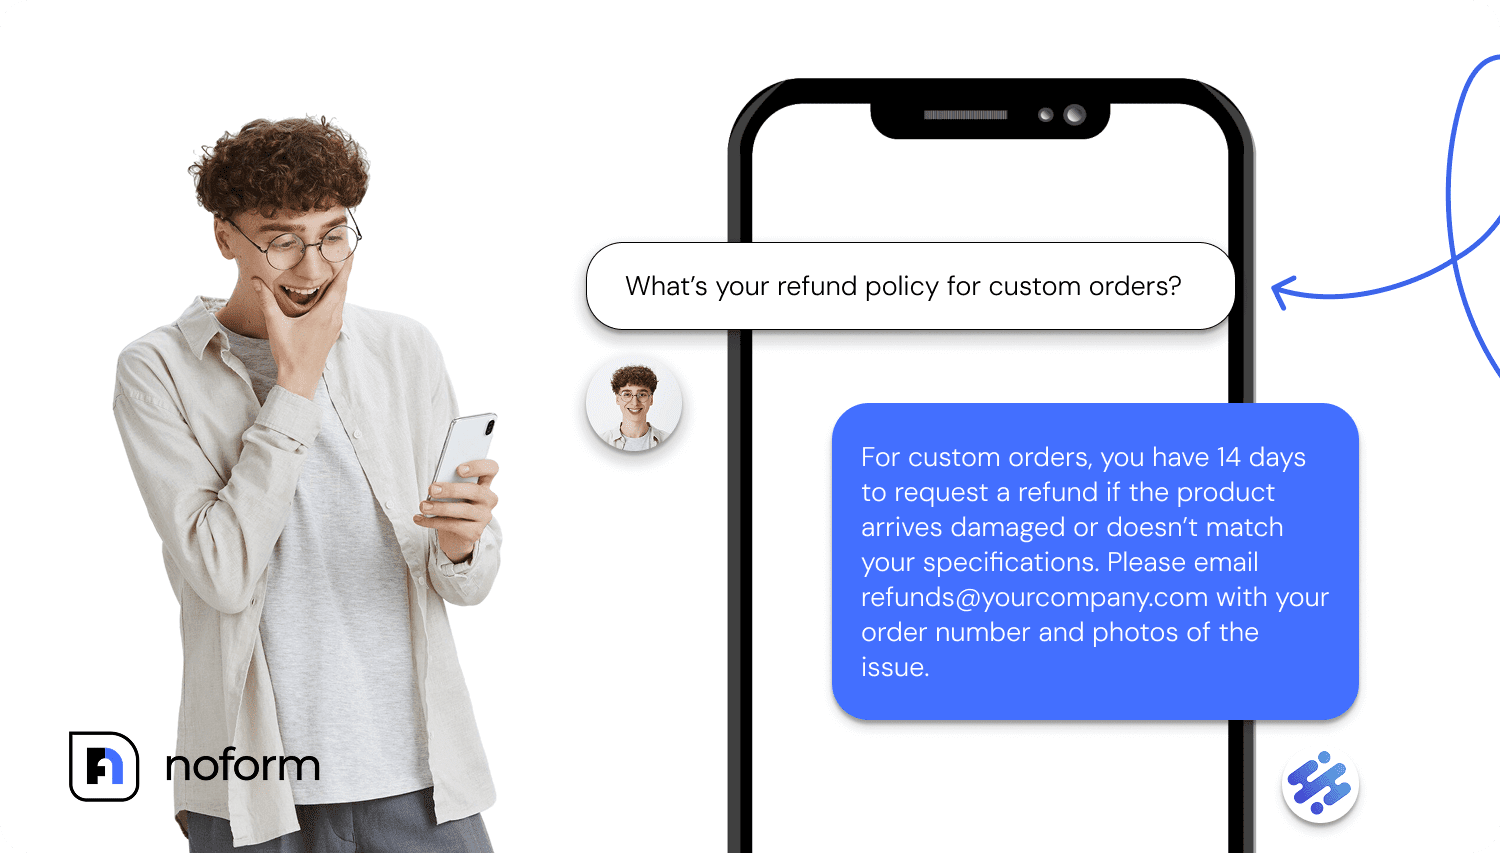
That’s the power of training. By feeding your Assistant accurate, up-to-date documents and web pages, you turn it into a truly informed member of your team.
Key benefits of training your AI assistant:
- Accuracy and detail. It ensures the AI provides accurate, detailed, and specific responses related to your business.
- Always current. By keeping the Training Center up to date, the AI stays current with new business updates, promotions, and product changes.
- Contextual knowledge. Your Assistant speaks authentically about your brand — using your language, understanding your tone, and reflecting your expertise.
This takes your chatbot far beyond default scripts. It becomes a reliable, up-to-date extension of your team.
Best practices for maximum effectiveness
To get the most out of your trained AI, follow these simple tips:
-
Prioritize high-value content
Focus on uploading core materials your customers frequently ask about: FAQs, product manuals, and troubleshooting guides.
-
Re-train regularly
Use the Training date filter to retrain or replace older content regularly (especially anything over 6 months old).
-
Keep documents clean and readable
Before uploading, remove anything that doesn’t add value to the content — such as headers, footers, page numbers, or excessive white space. Clean, focused text helps your Assistant process the information more efficiently and improves the quality of its learning.
-
Format well
Make sure your documents are well-organized and easy to follow. Use clear headings, bullet points, and sections to break down information logically. A well-structured document helps the AI understand context, hierarchy, and relationships between topics, leading to more accurate and confident responses.
-
Use descriptive file names
Instead of document_final_v3.pdf, use 2024_Product_Manual_ModelX.pdf. This makes management easier as your library grows.
-
Use filters often
Regularly check for outdated, failed, or duplicate sources before they cause confusion. A monthly review takes just a few minutes.
-
Break up giant files
If you have a single 100-page manual, consider splitting it into smaller, logically themed PDFs (e.g., “Product Setup,” “Troubleshooting,” “Warranty Details”).
This can improve the AI’s ability to pull out specific, focused answers.
-
Focus on clarity, not volume
Uploading hundreds of similar pages or outdated materials can dilute your Assistant’s responses. Prioritize the most accurate, current content.
-
Monitor customer interactions
Review conversations where the AI struggled or gave incorrect answers. This reveals gaps in your training that need to be filled.
Make your AI smarter, starting today
When your AI Assistant is trained on the right materials, it stops being “just another chatbot” and starts acting like a real member of your team.
With NoForm’s Training Center, you can upload, manage, and refine its knowledge anytime — ensuring it always gives accurate, helpful answers to your website visitors.
Ready to boost your AI’s performance? Log into your NoForm AI dashboard and start adding your unique business sources today!
Frequently Asked Questions (FAQ)
How do I train my NoForm AI chatbot?
To train your NoForm AI chatbot, navigate to the Training Center in your dashboard and upload your business data. You can train the AI using Web Sources (by entering your website URL) or Documents (by uploading PDFs, Word docs, or text files). This process allows the AI to learn your specific business information, enabling it to answer customer questions accurately without using generic scripts.
What file formats can I upload to NoForm AI?
NoForm AI currently supports .doc, .docx, .txt, and .pdf file formats. Each file must be under 10 MB in size. For the best results, ensure documents are text-readable (not image-only scans) and free of password protection or encryption.
Will NoForm AI automatically learn from my website subpages?
Yes, NoForm AI features automatic detection for web sources. When you add a main parent URL (e.g., yourwebsite.com/blog), the system automatically detects and includes connected ‘child links’ or subpages for training. You can then manage or remove specific pages individually within the Web Sources tab.
Why is my training source showing a ‘Failed’ status?
A ‘Failed’ status typically occurs if the URL is broken, the page is behind a login/password, or if a document is corrupted. For web sources, ensure the site does not block bots and is publicly accessible. For documents, check that the file is not encrypted, password-protected, or an image-only PDF without text recognition.
How often should I retrain my AI chatbot?
You should retrain your AI chatbot whenever your business content changes significantly, such as after updating pricing, policies, or product features. It is best practice to review your Training Center every 3 to 6 months using the ‘Training Date’ filter to spot content older than 6 months and refresh it to ensure accuracy.
Can I train the chatbot on confidential or internal documents?
While you can upload internal documents, you should avoid uploading confidential or sensitive information (like private customer data or unreleased financial records). The AI uses uploaded content to generate answers for your users, so only upload information that you are comfortable potentially sharing with a customer during a chat interaction.