A single, generic chatbot works okay for simple sites. But usually, websites have multiple goals across different pages. Your pricing page needs to convert, your help page needs to support, and your product pages need to educate. Every page serves a different purpose and requires a different conversation.
So why make one bot do it all?
That’s exactly why NoForm AI lets you create multiple AI Assistants, each tailored to a specific page, service, or audience segment.
You can have a Sales Assistant for pricing pages, a Support Assistant for your help center, or even a Multilingual Assistant for your international pages.
The result: more natural conversations, higher engagement, and better lead conversion.
In this post, we will show you, step-by-step, how to create, customize, and deploy multiple assistants in NoForm AI so each page has the right helper.
How multi-assistant setup works
Simply put, it’s using different AI assistants on different sections of your website, each one customized for that specific purpose or industry need.
The primary goal is to adapt the AI’s behavior based on where it appears on your website and what visitors are trying to accomplish there.
When should you use a specialized assistant?
|
Page type |
Recommended assistant role |
Why it works |
|
Pricing / Sales Pages |
Sales Assistant |
Focuses on overcoming objections, explaining value, and driving a demo/purchase. |
|
FAQ / Troubleshooting |
Support Assistant |
Delivers clear, patient solutions for common problems, reducing support tickets. |
|
Onboarding / Dashboard |
Navigation Assistant or Educator Assistant |
Acts as a friendly guide, highlighting key features and simplifying product exploration. |
Each assistant can have its own tone, behavior, and lead-qualification rules. This means your visitors get precisely the proper conversation for what they’re trying to do, rather than a one-size-fits-all experience.
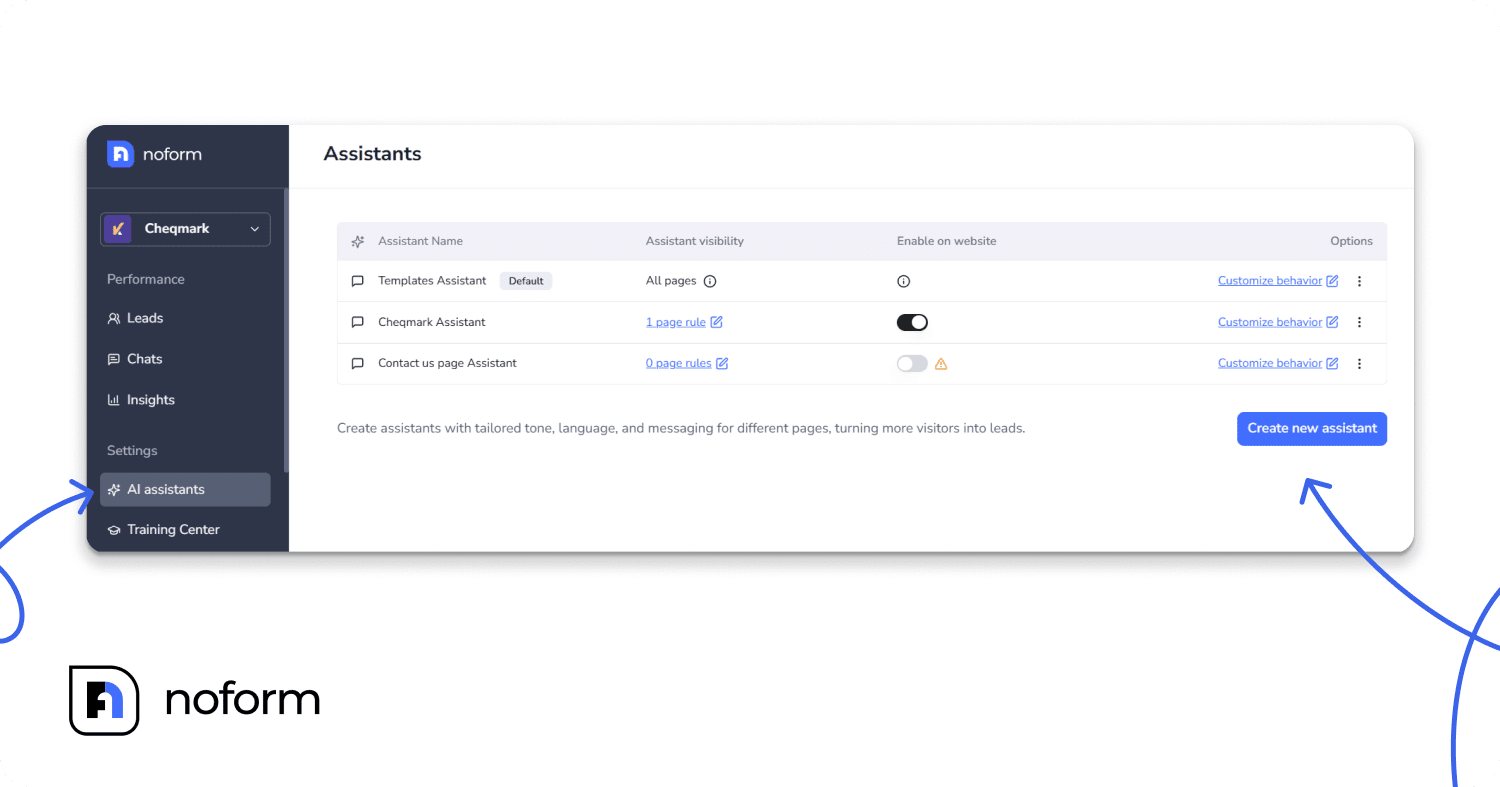
Step 1: Creating your AI assistants
Starting the creation process
Log into your NoForm AI dashboard → AI Assistants → Create Assistant.
This opens up the assistant builder where the customization happens.
Give it a meaningful name
The first step is naming your assistant something specific. Instead of “Chat Bot,” use descriptive names like: “Pricing Page Sales Bot”, “API Support Expert”, or “French Product Guide”. Keep it descriptive (0–50 characters). This keeps things organized as you build multiple assistants.
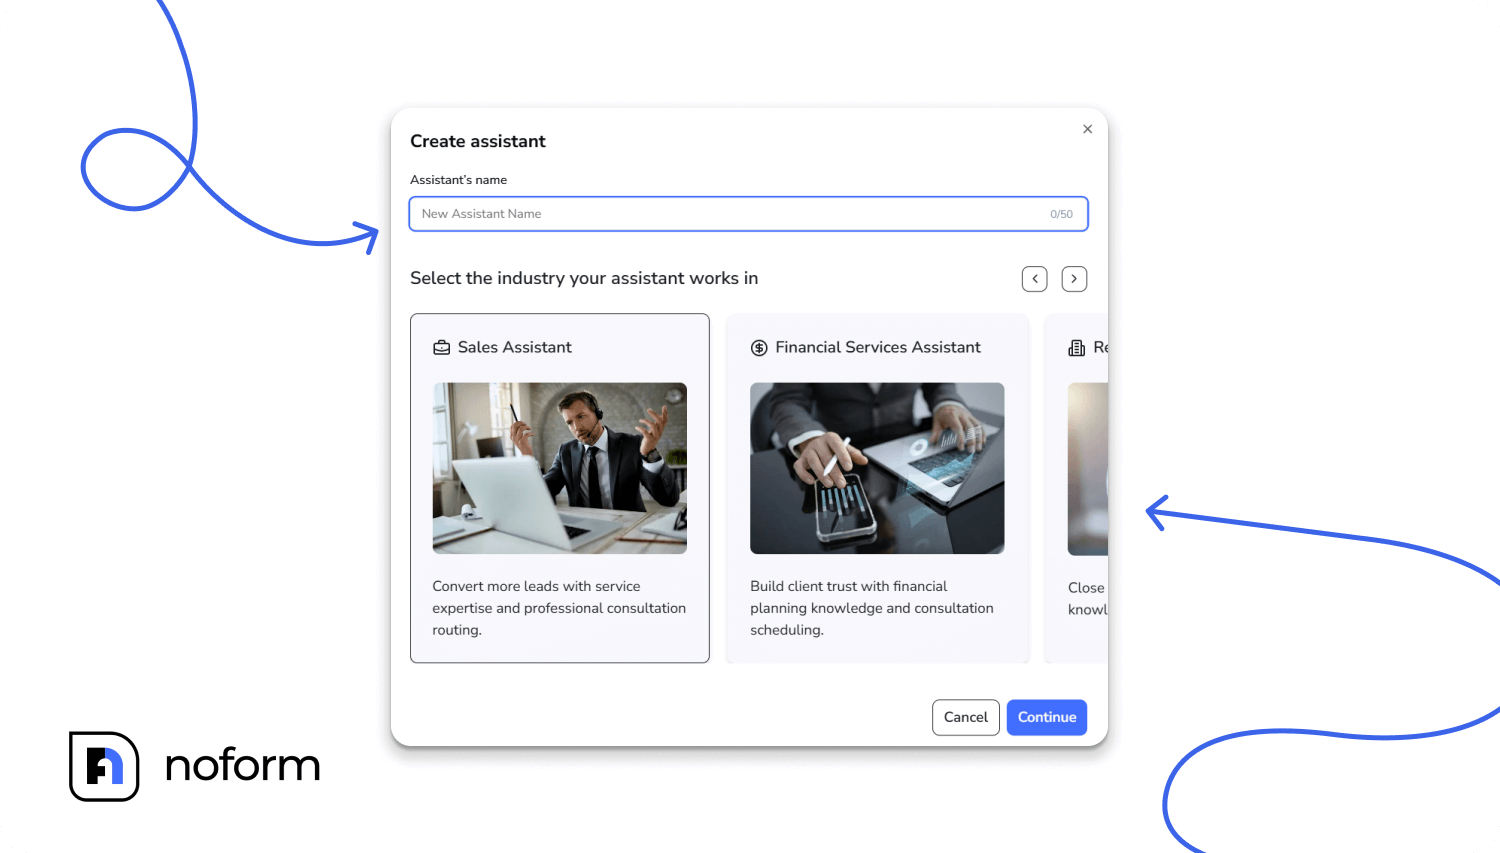
Choose your assistant template
NoForm offers pre-built templates tailored to specific industries and use cases. You can select from:
- Sales Assistant (for conversions and lead generation)
- Support Assistant (for customer support and troubleshooting)
- Healthcare Assistant (for medical and health-related services)
- Real Estate Assistant (for property sales and listings)
- E-commerce Assistant (for online retail)
- Financial Services Assistant (for banking and financial advice)
- Insurance Assistant (for insurance products)
- Car Dealership Assistant (for vehicle sales)
- Banking Assistant (for banking support)
- Pet Services Assistant (for pet care businesses)
- Roofing Assistant (for roofing and construction services)
Each template comes with a unique set of pre-filled instructions built for that industry, so you’re not starting from scratch.
Define the assistant’s core identity
Now comes the fun part—making your assistant actually sound right for its job. In the Setup tab, you’ll configure two key things:
Assistant’s role
First, pick the Assistant’s role. This is the primary function it’ll perform:
- Sales Assistant. Drives decisions and conversions. Use this for pricing pages, product demos, and sales-focused content.
- Support Assistant. Listens carefully and solves problems. Perfect for help centers and FAQ pages.
- Educator Assistant. Teaches step-by-step. Great for onboarding and documentation.
- Navigation Assistant. Guides visitors through your product or website. Ideal for dashboards and landing pages.
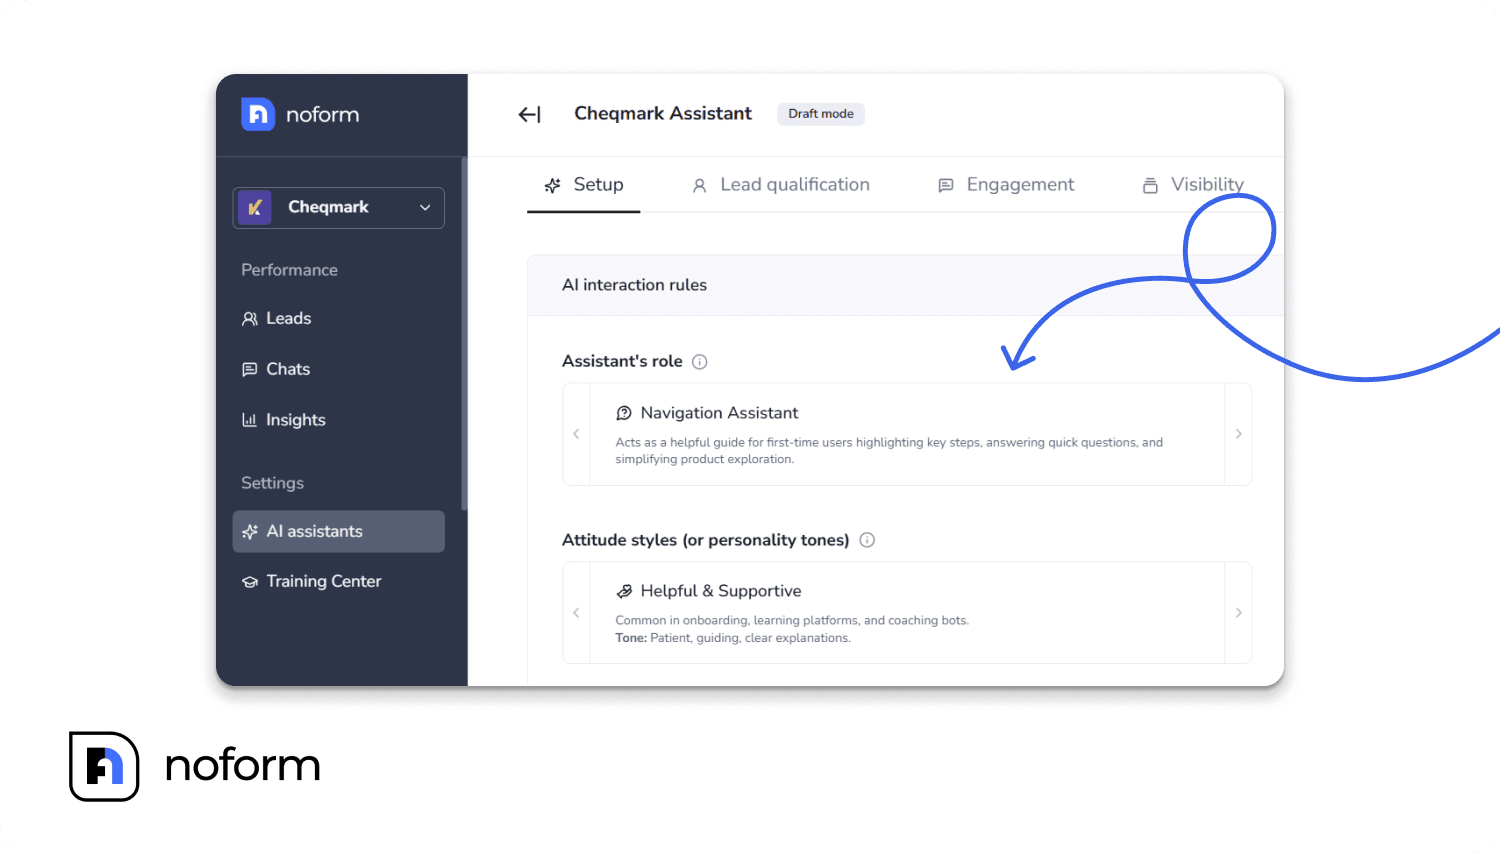
Attitude / Personality
Next, choose an Attitude style (personality tone). This is what makes your assistant feel natural and aligned with your page:
- Professional & Polished. For B2B, finance, legal, and healthcare. Clear, respectful, formal tone.
- Friendly & Approachable. For customer service and e-commerce. Warm, upbeat, conversational.
- Casual & Playful. For lifestyle brands and younger audiences. Chill, witty, sometimes humorous.
- Helpful & Supportive. For onboarding and learning. Patient, guiding, with clear explanations.
- Smart & Insightful. For data tools, analytics, and B2B SaaS. Confident, informative, efficient.
- Inspiring & Motivational. For wellness and personal development. Uplifting, positive, goal-oriented.
- Calm & Reassuring. For mental health, meditation, or sensitive topics. Soothing, gentle, empathetic.
- Neutral & Minimal:. When you want pure function. Direct, objective, to the point.
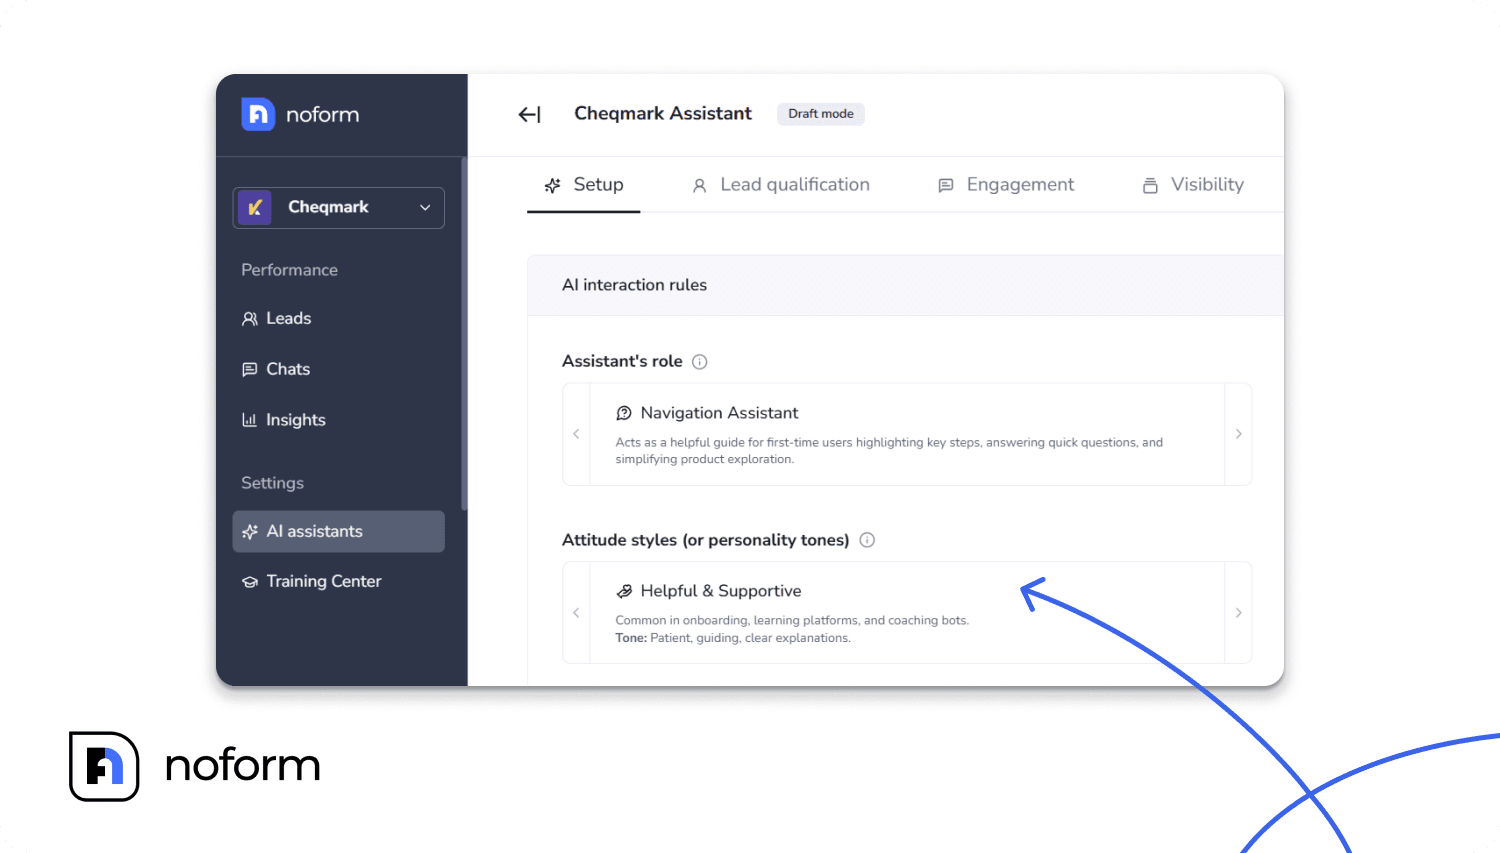
Note: The tone and role you choose will apply across that assistant’s responses, so pick one that fits the page’s audience and intent.
Set up details on products/services
This section is where you teach your assistant what it needs to know for its specific page:
- Product Information: The details about the product or service on that specific page.
- Pricing / Refunds: Clearly state pricing or refund policies to reduce confusion.
- Enrollment or Purchase Process: Write out the step-by-step flow so the assistant can guide people smoothly.
- Contact Real Person: Tell your assistant when to hand off to a human and what options (email, live chat, phone) are available.
- Compare to Alternatives: Arm your Sales Assistant with talking points on why your service is better.
- Support / Troubleshooting: List the most common problems and their solutions for your Support Assistant to handle effectively.
- Language Setup: If your audience is international, add language preferences so visitors can get help in their preferred language.

These fields help the assistant give precise, consistent answers without manual scripting.
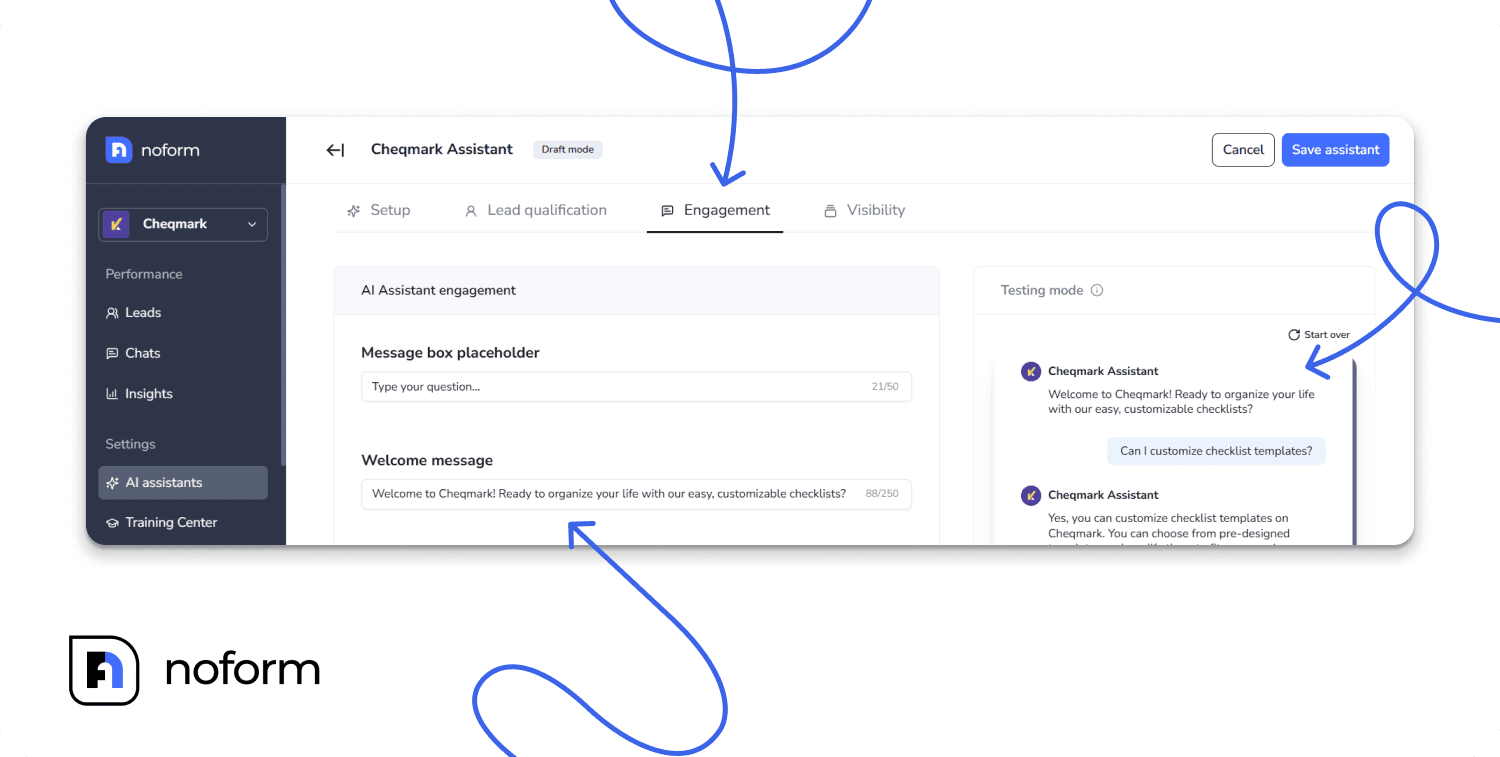
Step 2: Customize engagement for each assistant
Now it’s time to make your assistant actually engaging and effective for visitors. This happens in the Engagement Tab.
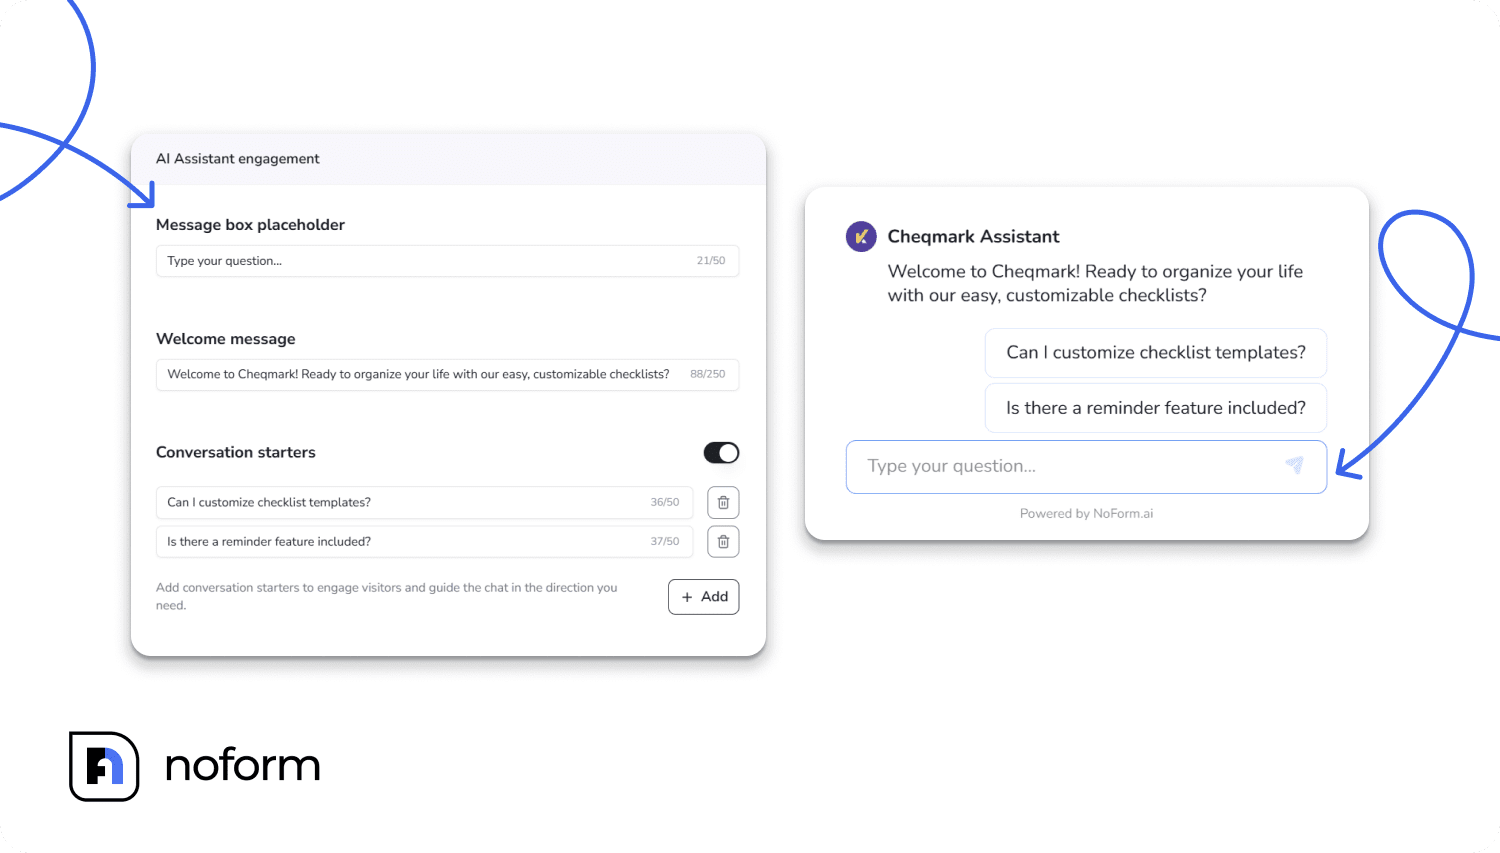
Welcome message
Craft a context-specific welcome message. This is the first thing visitors see, so make it count. Instead of a generic “How can I help?” try something that matches the page:
- On your pricing page: “Ready to find the perfect plan? Ask me about our features or refund policy!”
- On your support page: “Something not working? I’m here to help you troubleshoot.”
- On your product page: “Curious about how this works? I’ve got all the details.”
Conversation starters
Add conversation starters. These are suggested questions that guide visitors toward what you want them to do. They reduce friction and get conversations started faster:
- For a pricing page: “Compare our plans,” “What’s included in Pro?” “Do you have a free trial?”
- For a support page: “How do I reset my password?” “Why isn’t my integration working?” “How do I cancel?”
- For a product page: “What’s the return policy?” “Do you offer bulk discounts?”
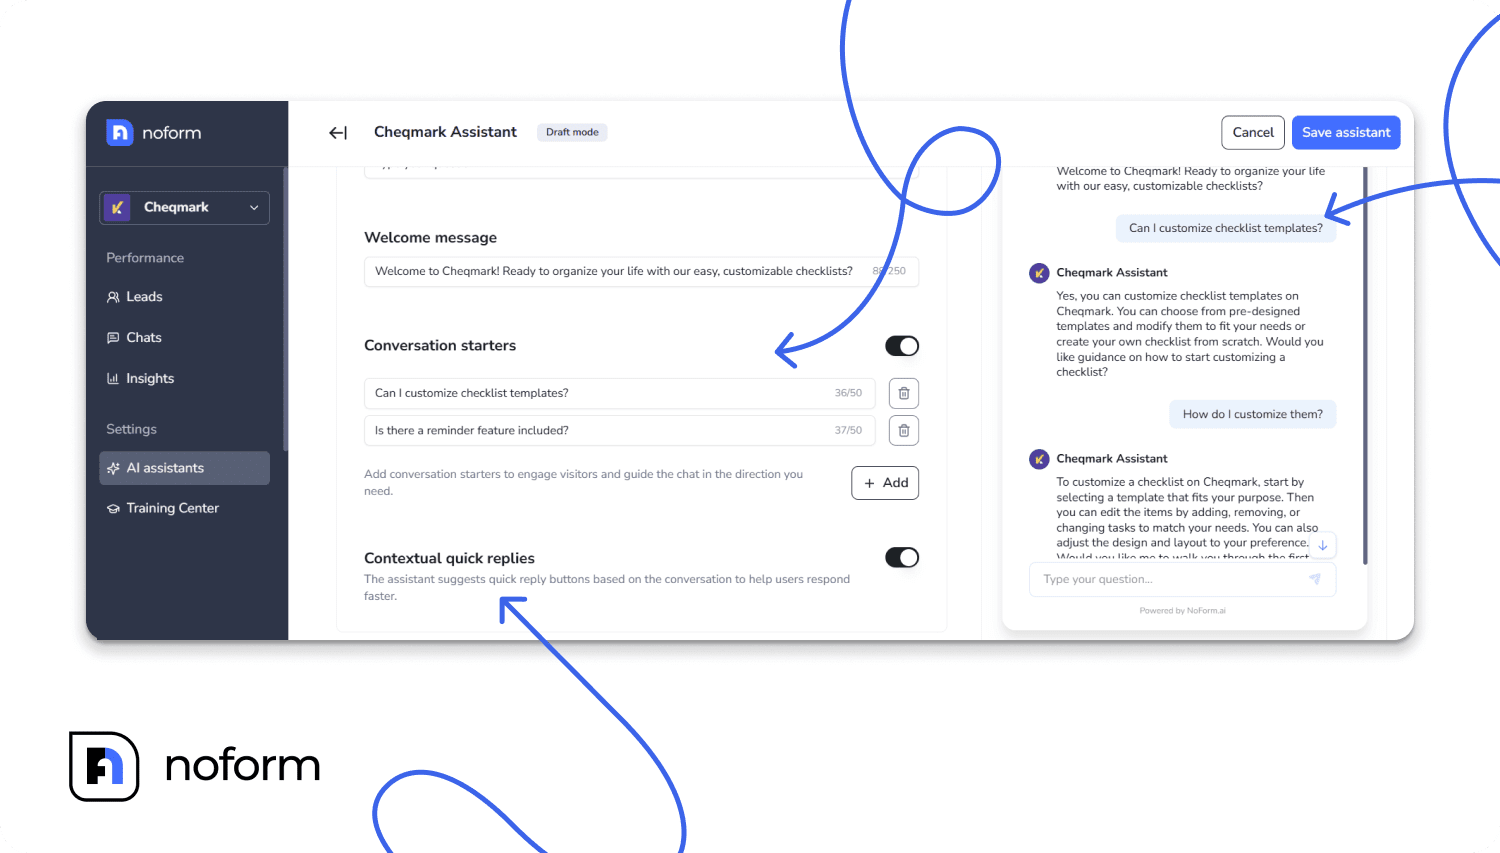
Contextual quick replies
When you enable this, the AI suggests reply buttons during the conversation to make responses easier and faster. The AI intelligently suggests options based on what’s being discussed, so the conversation flows naturally.
Customize the message box placeholder
This is the hint text visitors see in the chat input field before they type anything. Instead of a generic “Type here,” personalize it to match the context and your assistant’s tone.
- On a pricing page: “Ask about our plans…”
- On a support page: “Describe your issue…”
- On a product page: “Tell me what you need…”
Step 3: Set up lead qualification rules
Every visitor who engages with your assistant is a potential lead. In the Lead Qualification Tab, decide what counts as a lead and what information this specific assistant should collect from visitors.
Set required lead attributes
You’ll collect essentials like email and phone. You can toggle off one of them if you don’t need both—for example, maybe you only need email. When either email or phone is captured, the chat is automatically qualified as a lead.

Set custom attributes
Beyond email and phone, you can define custom data points the assistant should capture. For example:
- “Company Size” (for B2B sales)
- “Ticket ID” (for support conversations)
- “Property Type” (for real estate)
- “Issue Type” (to categorize support requests)
This flexibility ensures you’re collecting the right data in the right context. Your sales assistant might collect company and budget. Your support assistant might collect issue type and urgency level.
Step 4: Set visibility: show different bots on different pages
This is the most important step for deploying your multi-assistant strategy. In the Visibility Tab, you’ll tell NoForm exactly which bot to show where.
Understanding page rules
After customizing your assistant, click on the Visibility tab for the assistant.
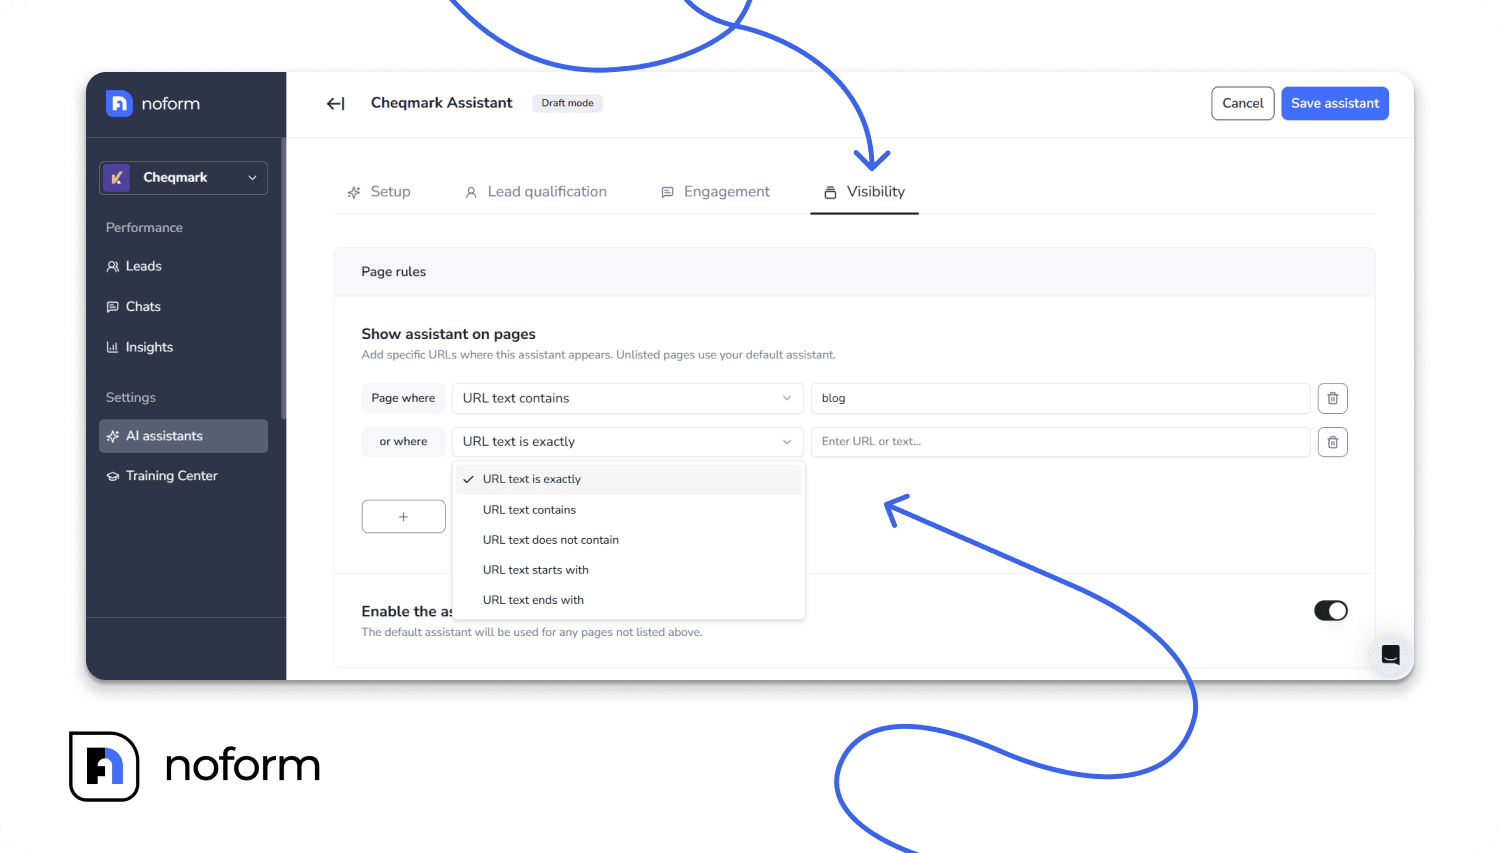
Go to the Page rules section and define where this assistant appears. Here’s how it works:
You use flexible URL matching rules to target specific pages or groups of pages. The options are:
- “Contains” – The URL contains a specific text string. Example: If you use “/pricing”, the assistant appears on /pricing, /pricing-plans, /enterprise-pricing, etc.
- “Is exactly” – The URL matches precisely. Example: https://yoursite.com/pricing shows the assistant only on that exact page
- “Starts with” – The URL begins with specific text. Example: “/help” matches /help, /help/faq, /help/contact, etc.
- “Ends with” – The URL ends with specific text. Example: “.pdf” could match all PDF pages
Real-world examples:
Single pricing page: Your “Pricing Page Sales Bot” uses:
- Rule: “Is exactly” → https://yoursite.com/pricing
- Result: This assistant only appears on your pricing page
Entire support section: Your “Support Assistant” uses:
- Rule: “Starts with” → /help
- Result: This assistant appears on /help, /help/faq, /help/contact, /help/integration-guide, etc.
Language-specific pages: Your “French Assistant” uses:
- Rule: “Starts with” → /fr/
- Result: All French pages (/fr/accueil, /fr/tarification, /fr/aide) get the French-language assistant
Product line: Your “Product X Expert” uses:
- Rule: “Contains” → /product-x/
- Result: All Product X pages show this specialist, whether it’s /product-x/overview, /product-x/pricing, /product-x/docs
What about pages without rules?
Pages without an explicit rule will use the Default Assistant.
The Default Assistant has special coverage that can’t be changed. It will automatically respond to all pages except those assigned to another assistant. This means 100% of your website always has a chatbot experience—no gaps, no blank spots.
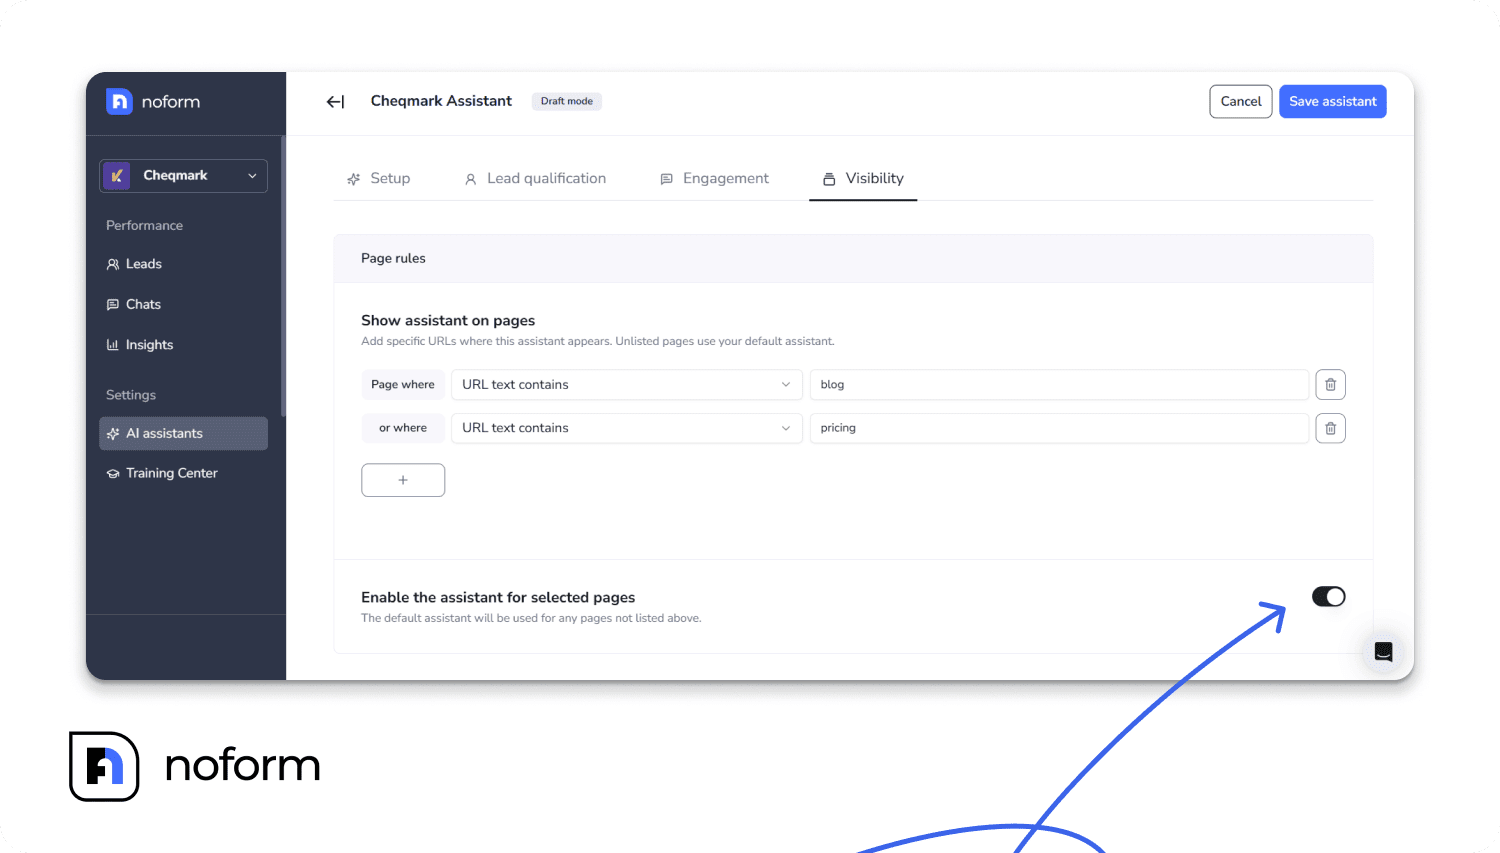
So if you have 10 custom assistants covering specific pages, the Default Assistant handles every other page on your site.
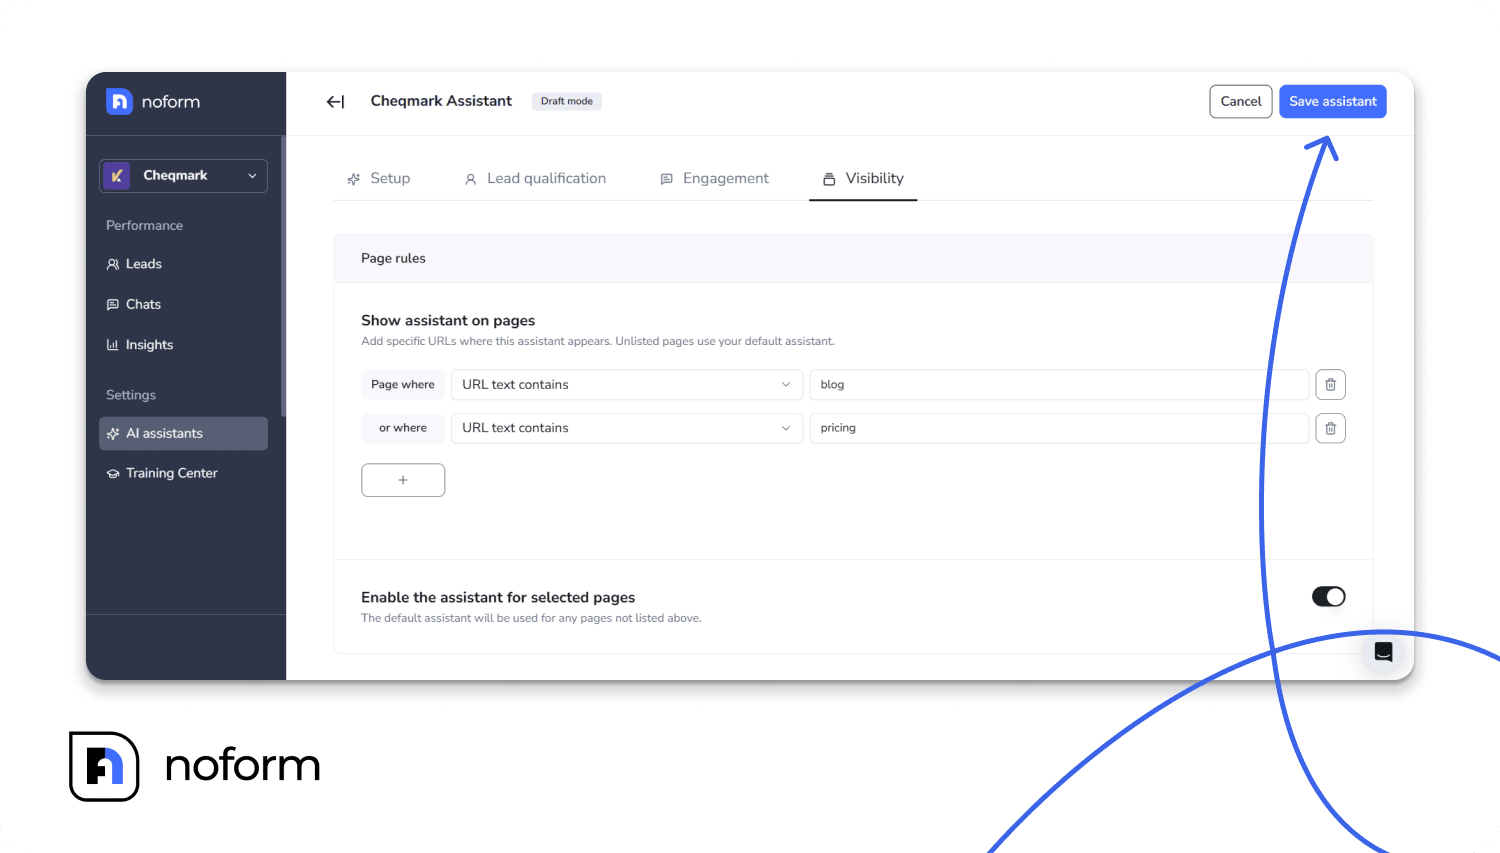
Save the AI assistant
Once you’ve set up your rules and customized everything, click “Save assistant.” Your specialized bot immediately deploys to those pages (assuming the chat widget is installed on your site).
Best practices for multi-assistant setup
Match personality to page purpose. This is the most essential principle. Think about what the visitor needs:
- Sale/Product pages → Use a Sales Assistant with a goal-oriented, confident tone
- Help/Support pages → Use Support Assistant with Friendly & Approachable or Calm & Reassuring tone
- Learning/Onboarding pages → Use Navigation or Educator Assistant with Helpful & Supportive tone
- Executive/B2B pages →Use Professional & Polished tone
Use conversation starters strategically. Don’t leave these generic. Guide visitors toward conversions on sales pages and solutions on support pages.
Test before going live. NoForm includes a Testing Mode. Use it. Talk to each assistant, check that the tone feels right, and make sure the information is accurate. Only deploy when you’re confident.
Keep information current. Your assistants are only as good as the information you feed them. Update pricing, refund policies, and product details regularly.
Avoid feature overlap. Don’t create conflicting assistants for the same exact URL.
Advanced tips
Seasonal or campaign assistants
Need a special bot for a holiday promotion or product launch? Create a temporary assistant with campaign-specific messaging (for example, for Black Friday), set its page rules to specific landing pages, and deploy it just for the campaign. When it’s over, simply disable or delete it.
Multi-language support
If you serve international audiences, create language-specific assistants. For example, if you have /fr/ pages for French visitors, create a French Assistant with French welcome messages, conversation starters, placeholder text, and instructions. Set its page rules to “Starts with /fr/”. Visitors naturally get help in their preferred language.
A/B testing
Create two versions of an assistant with slightly different tones, welcome messages, or conversation starters on similar pages. See which one drives more engagement and lead qualification. Use what you learn to refine your other assistants.
Advanced lead qualification
Different assistants can collect different data. Your Sales Assistant collects email, company size, and budget. Your Support Assistant collects email, issue type, and urgency. Your onboarding assistant collects email, industry, and use case. This gives you richer, more relevant data for each visitor segment—a game-changer for your sales and marketing teams.
Summing up
With NoForm AI, you don’t just get a chatbot — you get an entire team of digital assistants, each specialized for their role.
They adapt their tone, knowledge, and goals to match the context of the page they’re on.
The result?
Smarter conversations, happier visitors, and more qualified leads — all with zero code.
Try it yourself: Log into your NoForm AI dashboard and create your first specialized assistant today.
Frequently Asked Questions (FAQ)
Why should I use different AI assistants on different pages?
Using different AI assistants on different pages allows you to match the conversation to the visitor’s intent, such as closing a sale on a pricing page versus troubleshooting on a help page. A generic ‘one-size-fits-all’ bot often fails to convert because it lacks context, whereas specialized assistants can be tailored with specific roles (e.g., Sales vs. Support) and tones to increase engagement and conversion rates.
How do I assign specific AI assistants to specific URLs?
You can assign assistants to specific URLs using Visibility Rules in the NoForm AI dashboard. These rules use logic such as ‘Is exactly,’ ‘Starts with,’ or ‘Contains’ to match URL patterns. For example, you can set a Sales Assistant to appear only on URLs containing /pricing and a Support Assistant to appear on URLs starting with /help.
What happens to pages that don’t have a specific assistant assigned?
Any page that does not have a specific URL rule assigned to it will be automatically handled by the Default Assistant. This ensures 100% site coverage, meaning visitors will always have access to an AI helper regardless of which page they land on, preventing any gaps in your customer experience.
Can I customize the personality of each AI assistant?
Yes, each assistant can be customized with a unique Role and Attitude. For example, you can configure a ‘Sales Assistant’ to have a Professional & Polished tone for B2B clients, while setting a ‘Support Assistant’ to be Calm & Reassuring for handling customer complaints. This ensures the bot’s behavior aligns perfectly with the user’s emotional state and goals.
How does a multi-assistant setup improve lead qualification?
Multiple assistants improve lead qualification by collecting data relevant to the specific context of the page. A Sales Assistant on a pricing page can be set to require ‘Company Size’ and ‘Budget’ attributes, while a Support Assistant can be configured to capture ‘Issue Type’ and ‘Ticket ID.’ This ensures your sales team gets high-quality prospects while your support team gets actionable technical details.
Can I use multiple assistants for different languages?
Yes, you can create language-specific assistants to serve international audiences. By using URL rules like ‘Starts with /fr/‘ or ‘Starts with /es/,’ you can deploy assistants that are fully localized with native welcome messages, placeholders, and knowledge bases for French or Spanish-speaking visitors, respectively.